
LinkSoul User Manual
💫 LinkSoul User Manual
🔍 Get to Know the Platform
Platform Overview
LinkSoul Platform (LinkSoul) is a robot "Soul Workshop" launched by AgiBot, targeting both enterprise and individual users.
Here, you can endow standard robots with their own personality and soul. Through simple and intuitive operations, you can infuse robots with emotions and thinking, making them your exclusive intelligent companions.
- Individual users: can freely customize the interactive experience of robots, including persona, personality, voice, knowledge base, skills, face, and memory, etc. Create their own "soul" on the platform and bind it to the device to make the robot truly come to life.
- Enterprise users: can leverage intelligent agent templates for specific scenarios (such as** exhibition hall tour , health care companion, intelligent shopping guide, front desk reception**, etc.) to enable robots to quickly integrate into business scenarios, achieving business implementation and intelligent upgrading.
Core Function
- Whole-link Visual Configuration: Wake words, persona, voice, Knowledge Base, skills, user identification, etc. All content can be configured in an intuitive interface without programming, defining the personality and behavior of the agent with zero code.
- Decoupled resources and agents with clear governance: Resource Center centrally manages all creatives (knowledge, facial information, expressions, actions, skills, sounds), and Agent Center calls them as needed, uploaded once, reused multiple times, enabling efficient collaboration.
- One-click deployment for consistent experience: Configured agents can be bound and deployed with robots in one click in Device Management, ensuring a unified experience and efficient deployment.
User Value
- ⏱ Time and Effort Saving: Quick customization and modification with simple operations
- 🧩 Free Creation: All resources can be reused, and creativity extends infinitely
- 🤖 Effective Immediately: One-click deployment enables agents to "go on duty" right away
- 💡 Unique: Each robot can have its own unique personality and story
✍️ Preparation
Platform Access
- Same entry for web and mobile
- Switch between Chinese and English interfaces via the top buttons
👉 Platform Address:🔗 Lingxin Platform
👉 Chinese user manual:💫 灵心LinkSoul使用指南
Registration and Login
The platform supports multiple convenient login methods, allowing users to freely choose according to their preferences:

- Phone login: Log in via mobile phone number + SMS verification code, no registration required.
- Email Login: Log in via email address + email verification code, no registration required.
- Account Login: After the first login, you can set a password of 8 characters or more in the Personal Center. Once the setup is complete, you can useMobile Number/Email + Passwordto log in.
Organization Management: Manage your organization and members
When you log in to the system for the first time, a default organization will be automatically created - "Your Robot Home".
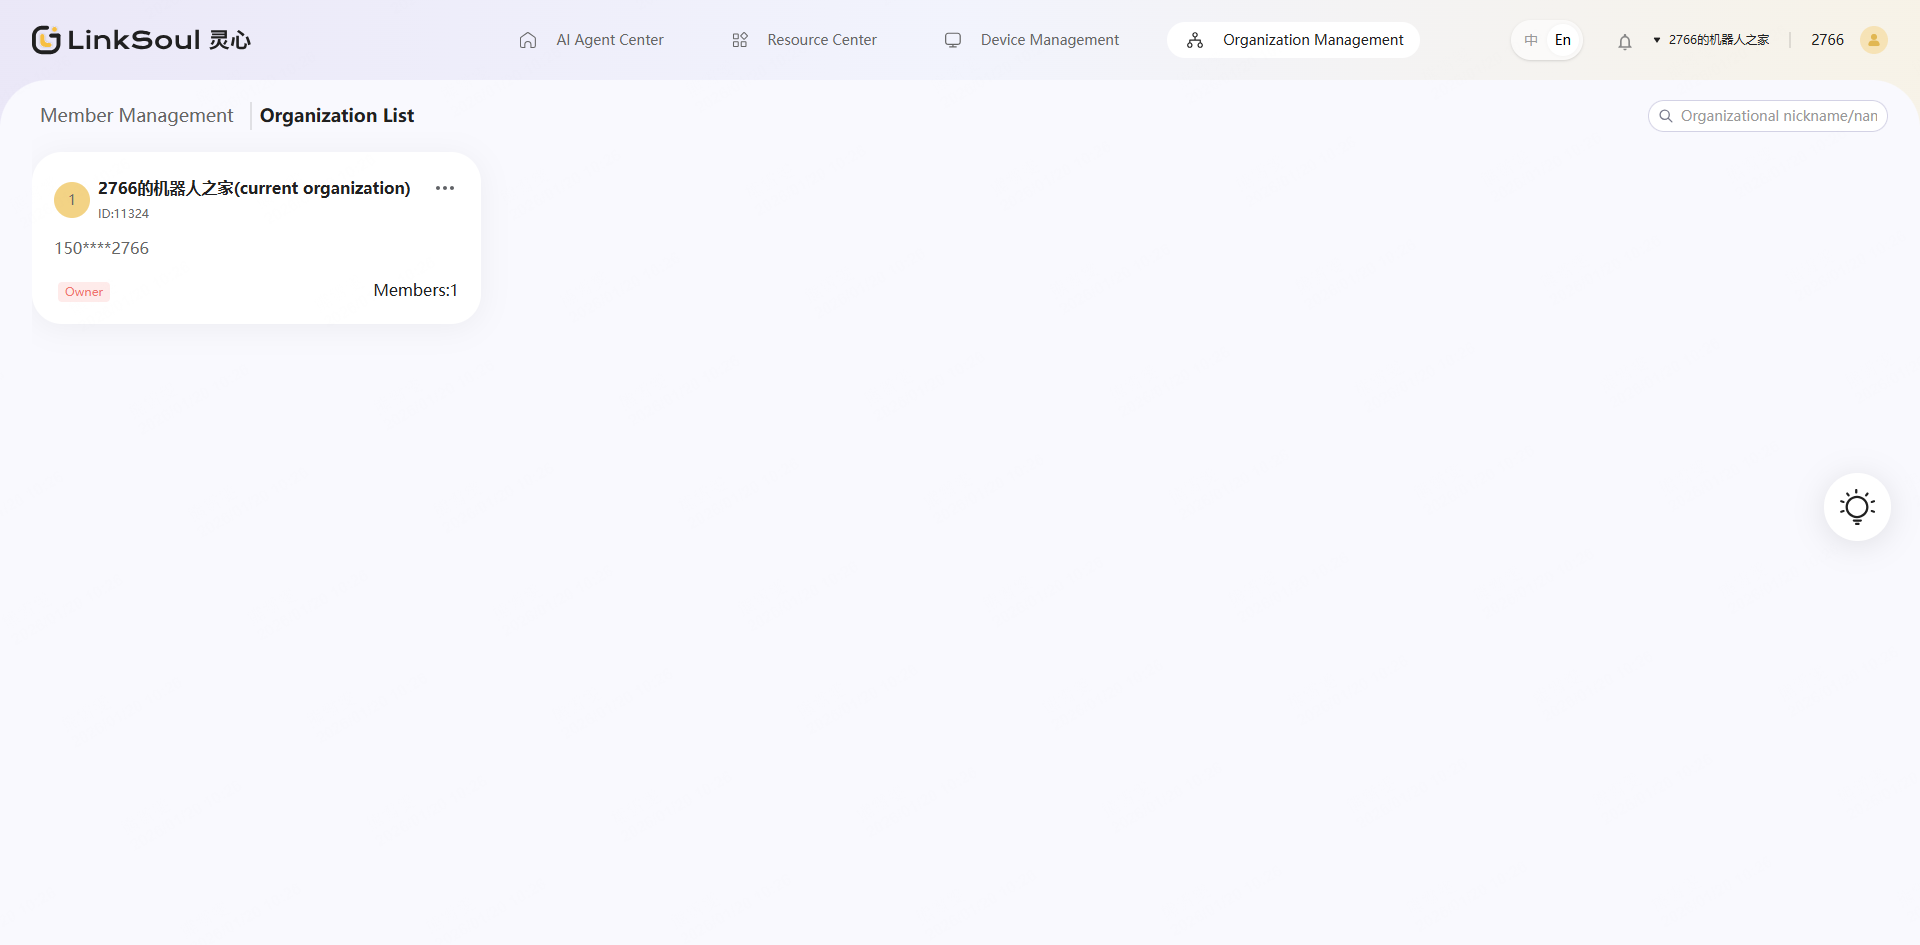
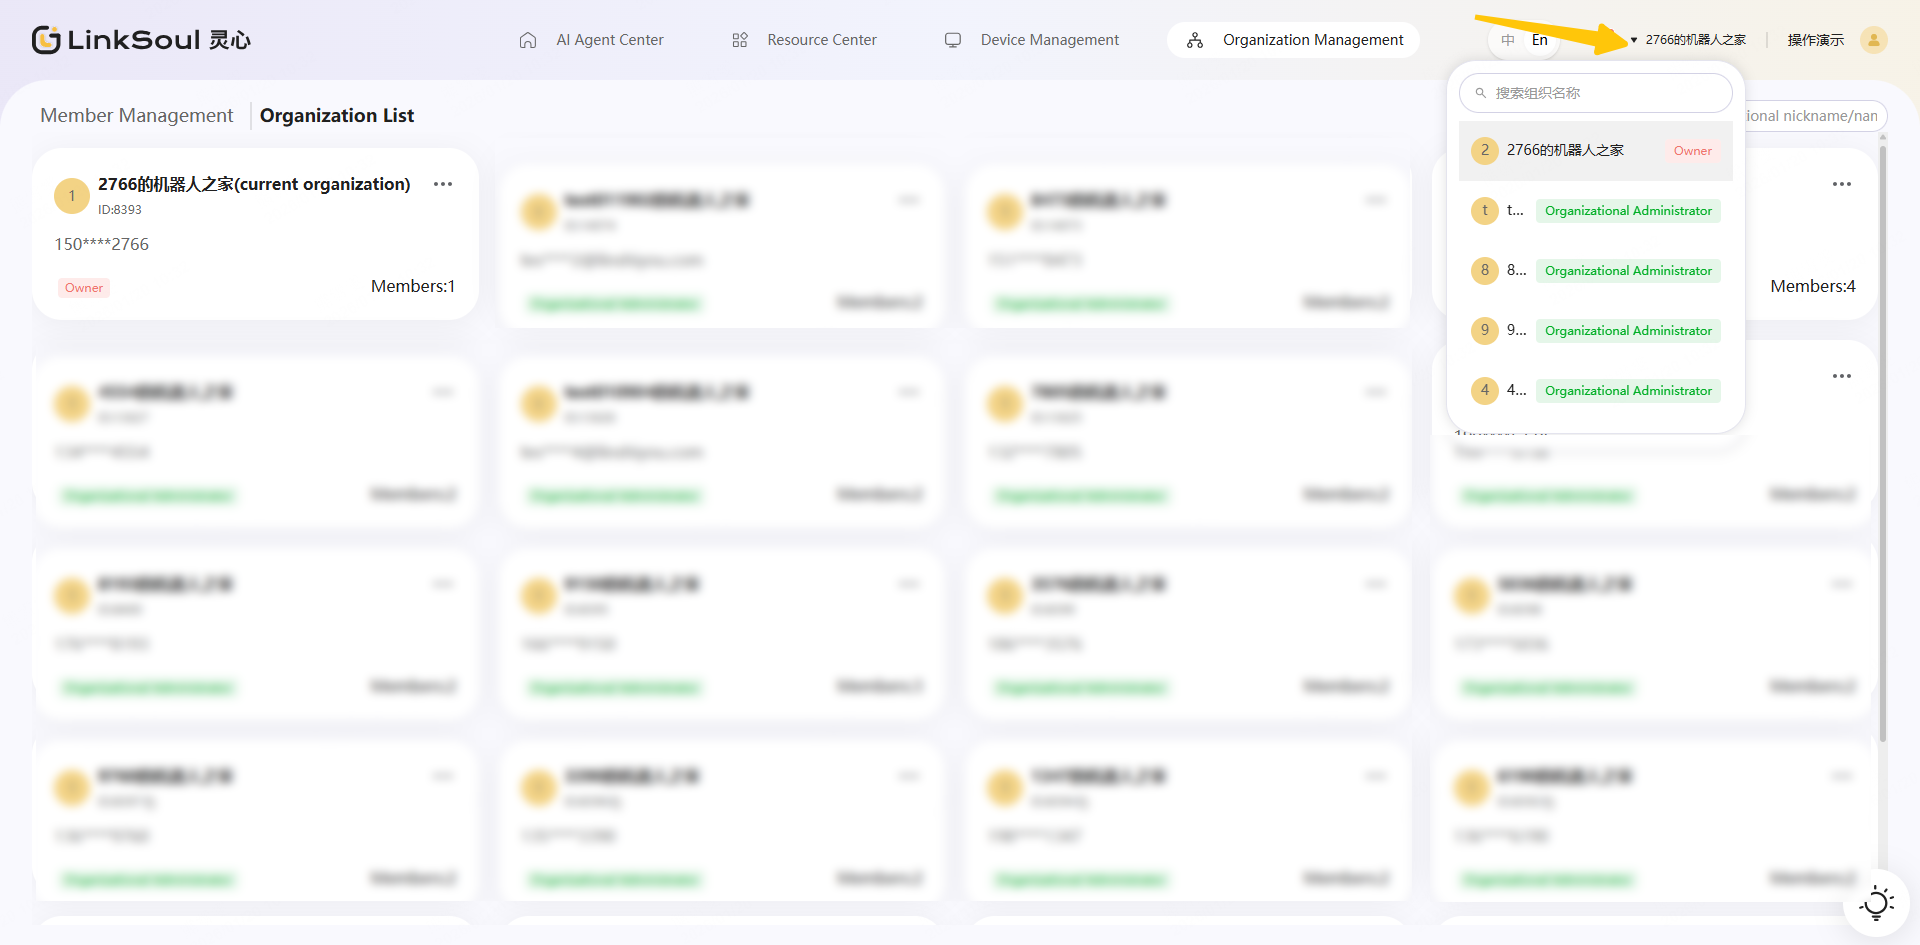
Organization Switching
Switch organizations in the upper right corner of the page, and enter the organizations you have permissions to view and operate resources.
This feature is suitable for enterprise users, facilitating the management of agents and devices in multi-team, multi-department, or multi-project scenarios.
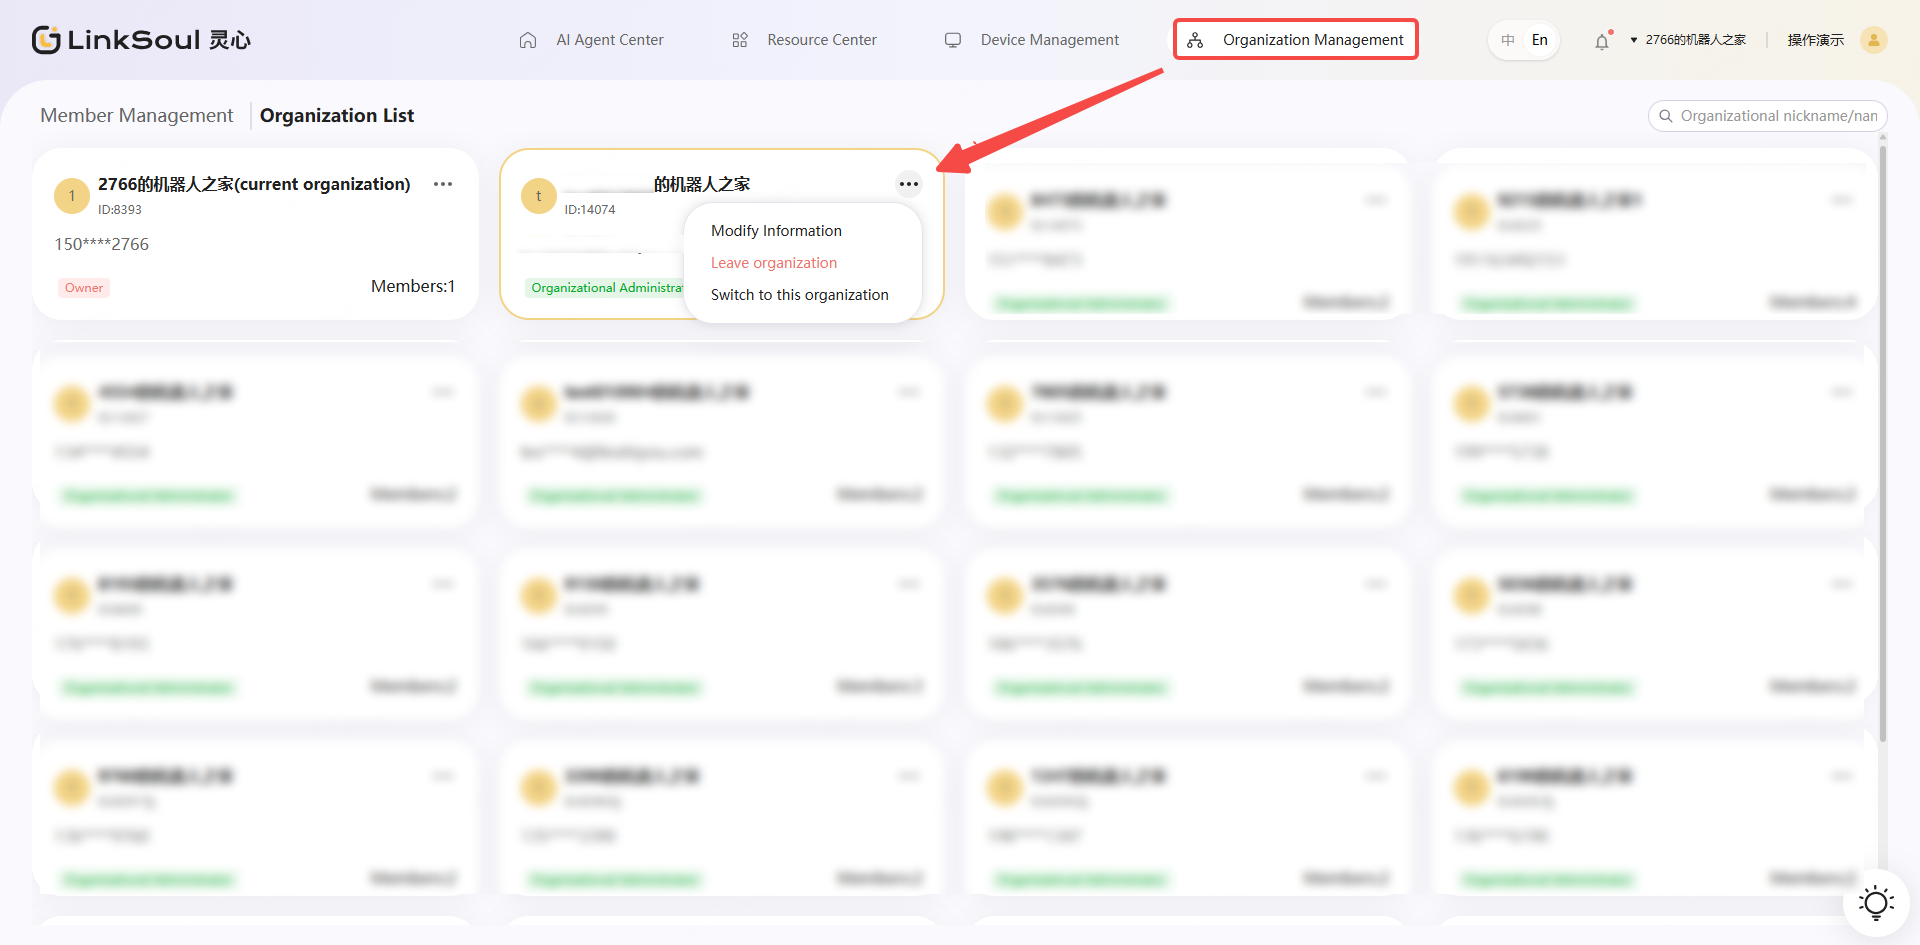
View and modify organizational information
In the Organization Management > Organization List module, you can view the organizations you have joined, and you can modify information or leave the organization.
⚠️ Attention: Permissions may vary among different organizations, and each permission corresponds to a different scope of operations. Please operate reasonably based on your own role.
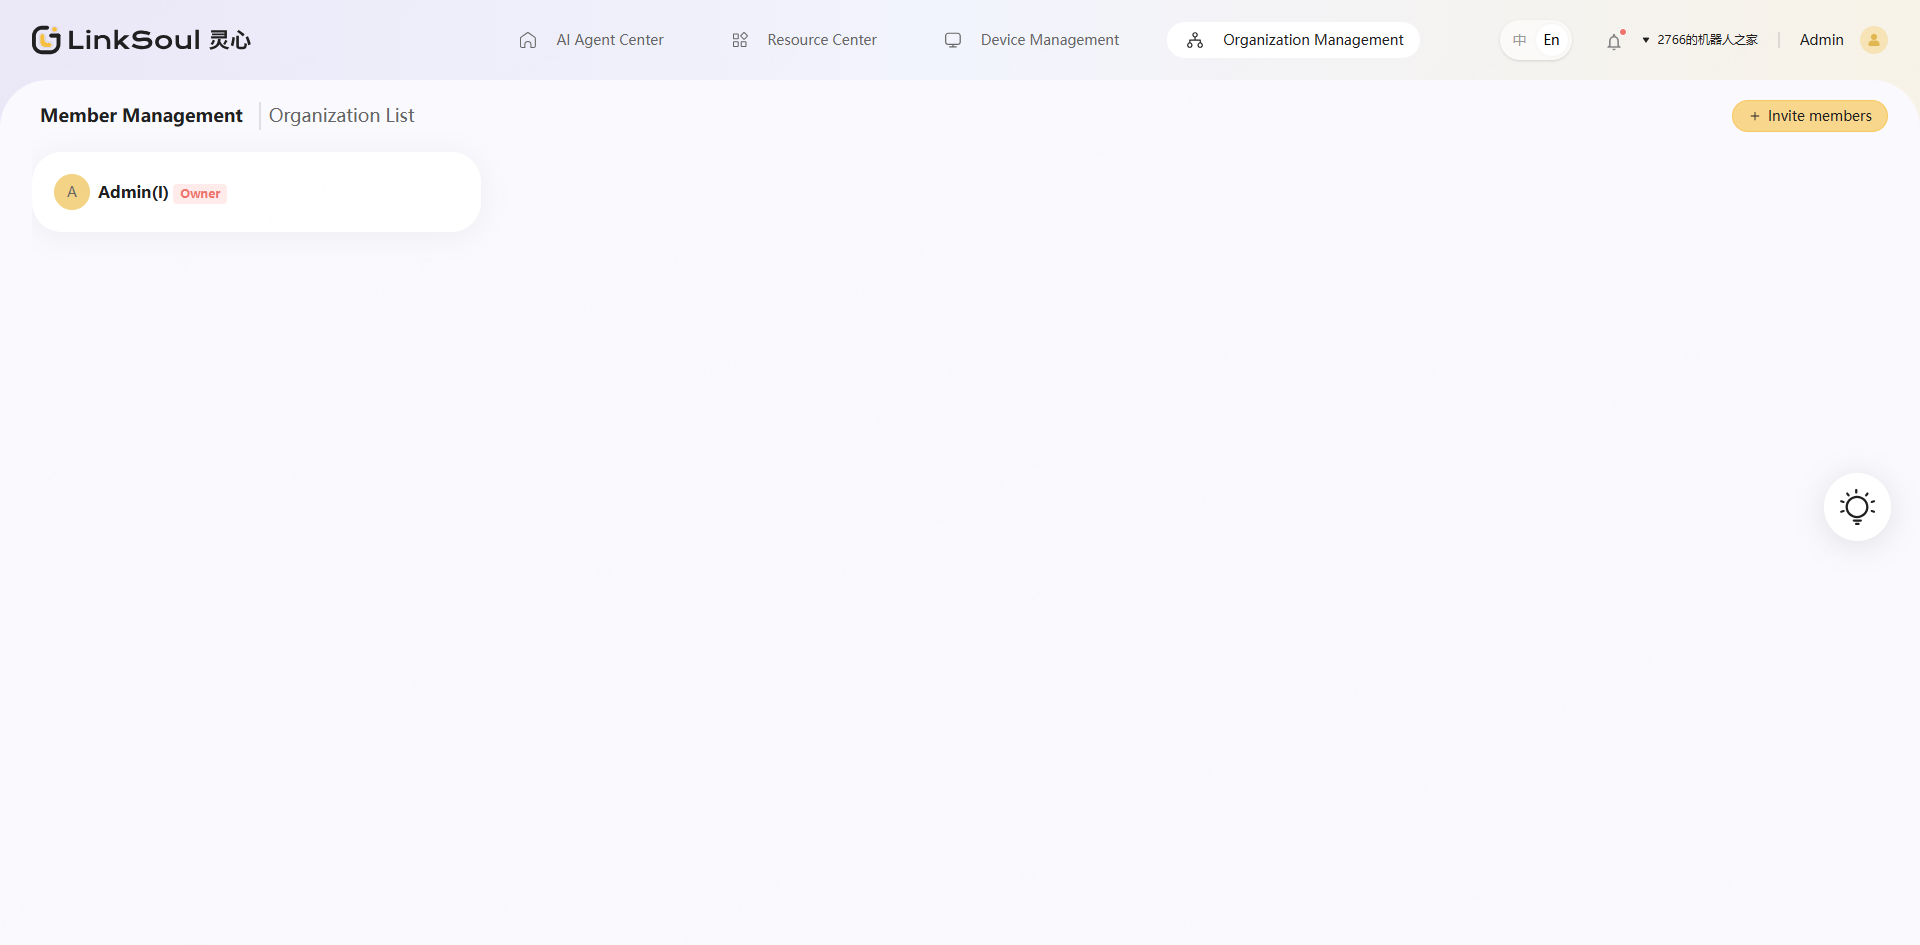
Member Management and Invitation
- In the "Organization Management > Member Management" module, you can view information about all members under the organization.
- You can invite other members of your family or business to join your organization and assign them **administrator **or **regular member **roles.
- Enter the Organization Management > Member Management module
- Click the "Invite Members" button
- Select a character, click on 「Copy Link」
- Send the invitation link to the user to be invited
- Users can join the organization by clicking the link to log in to the platform
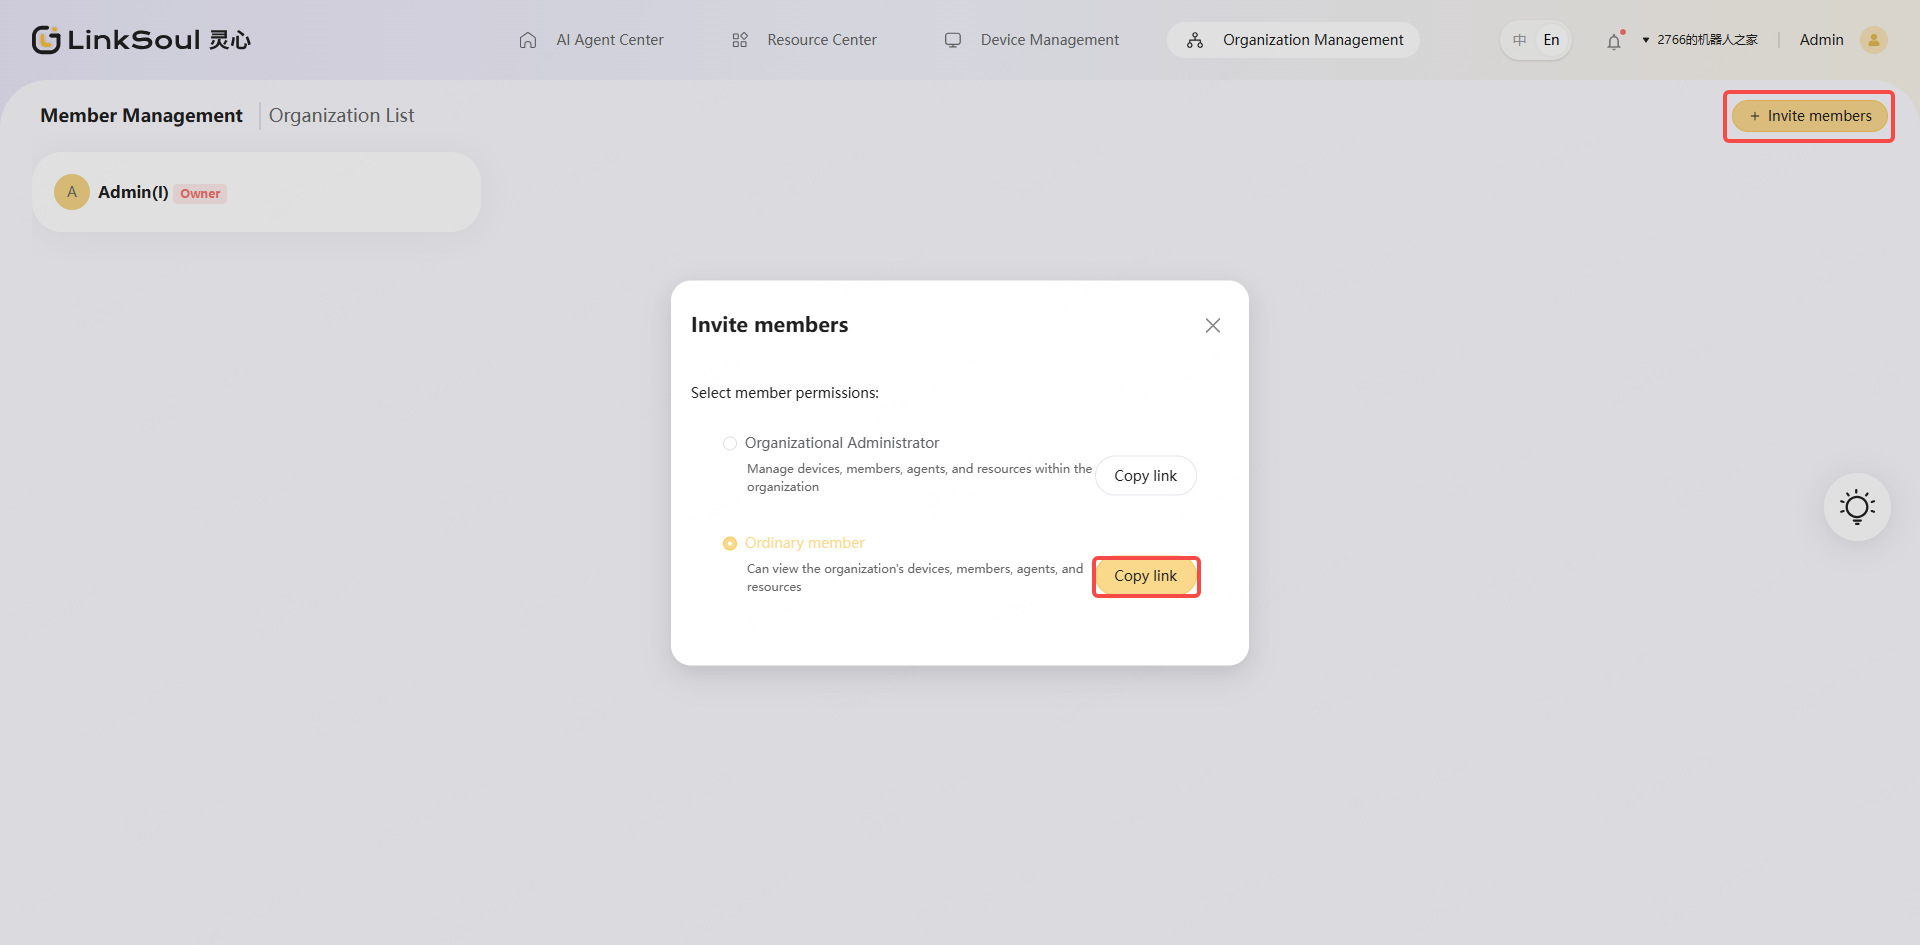
- After a member joins, you can modify roles or remove members at any time in member management ** **, facilitating internal organizational management and access control.
💡 Tip: Reasonable allocation of roles between administrators and ordinary members can ensure efficient teamwork and operational safety.
Role Permission Description
Within different organizations on the Lingxin Platform, different roles have different operational permissions. Understanding the operational scope of each role helps to manage organizations and members effectively and avoid misoperations.
Precautions
- ⚠️ Operation scope is restricted by role: Please operate reasonably based on your own role to avoid unauthorized modification or deletion of resources.
- ⚠️ Organization owners should use permissions with caution: Operations such as deleting the organization or removing members are irreversible. Please confirm before proceeding.
- ⚠️ Role changes take effect immediately: After an administrator or owner modifies a member's role, the system will immediately update permissions, and the changes will take effect after the member refreshes.
Device Management: Manage your robotic devices
Add device via verification code
To ensure a smoother user experience, it is recommended to register the robot device to the platform before use. If you have not purchased a device yet, you can also directly go to "Agent Center" to create your own agent without binding a physical device.
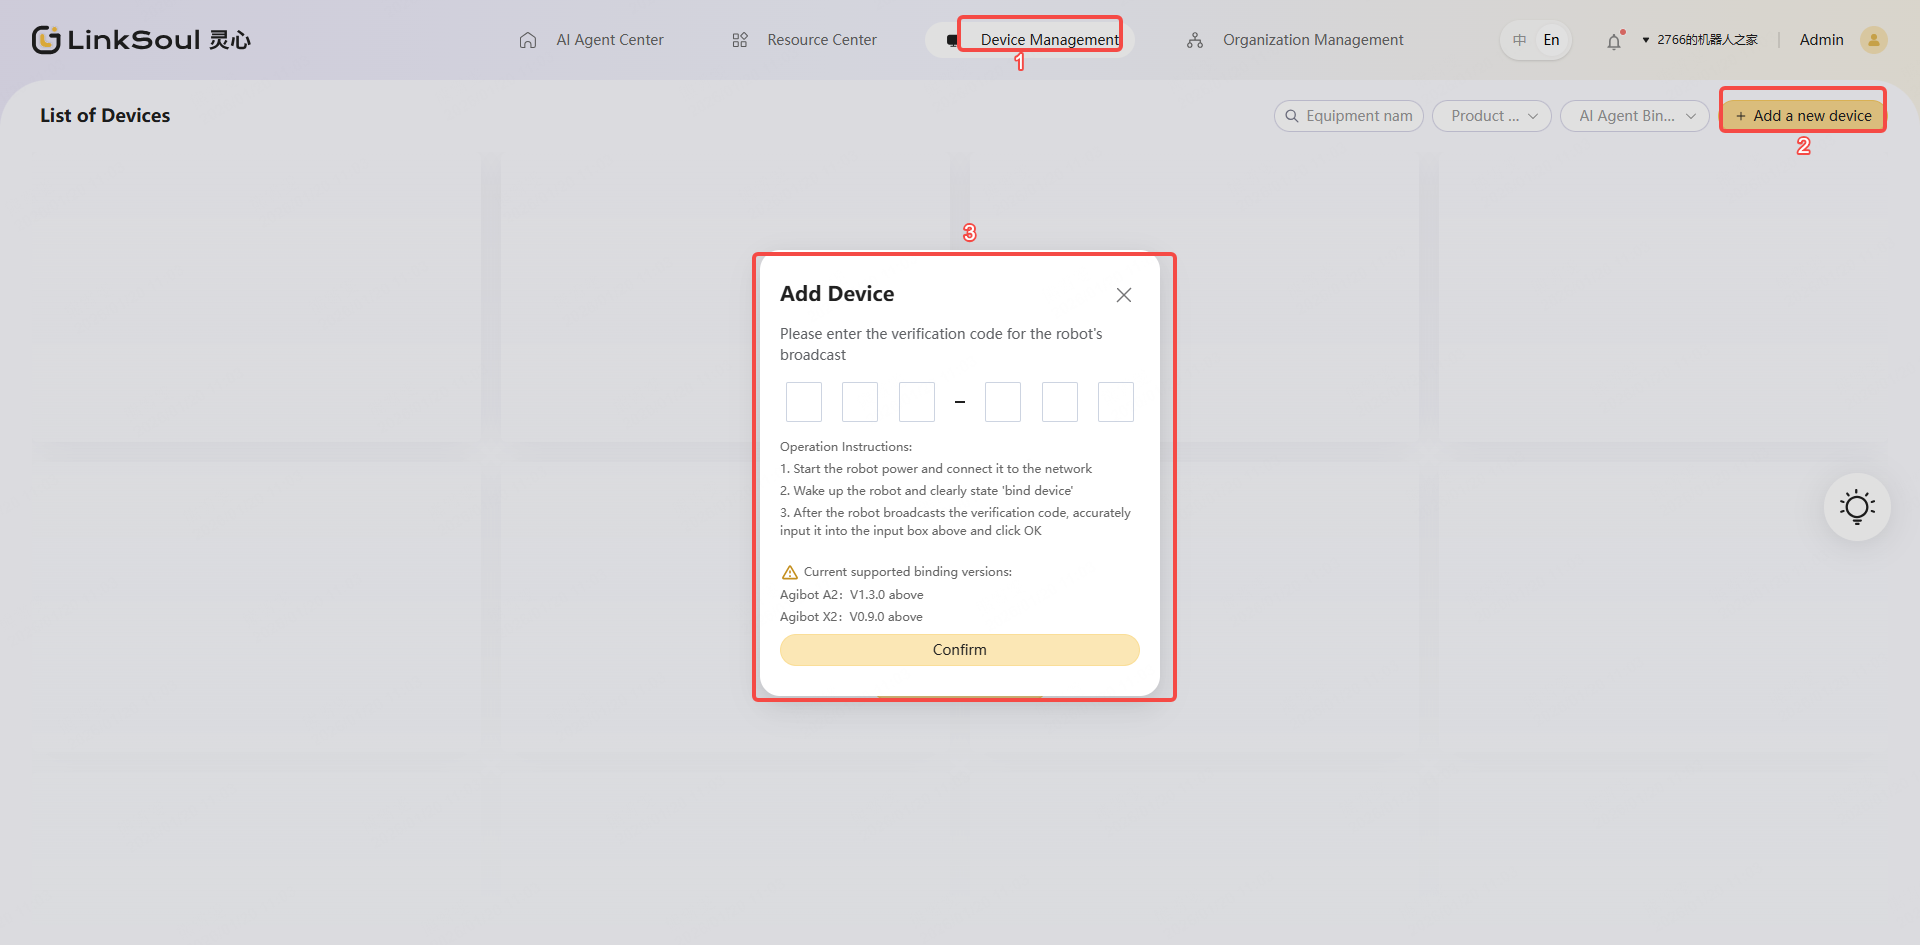
- Enter Device Management: Device Management >List of Devices
- Add Device: Click "Add New Device", follow the on-screen instructions to interact with the robot via voice, and obtain a 6-digit verification code.
- Fill in the verification code and submit: After entering the verification code on the platform, click 「Confirm」 to submit. After the system verification is successful, the device binding is completed.
Precautions
- The verification code** is valid for 5 minutes**. If it expires, you need to re-initiate voice interaction to obtain the latest verification code.
- Avoid frequent triggering of verification code requests, as excessive frequency may lead to acquisition failure.
- If the device has been bound to another organization, it cannot be bound again. Please contact the administrator of the original organization to unbind it, or contact the sales service staff for assistance.
- Device Model and Version Requirements: Currently only supports Model A2 v1.3.0 and above, as well as Model X2 v0.9.0 and above device registration.
View and modify device information
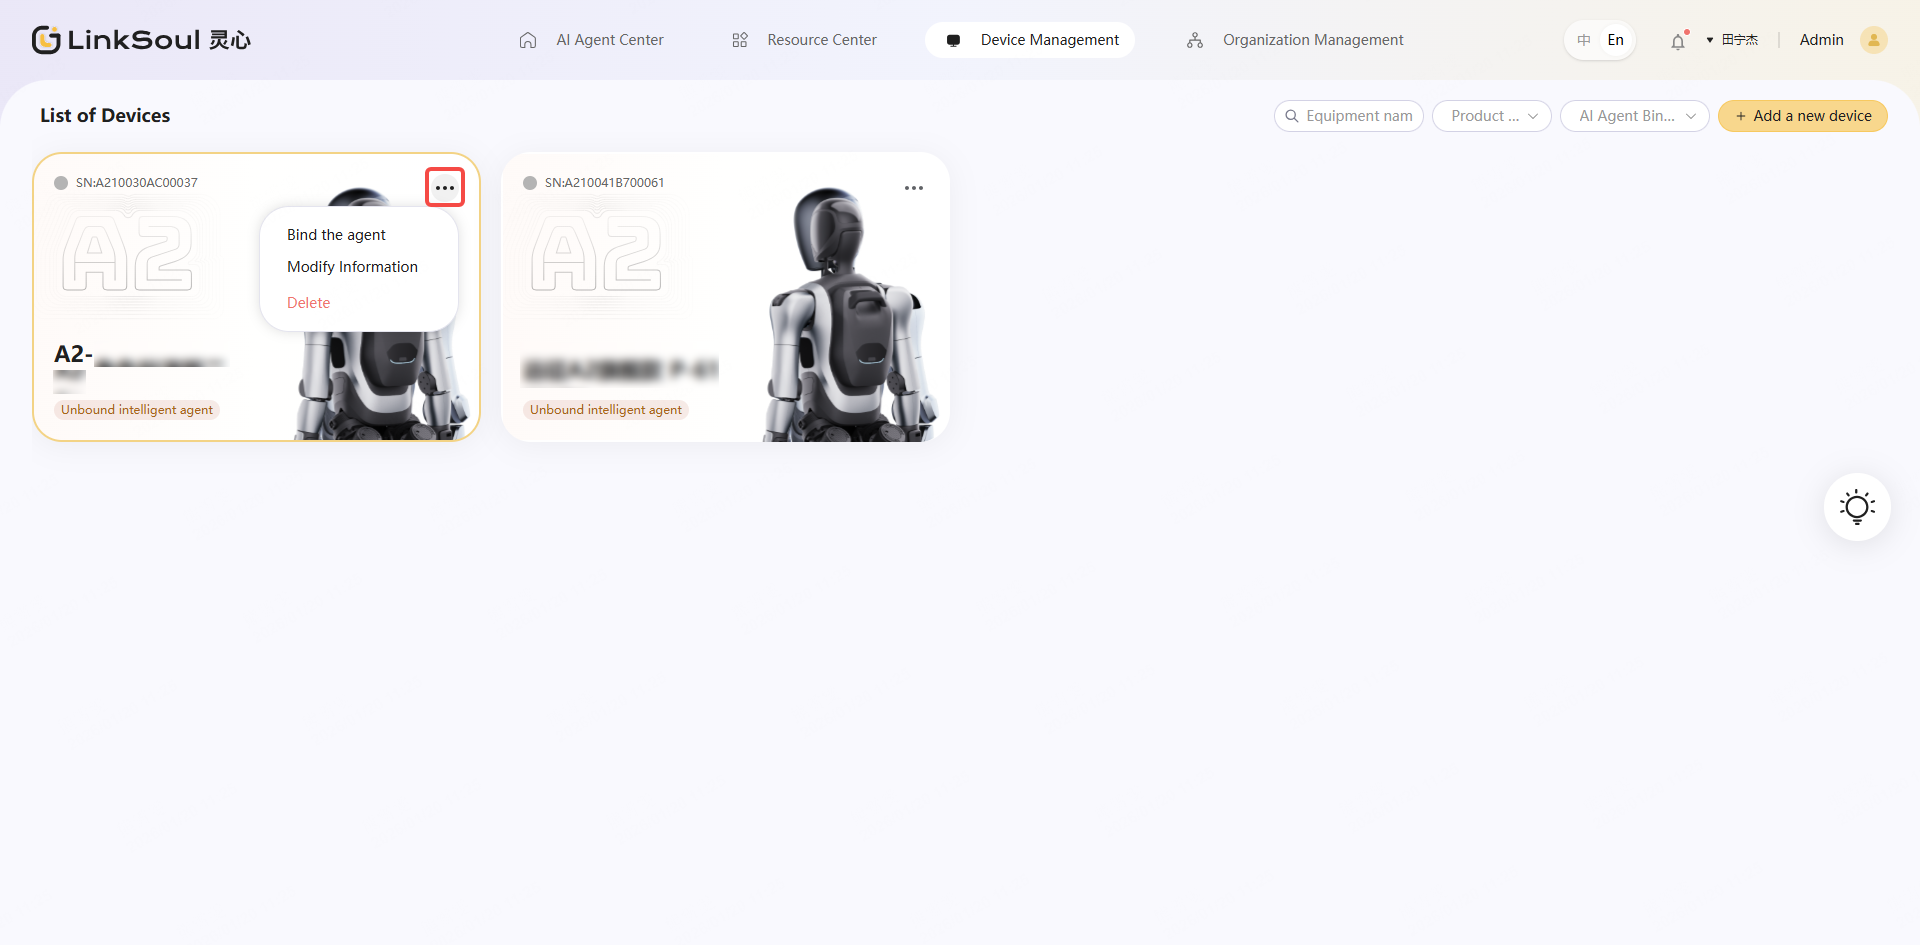
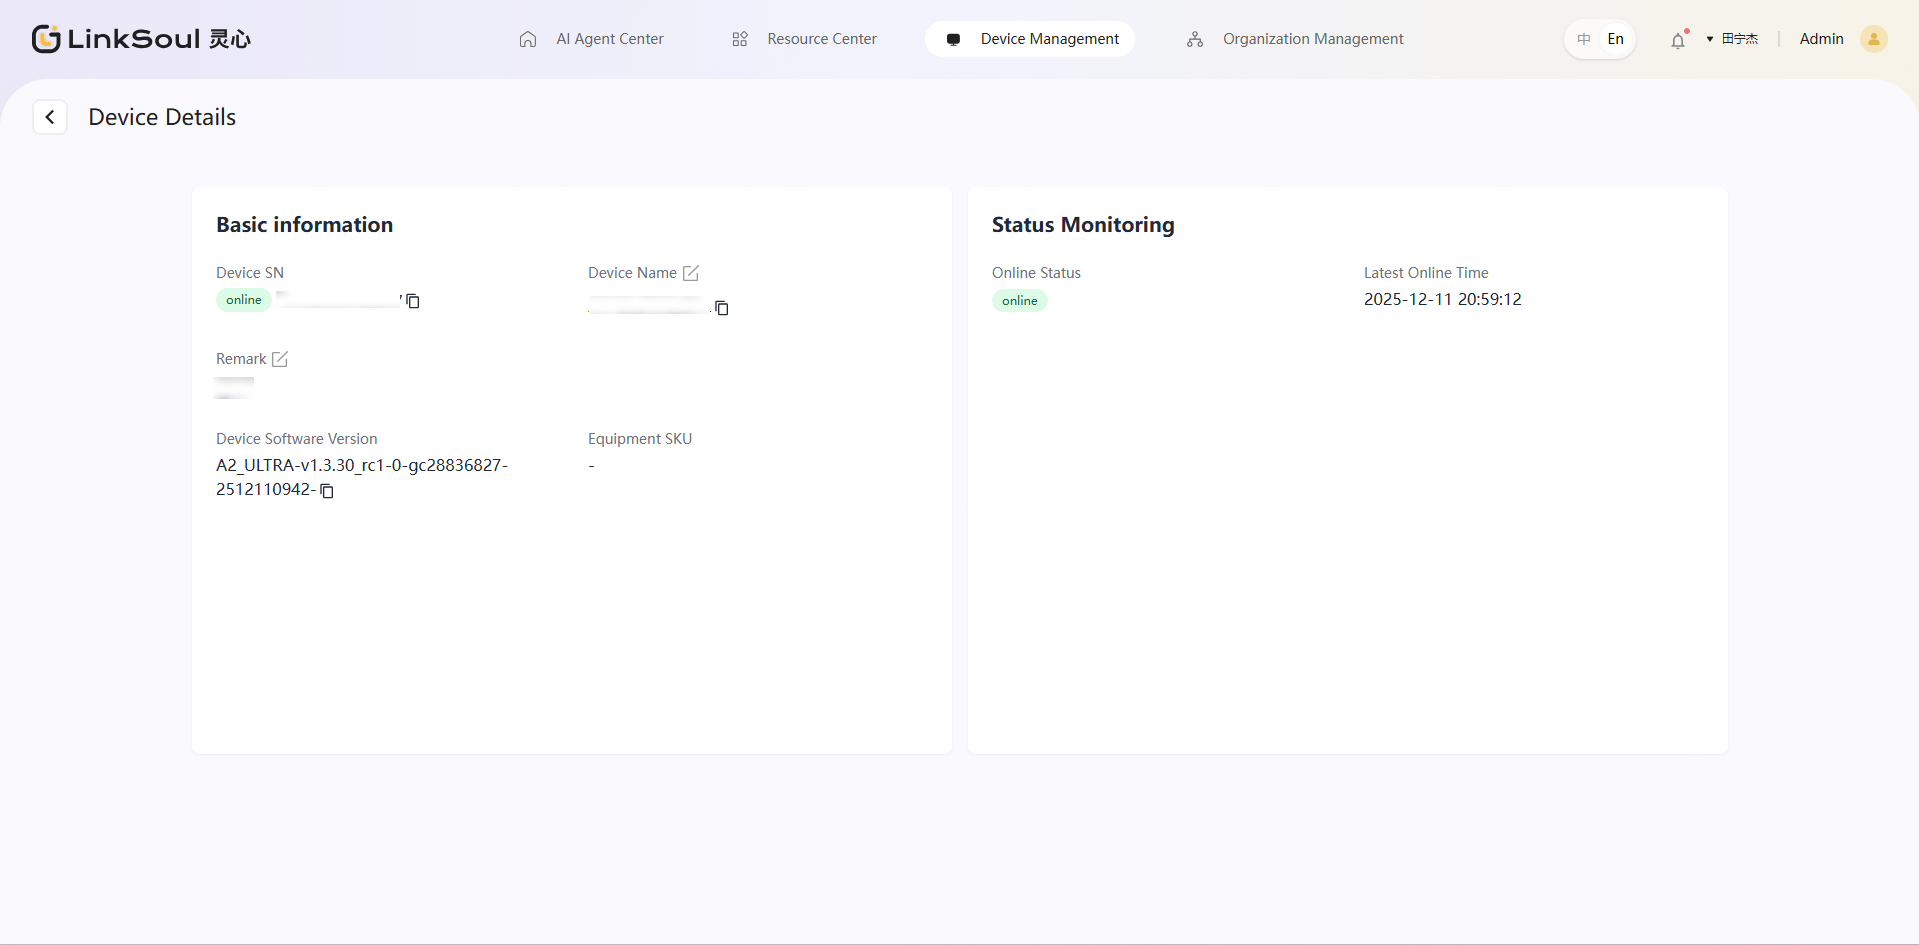
In the Device Management > List of Devices module, you can view all the devices that have been bound under the currently selected organization, including the device's basic information, online/offline status, and SN code. Clicking on a device card will take you to the device details page, where you can view and manage the device's basic information and current operating status.
- **Modify Device Information:**You can modify the device name or description through the card "... - Modify Information" or by entering the device details page, which facilitates identification and management.
- Delete Device: After deleting the device, all agent configurations bound to the device will become invalid, and the device will revert to its default configuration.
⚠️ Precautions
- The LinkSoul Platform and LingGen Platform share device relationships. Deleting a device will affect both platforms simultaneously. Please proceed with caution.
- The deletion operation cannot be undone. Please confirm before proceeding.
Resource Center: Manage Your Resources in a Unified Manner
Knowledge Base Management
The Knowledge Base is used to store professional content that devices or agents need to call during interactions. By uploading documents, web pages, or FAQ templates, you can quickly build your own knowledge system.
- Step 1: Create a Knowledge Base
- Enter the "Resource Center > Knowledge Base Management" module, click "+ New Knowledge Base".
- After creation is completed, you can upload documents to the Knowledge Base (see the operation steps guide in Step 2).
- After the upload is completed, open the "Enable" switch on the Knowledge Base card, and you can select this Knowledge Base when configuring the agent.
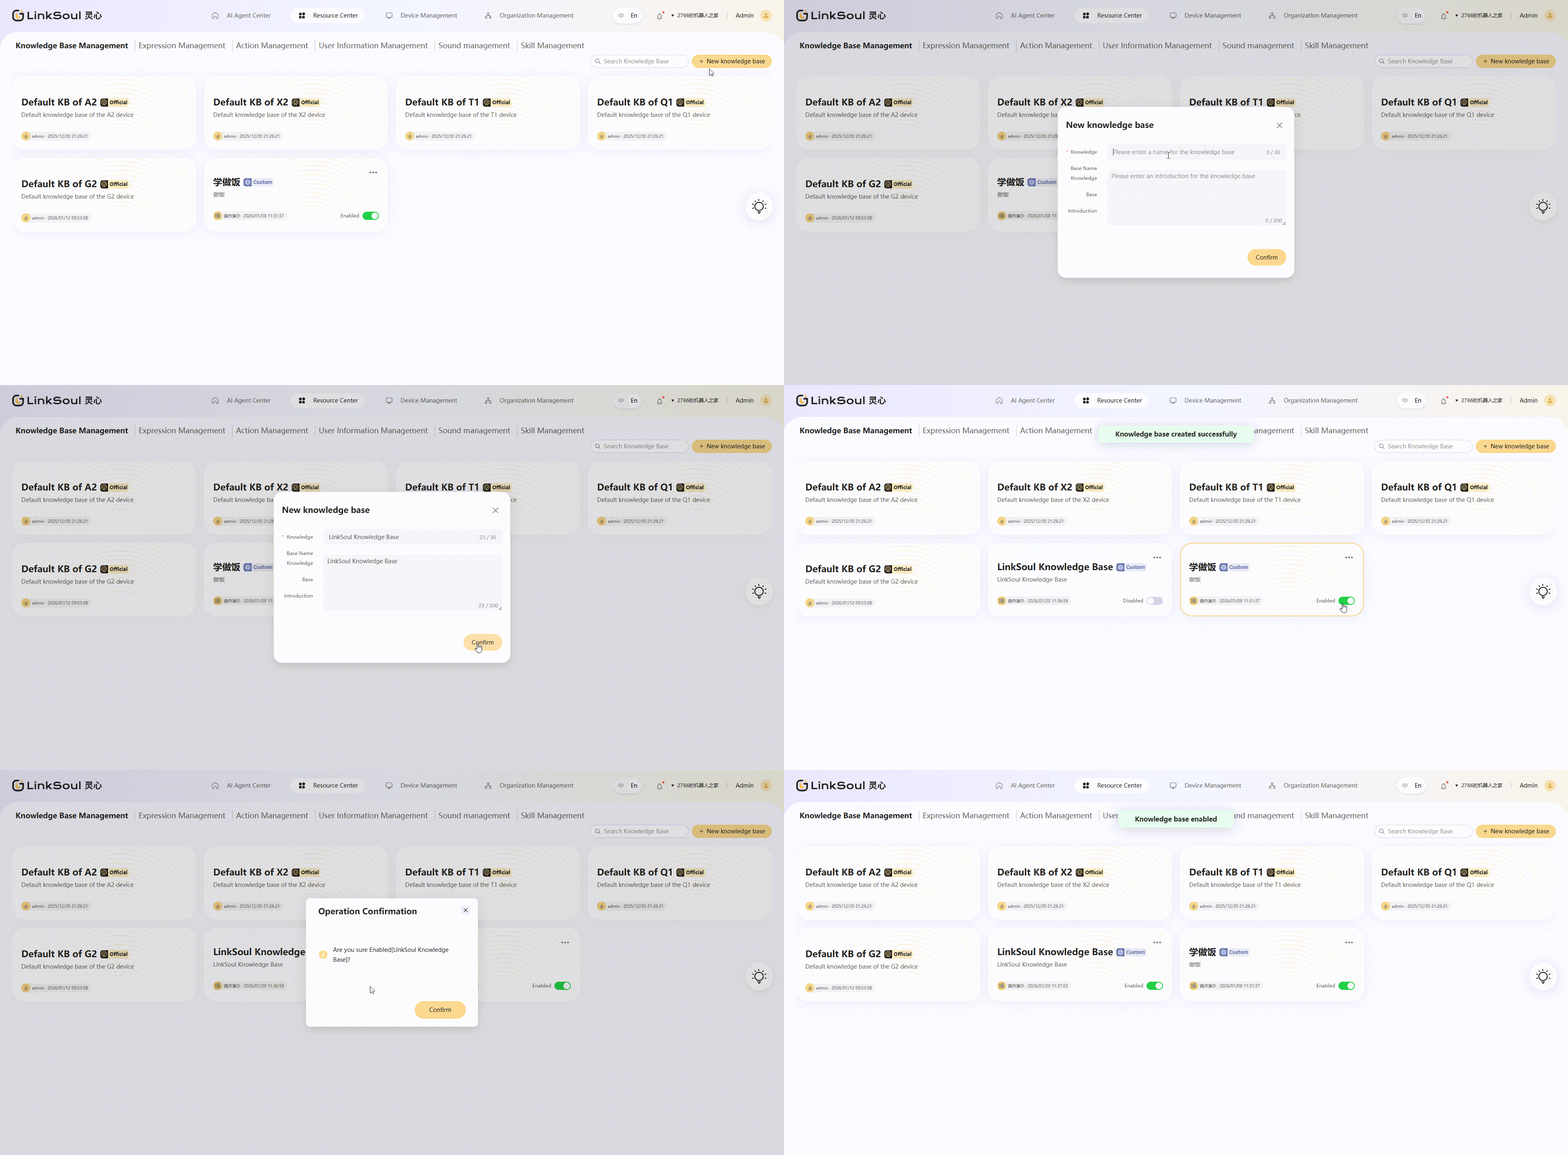
- Step 2: Upload Knowledge Documents
In the Knowledge Base, you can upload different types of knowledge sources. Currently, three upload methods are supported:- Local File:
- Supports
pdf / pptx / xlsx / csv / docx / md / txtformat files. After uploading, the system will automatically slice the content and store it as knowledge points. - Supports
jpg/pngformat images. After uploading, the system will automatically extract FAQs and store them as knowledge points.
- Supports
- Local File:

Upload Map
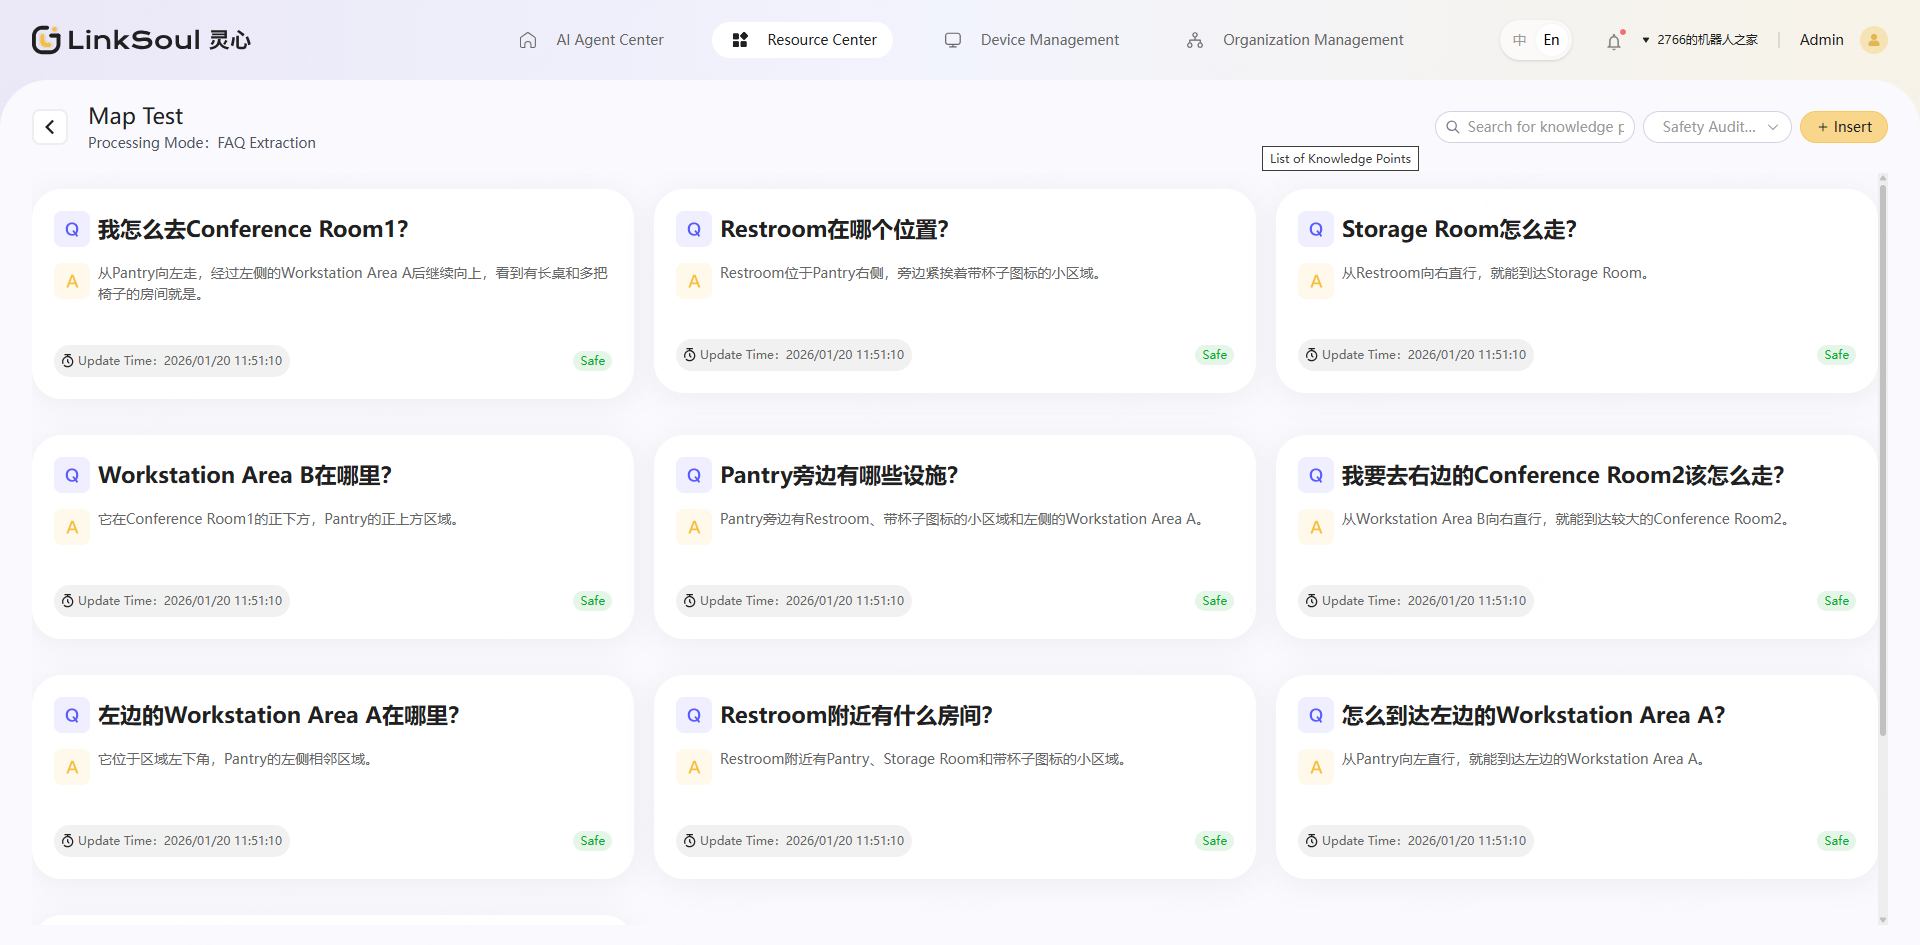
    Automatically generate relevant Q&A

- **Web Link**: Enter the web link address, and the system will automatically capture the page text and perform content slicing.

- **FAQ Template**: Downloadable FAQ template (supports `xlsx / csv` formats), fill it out and upload. After uploading, each Q&A row will be automatically stored as an independent knowledge point.
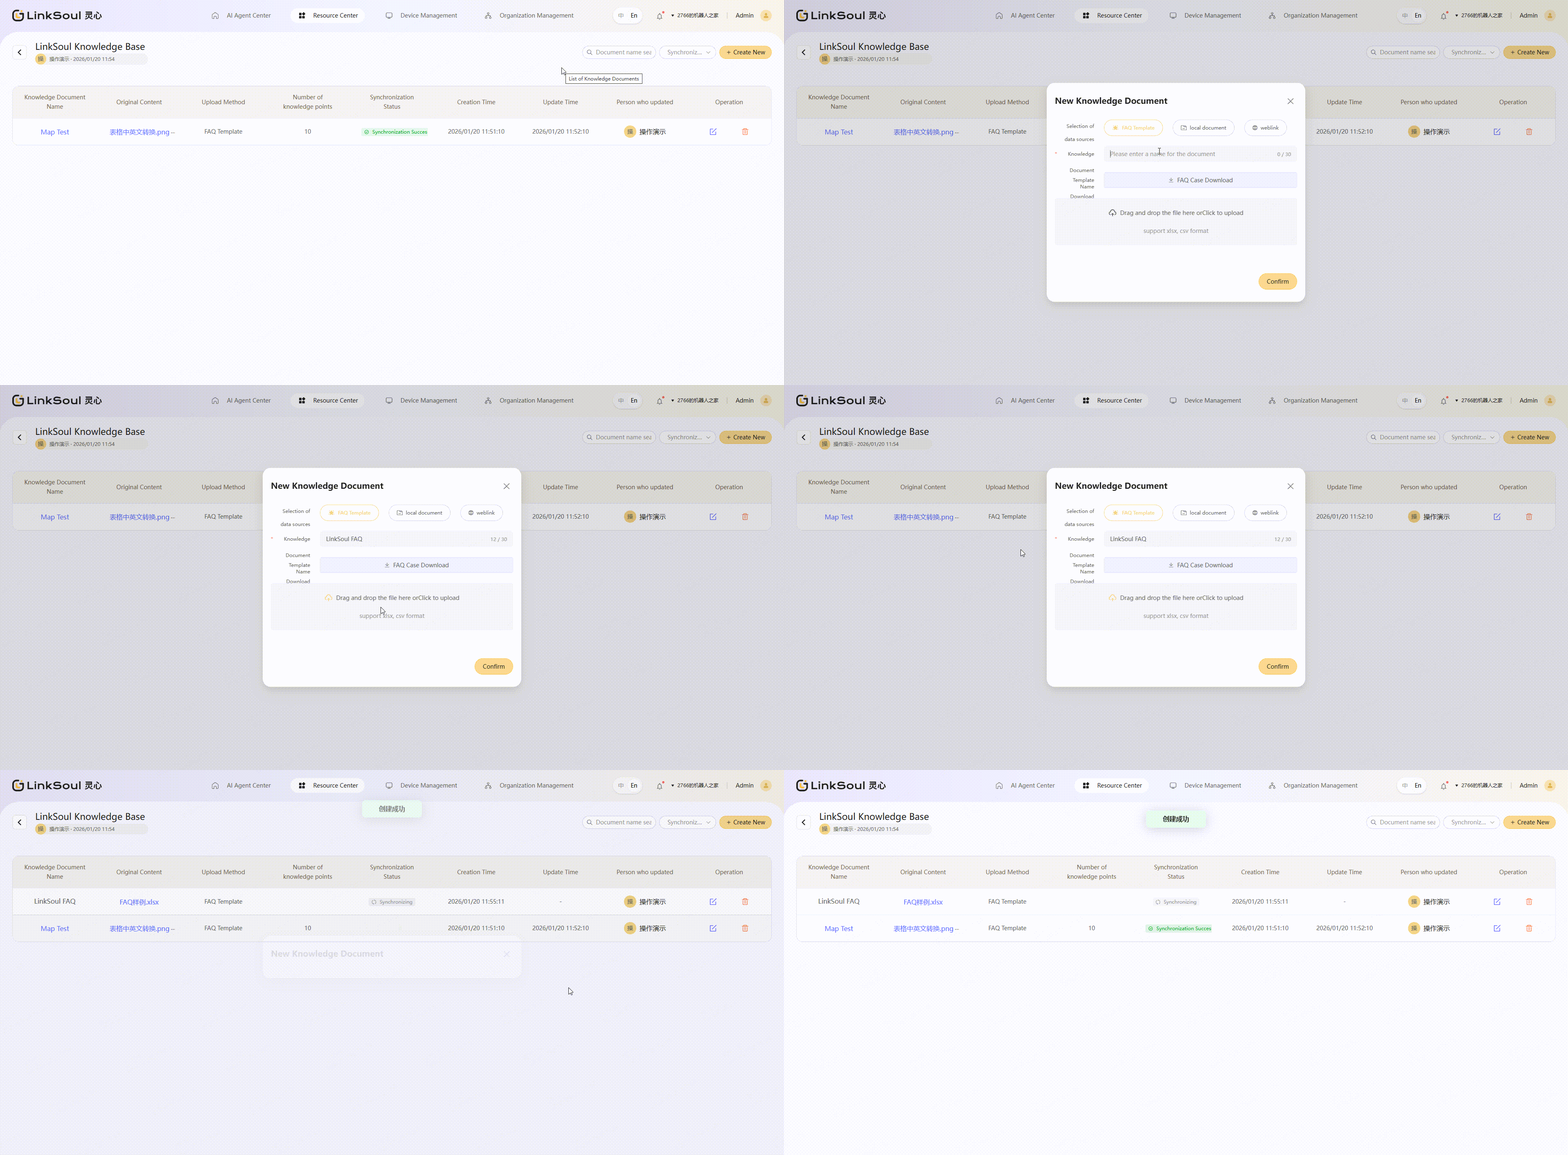
Moreover, the knowledge base now supports uploading multiple documents at once, allowing up to 5 files to be uploaded in a single batch. This feature applies to both local files and FAQ template channels. Batch uploading reduces repetitive operations and is ideal for scenarios involving bulk import of multiple documents into the knowledge base.
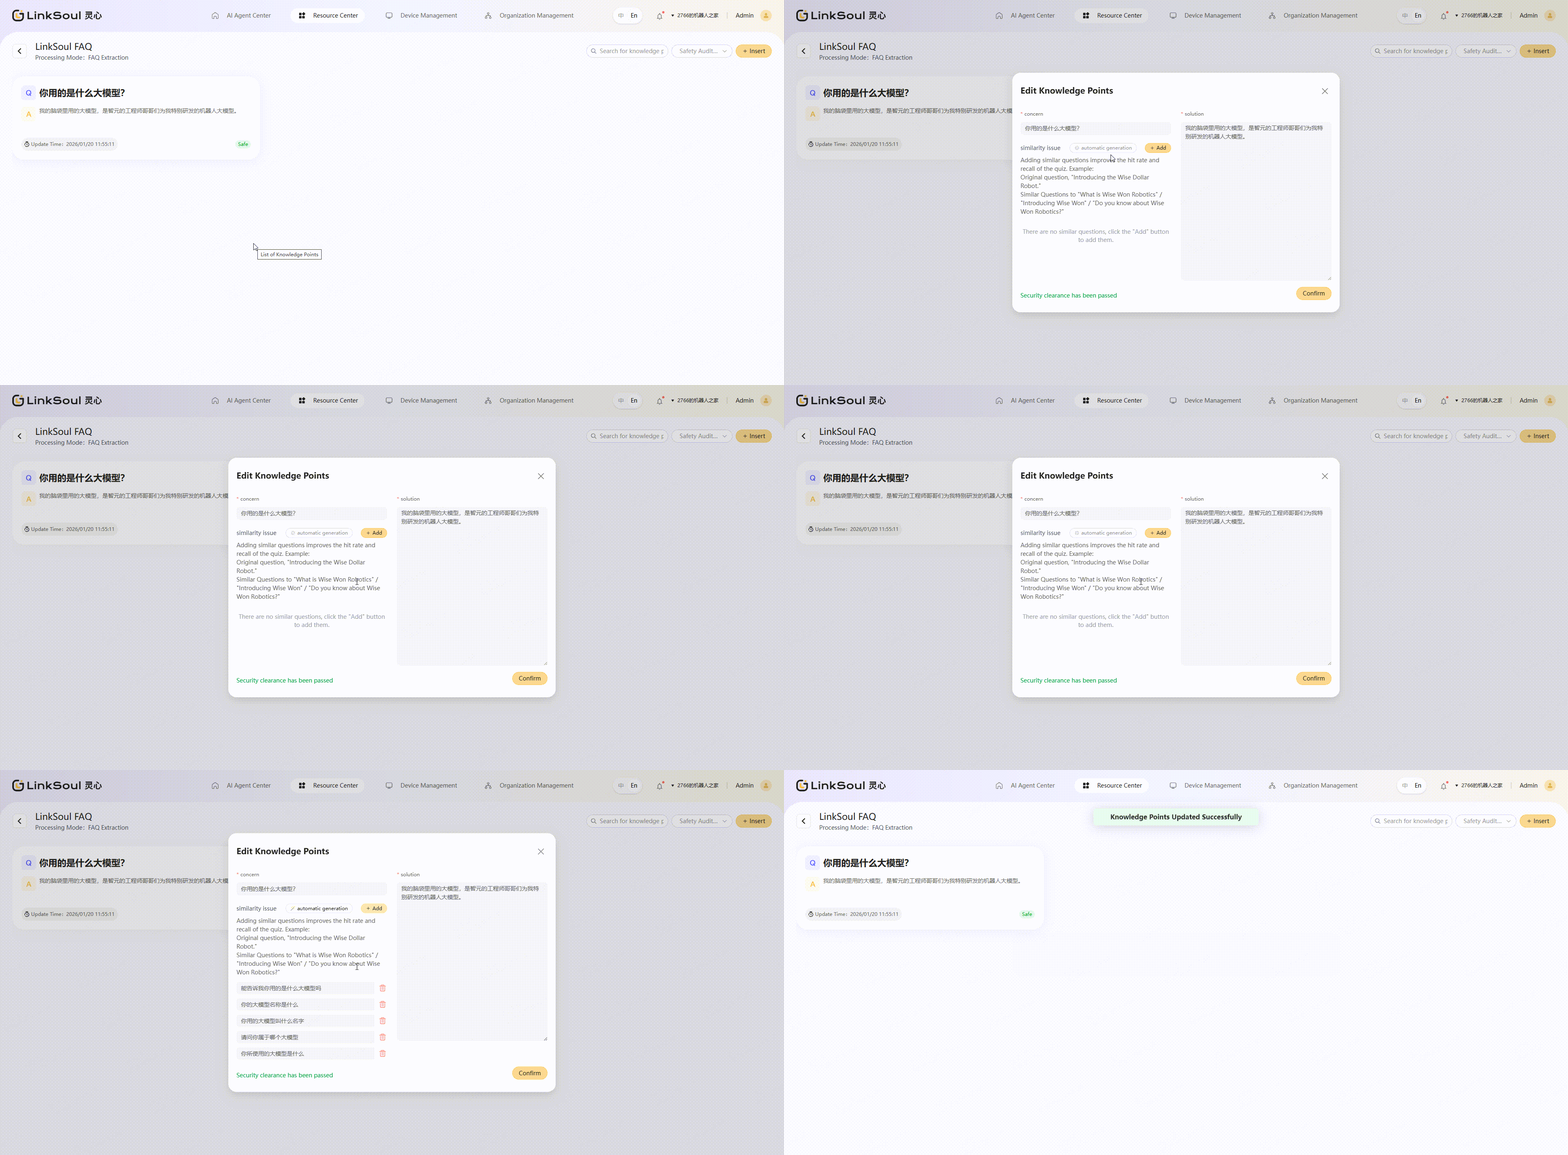
- Step 3: View and Edit Knowledge Points
Clicking on the name of the uploaded knowledge document will take you to the details page to view the system slices or knowledge points after FAQ splitting.
On this page, you can:- Modify, add, or delete a single knowledge point;
- Review or adjust the security verification results of knowledge points to ensure content quality and compliance;
- For knowledge points of the FAQ extraction type, you can add similar questions automatically or manually during editing to increase the hit probability of knowledge points
Material Management
2.5.2.1 Emojis (NEW)
In the "Resource Center > Resource Management >Emoji" module, you can view the built-in emoticon library corresponding to all device models and preview the effects of each emoticon.
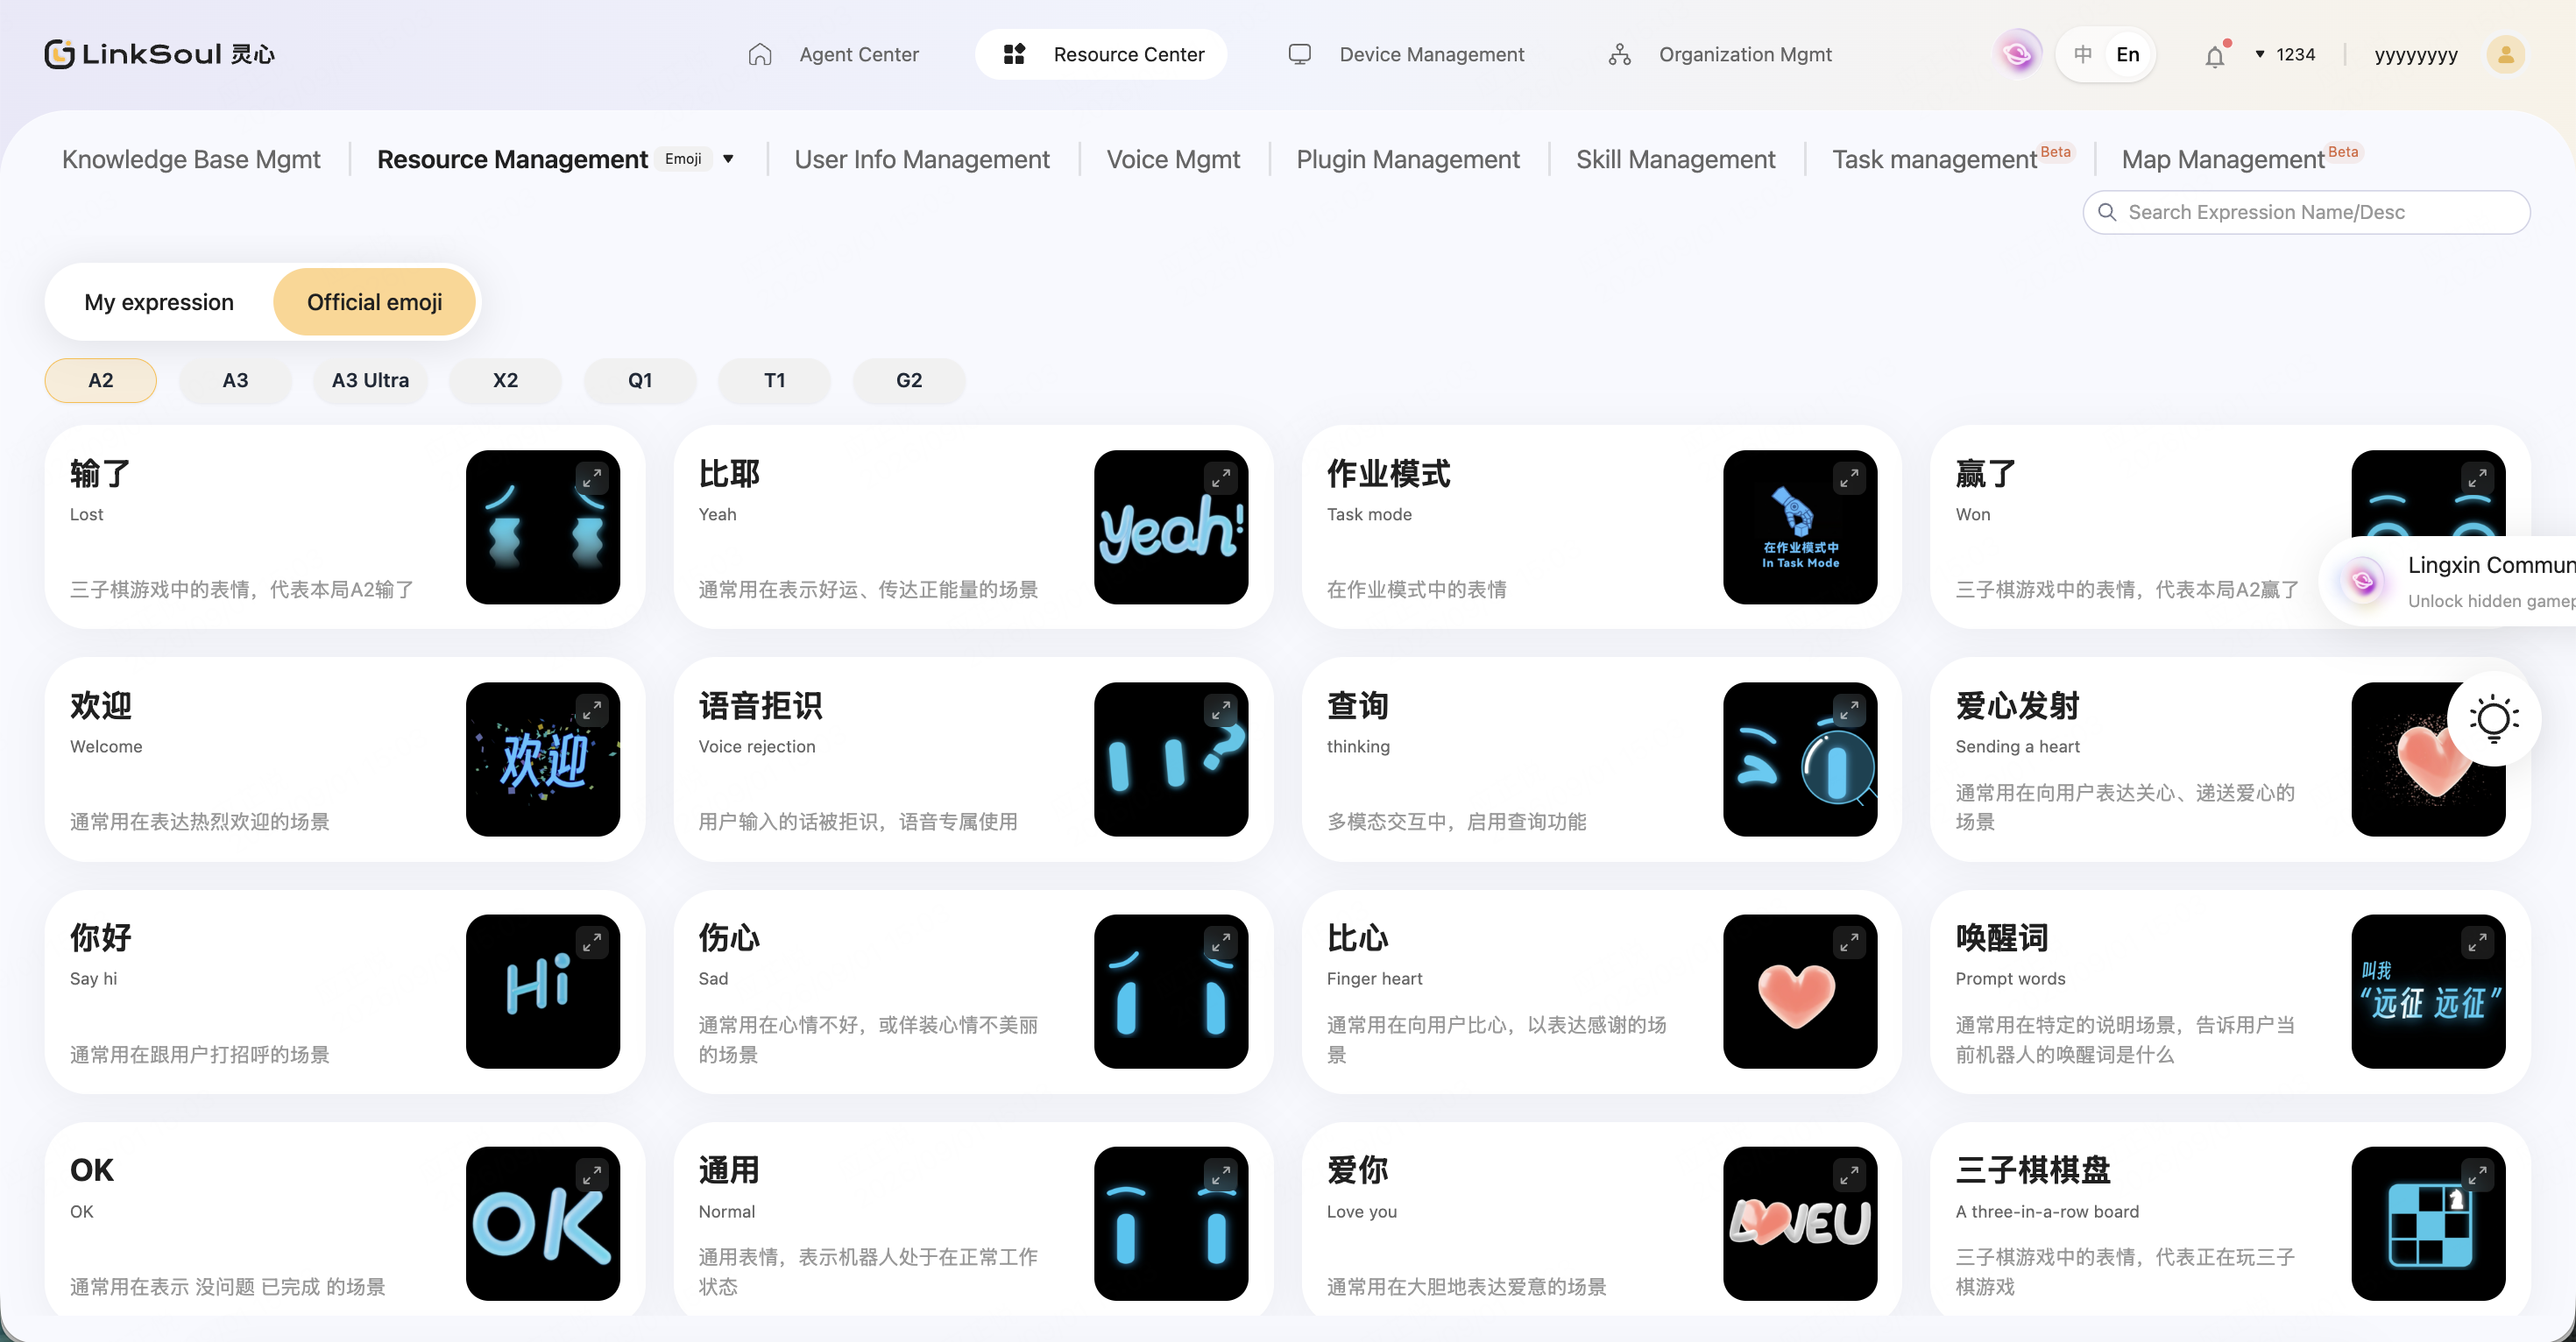
In addition to viewing built-in emojis, the A3/A3 Ultra models currently support custom emoji upload and usage:
1. Adding Custom Emojis
- Go to Resource Center > Material Management > Emojis, click "Add".
- Fill in the emoji name; emoji description is optional.
- Upload the emoji file and edit the screen display range for different models.
- Confirm the information and save.
Upload Requirements:
- Supported formats:
png,jpg,mp4- Single file size: no more than 10 MB
**⚠️ Note: **Emojis cannot be edited after being bound to a device. Please confirm the emoji file and display range before binding.
2. Configuration and Triggering
Custom emojis support the following two configuration methods:
- Method 1: Configure via Skill Orchestration
- Select custom emojis in skill orchestration, add them to a custom skill, and set the trigger method.
- Method 2: Configure via Agent Settings
- Go to Agent Edit Page > Resource Configuration > Emojis.
- Add the desired custom emojis and bind them to the device.
- After successful binding, emojis can be triggered through natural language.
Trigger command examples:
- Make a
{name}expression- Perform a
{name}expression- Show me a
{name}expressionwhere
{name}represents the name of the custom emoji
Method1
Method2
2.5.2.2 Actions
In the Resource Center > Material Management > Actions module, you can view actions corresponding to all device models and preview the effect of each action.
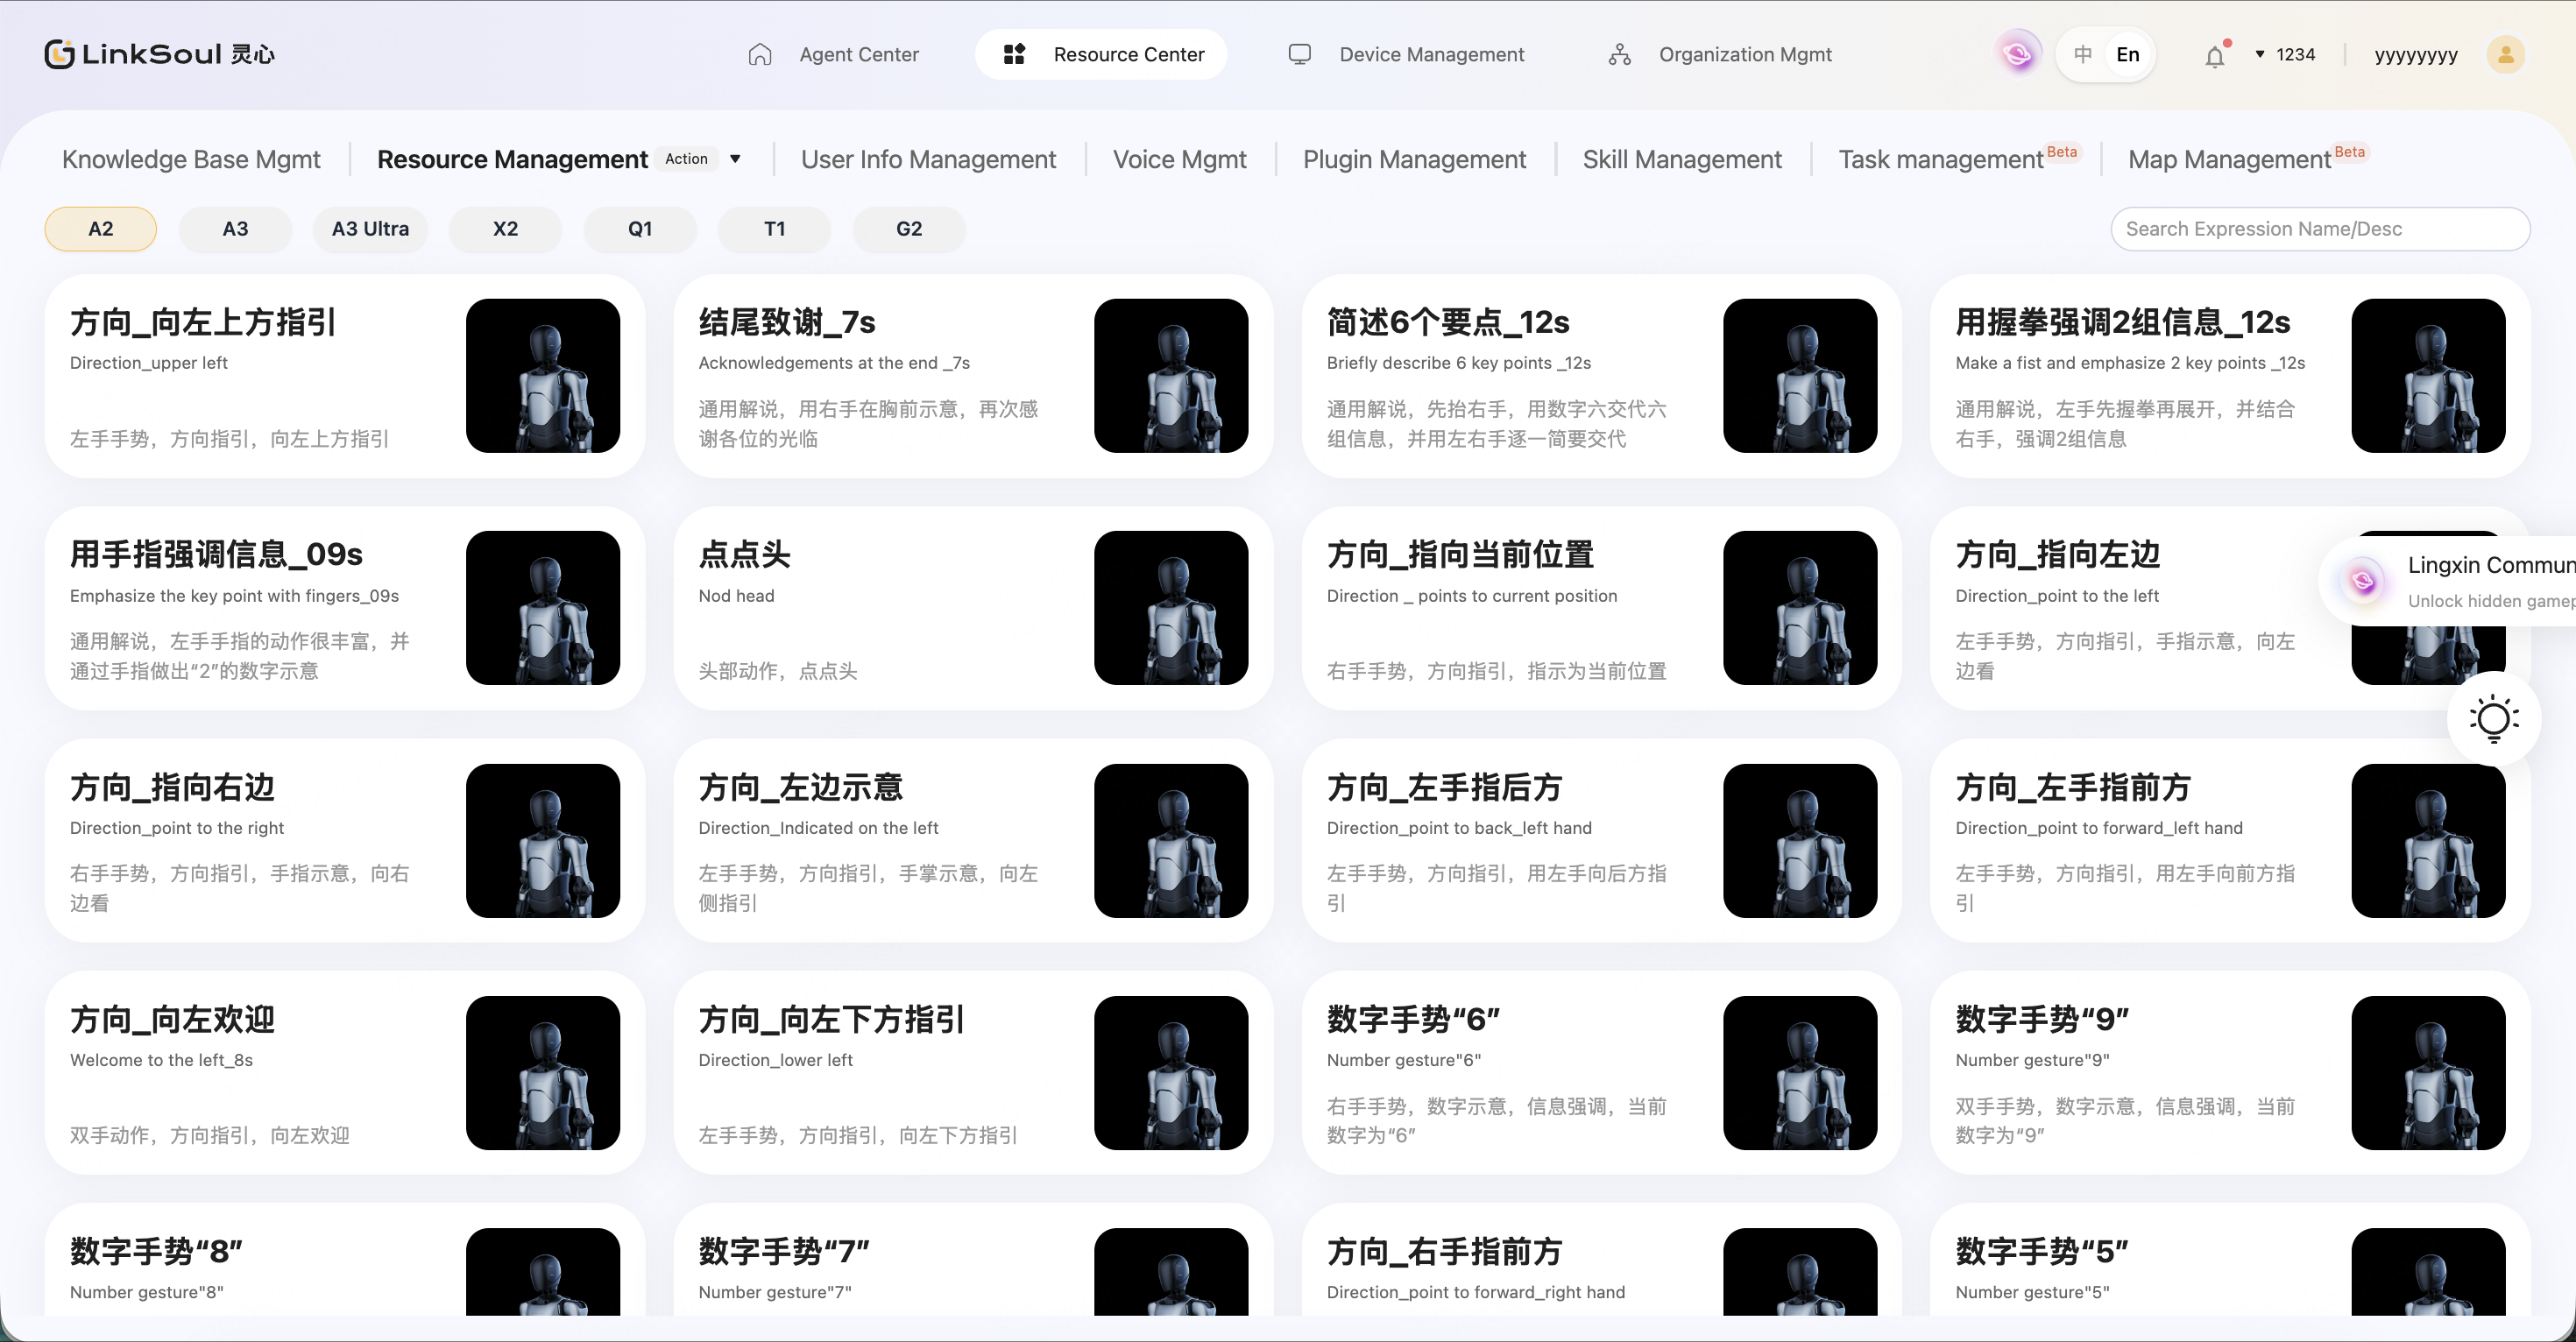
2.5.2.3 Sounds
In the Resource Center > Material Management > Sounds module, you can upload song audio or voice audio, and select a system voice timbre for synthesis to generate singing or voice files in the corresponding system voice. Suitable for quick production of resources for scenarios such as songs, broadcasting, and role impersonation.
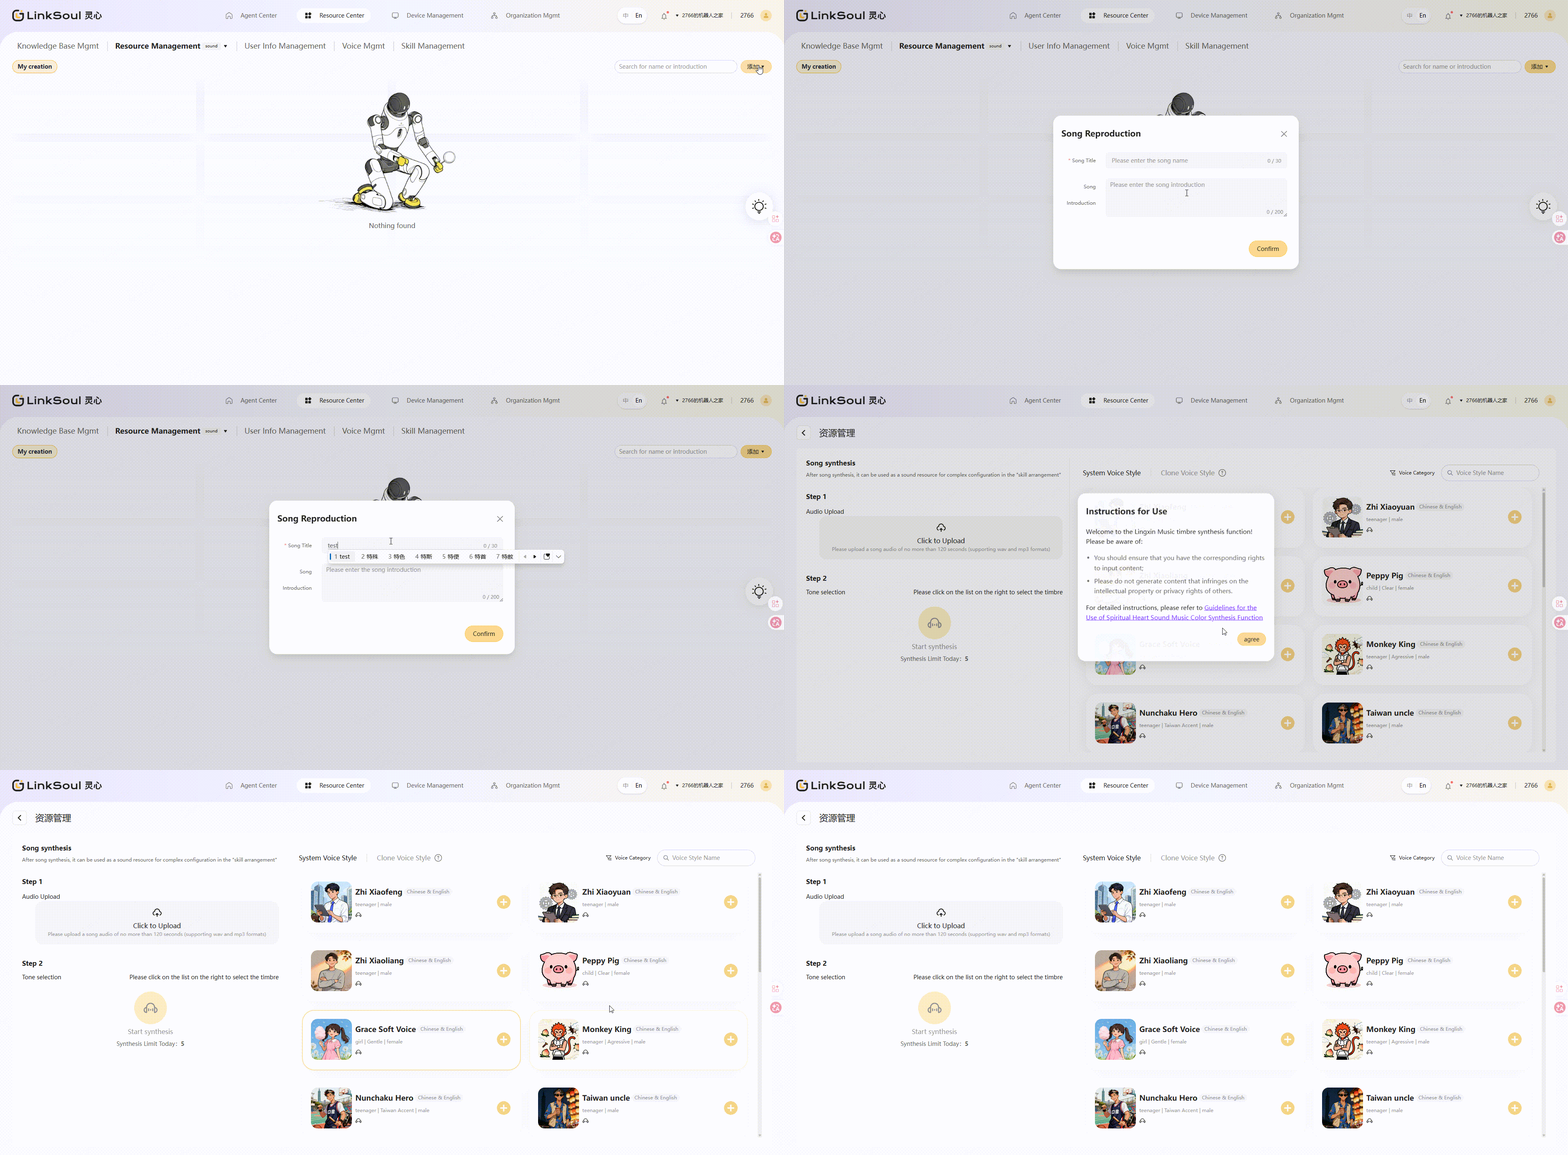
User Information Management
In the "Resource Center > User Information Management" module, you can view, upload, and manage face information that the robot can recognize.
- Method 1: Add Individually
- Enter** the Resource Center > User Information Management** module, and click
Add One . - Upload a face photo and fill in basic information (Chinese name, English name, brief introduction).
- Select face groups: You can create different groups according to your needs for classified management; when configuring agents, you can select all face information in the same group at once.
- Click 「Confirm」 to submit, and the system will automatically perform facial** feature extraction and risk control detection**. Creation will be completed upon success.
- Enter** the Resource Center > User Information Management** module, and click
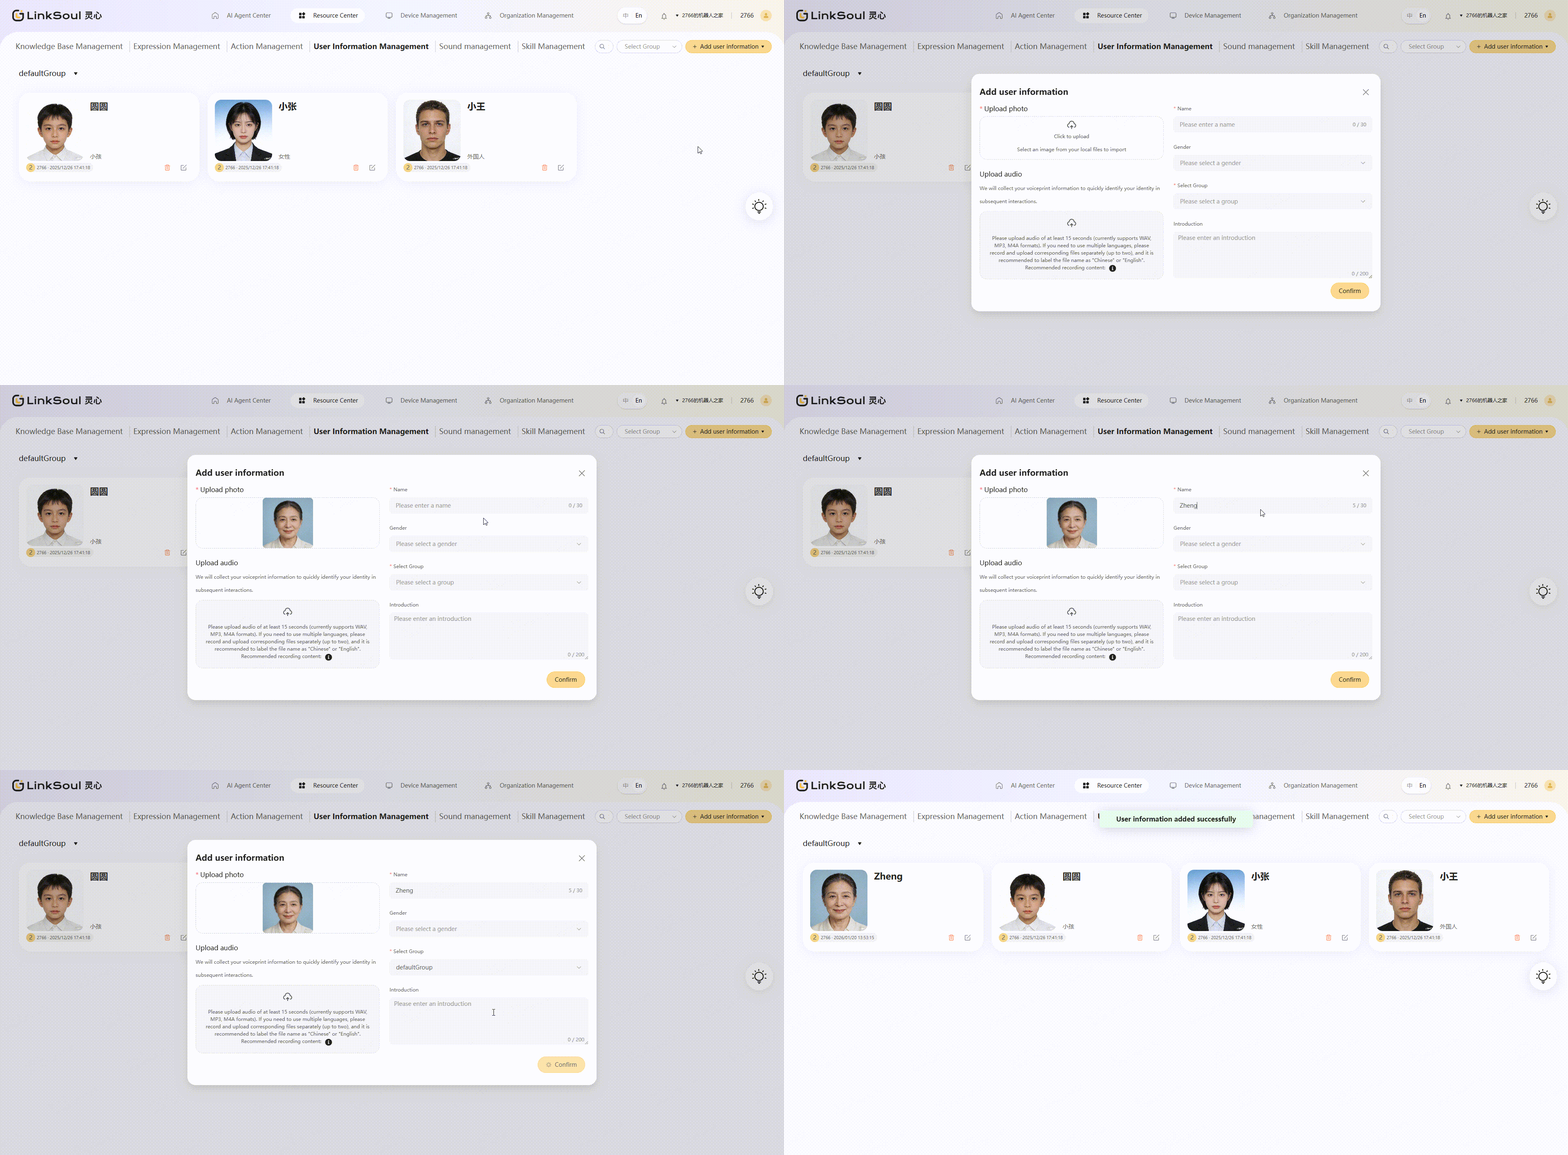
- Method 2: Bulk Addition
- Enter the
User Information Management module, clickBulk Add . - Upload a folder containing photos with multiple faces (up to 50); please ensure the photo naming format is:Name_Introduction
- Select face groups: You can create different groups according to your needs for classified management; when configuring agents, you can select all face information in the same group at once.
- Click** "Next step"**, the system will automatically parse the face photos in the folder and display the parsing results, where you can make secondary modifications
- Click**「Confirm」**to submit, after which the system will perform facial feature extraction and risk control detection; those that pass will be automatically created successfully, and records that fail will be centrally displayed, allowing you to modify and resubmit
- Enter the

⚠️ Precautions:
- Currently, only clear, unobstructed frontal face photos are supported;
- If the detection fails, please replace the image and try again;
Sound Management
In the "Resource Center > Sound Management" module, you can view and audition the system tones provided by the current platform; at the same time, you can also perform tone replication here to generate your own exclusive tones.
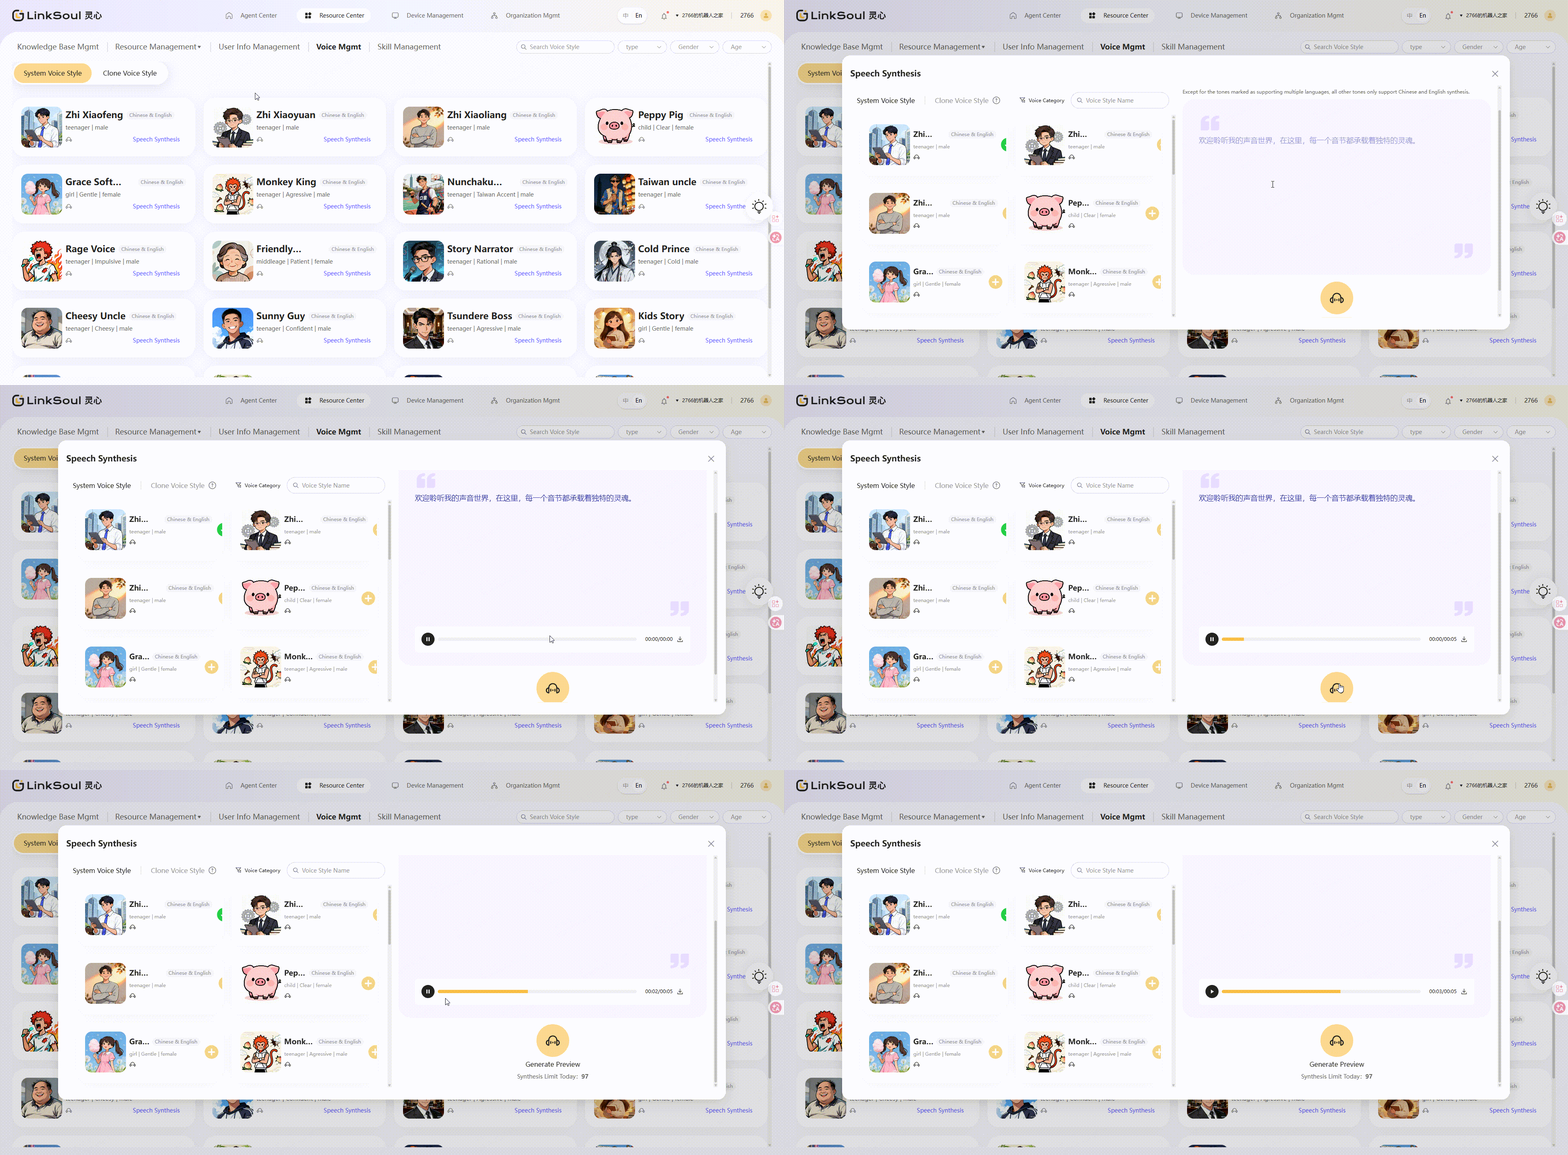
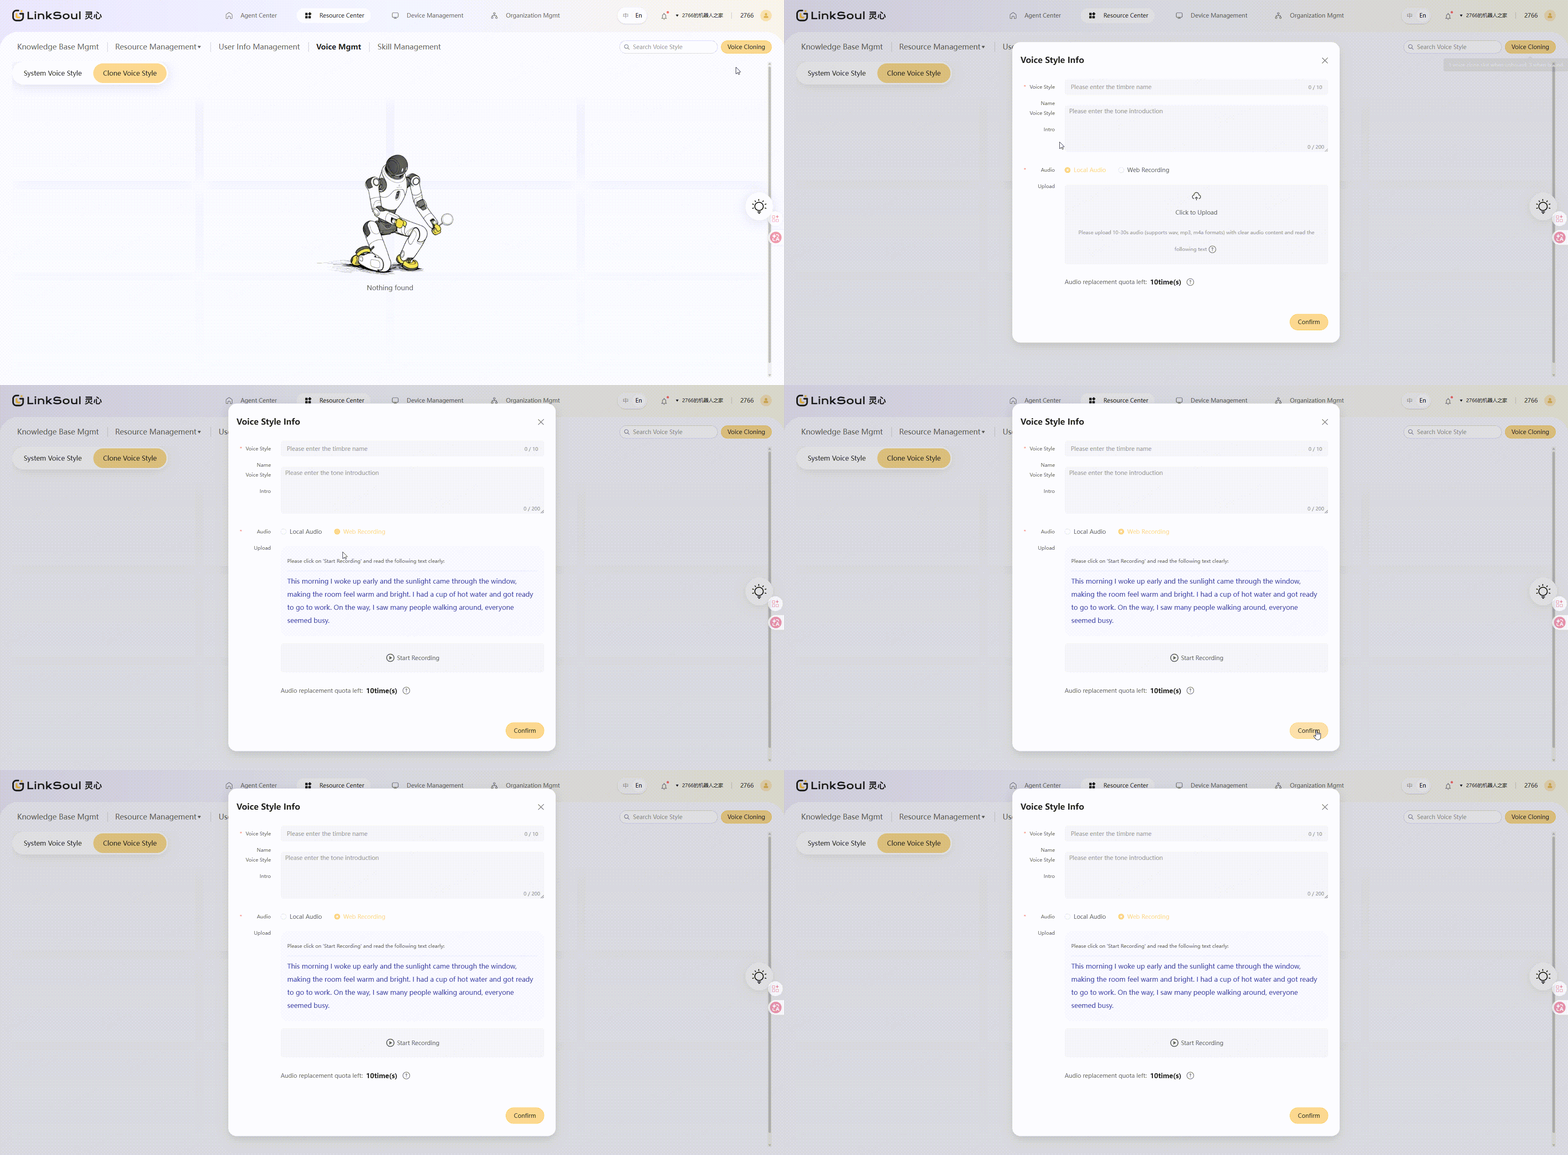
⚠️ Precautions: When performing voice cloning, you need to upload a clear audio file of 10 to 30 seconds (supporting wav, mp3, m4a, aac formats). Please ensure that the audio content is a clear and complete reading of the specified text provided by the platform, so that the system can accurately complete the extraction of voice color features.
Skill Management
2.5.5.1 Form Skills
In the Resource Center > Skill Management module, you can add Form type skills, which support custom combinations of expressions + actions + broadcast content, and set corresponding trigger commands for the skills.
- Enter the Resource Center > Skill Management module, click "+ Add Skill Package", fill in the skill package name and compatible device models.
- After entering the skill package, click "+ Add Skill - Form", and fill in the basic information of the skill.
- On the skill configuration page:
- **Left "Trigger Configuration" area: **You can add up to 10 trigger commands. When any command is recognized, the skill will be triggered.
- **Right "Skill Orchestration" area: **You can configure up to 3 steps. Each step can add up to 5 random items. After the skill is triggered, the robot will execute in step order and randomly select one random item in each step to execute synchronously.
- **Task type: **You can flexibly configure the start and continue trigger commands for any exhibition hall tour task or navigation task, achieving more natural task transitions.
Task type currently only supports Yuanzheng A2 and Lingxi X2; The "navigation" task type for Lingxi X2 is in the limited beta phase. If you need to use it, please contact sales staff to request activation.
- **Expression/Action/TTS type: **You can combine expressions, actions, and voice broadcasts for device execution.
2.5.5.2 AgentFlow Skills (NEW)
In the Resource Center > Skill Management module, you can add AgentFlow type skills for complex skill configuration, and set corresponding trigger methods for the skills.
- Enter the Resource Center > Skill Management module, click "+ Add Skill Package", fill in the skill package name and compatible device models.
- After entering the skill package, click "+ Add Skill - AgentFlow", and fill in the basic information of the skill.
- On the skill configuration page: You can combine the robot's trigger conditions, judgment logic, AI generation, external capability calls, and final actions into an automatically executing task flow by dragging and connecting nodes.
Learn more:💡 AgentFlow使用指南
Map Management
In Resource Center > Map Management, you can view map resources uploaded by clients and deploy maps to other devices within the same organization.
This feature is currently in limited beta. Only Lingxi X2 beta version and Yuanzheng A3 Ultra v3.2 and above support map upload and multi-device deployment. To request access, please contact our sales team.
**Map Viewing: **After a map is successfully uploaded via the client, you can view maps uploaded by a specific device in Device Management > Device Details, or view all maps uploaded by devices in your organization in Resource Center > Map Management.
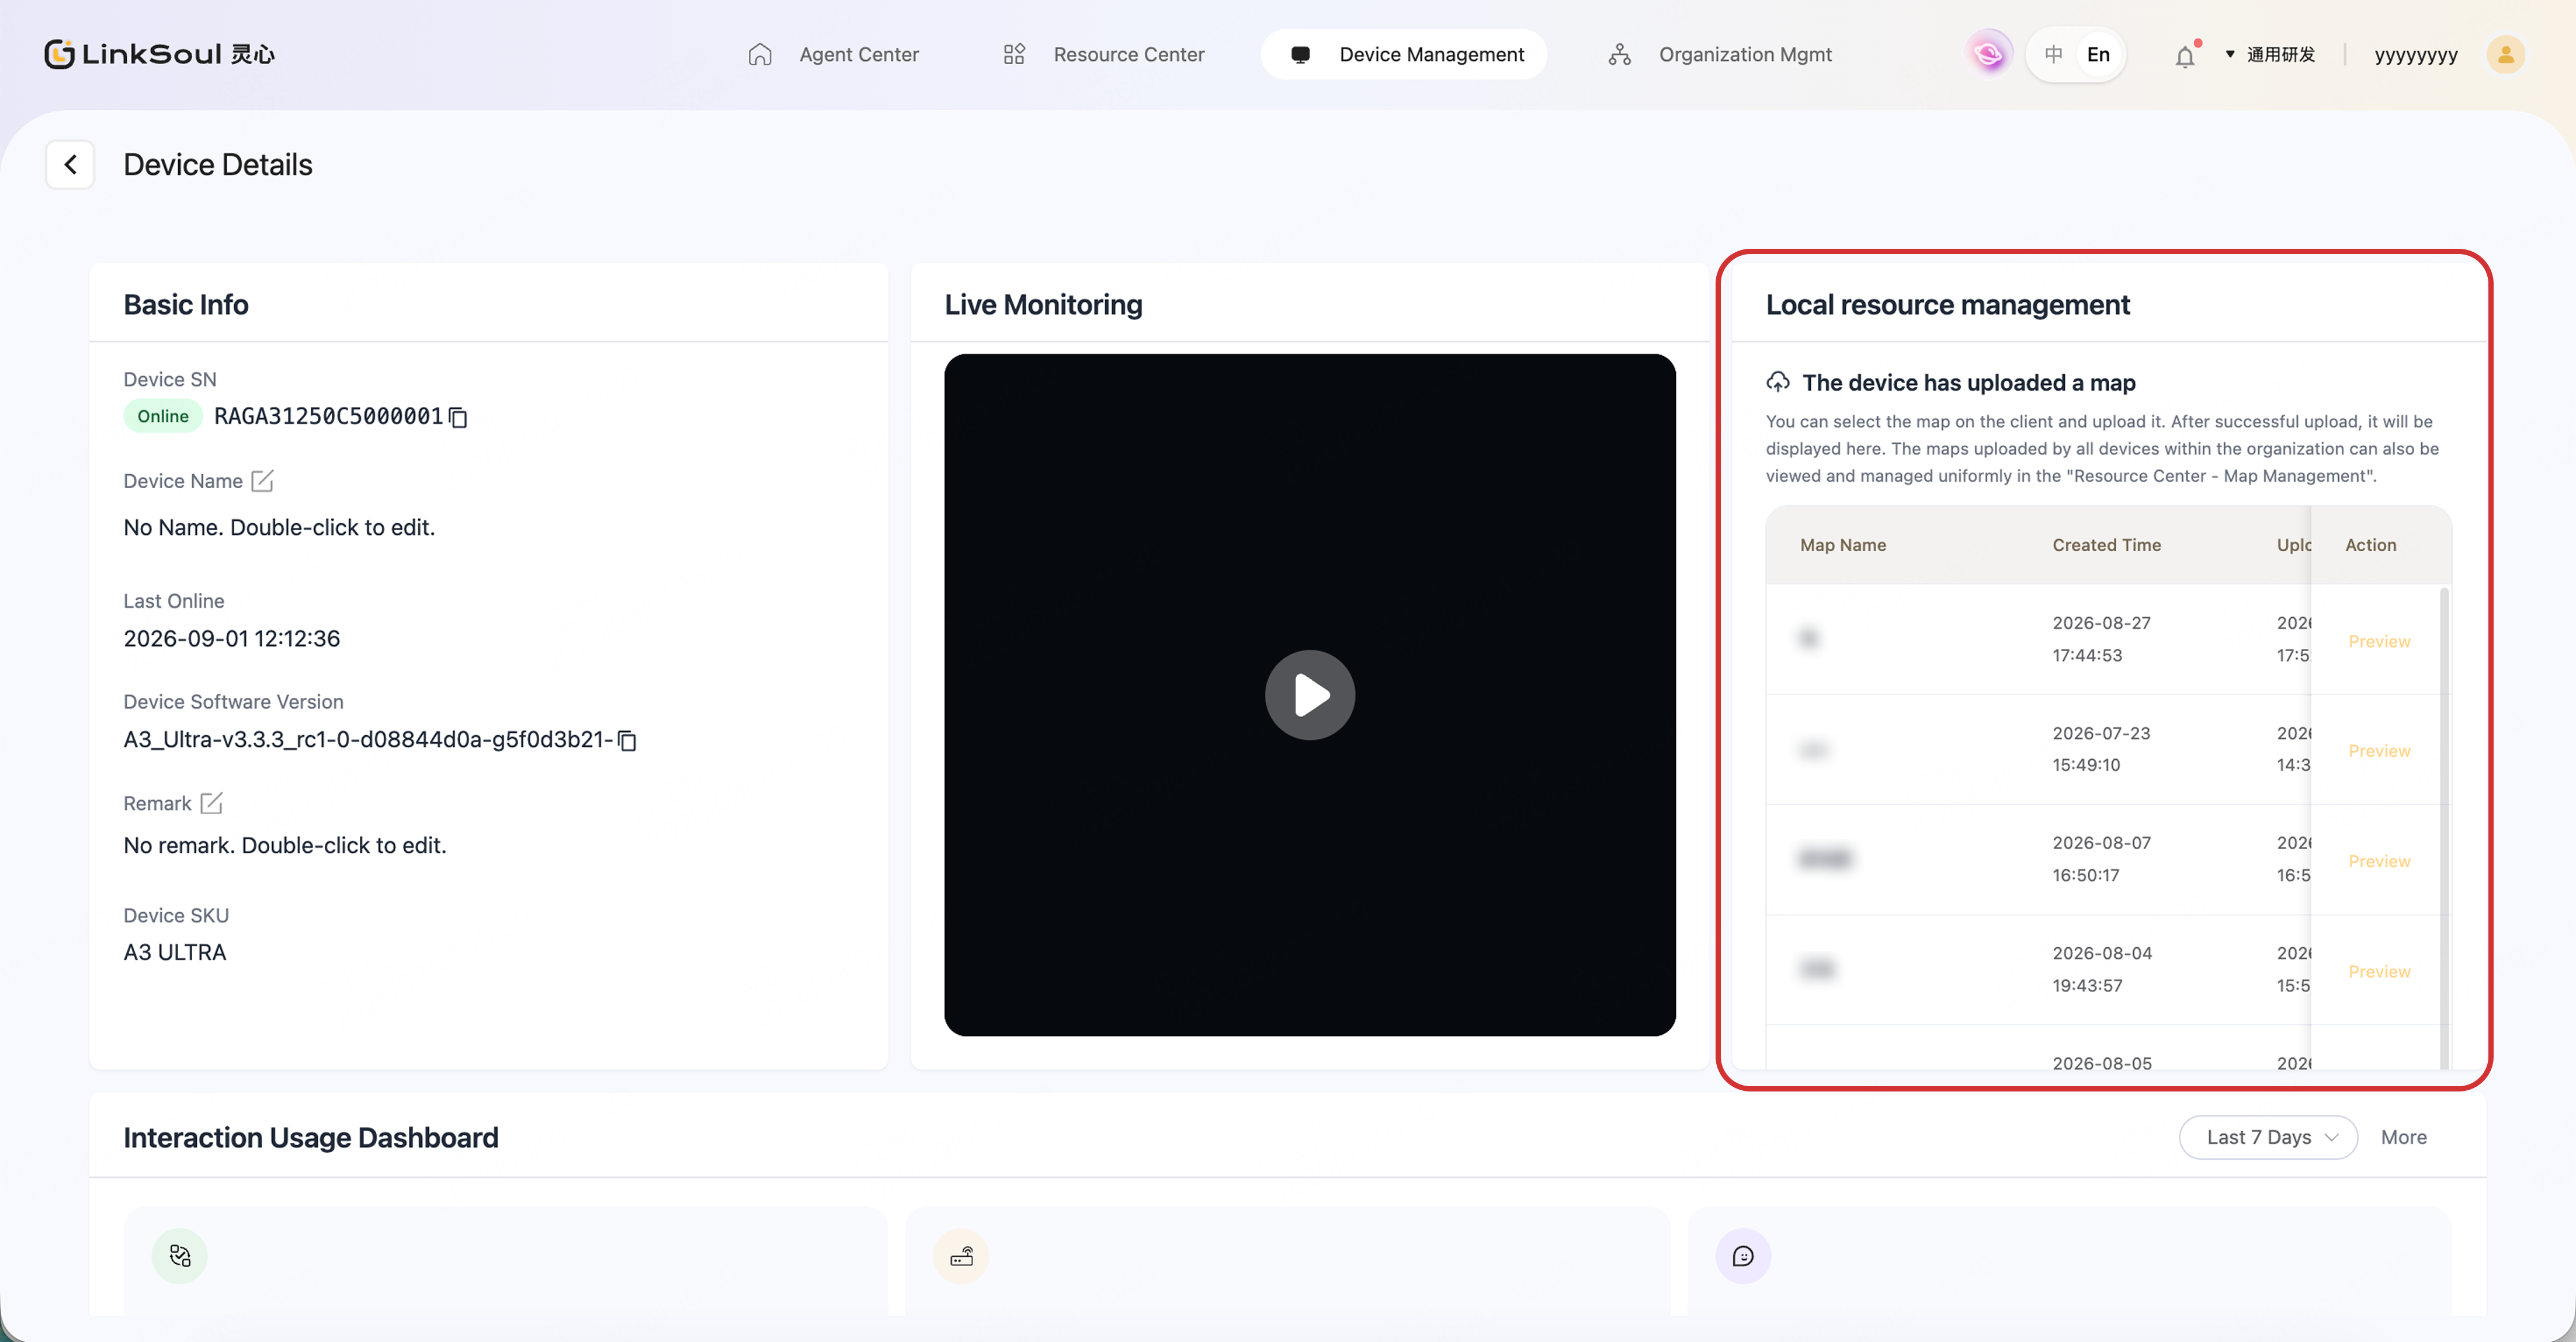
Equipment Management --> Equipment Details

Resource Center > Map Management
**Map Deployment: **Cloud maps can be deployed to any device in the current organization, including the device that originally uploaded the map. Two deployment methods are supported:
- **Method 1: **In Device Management > Device Details, select a map uploaded by a device in your organization and deploy it to the current device for subsequent task configuration. If the original map or point information is updated and re-uploaded, you need to re-deploy the map.
- **Method 2: **In Resource Center > Map Management, select the map to deploy, filter the target devices, and confirm to complete the deployment.
Plugin Management
2.5.7.1 MCP Plugins
1. What is MCP
MCP (Model Context Protocol) is a standard protocol that enables agents to call external tools and services. With MCP plugins connected, agents can automatically determine whether to invoke tools in the plugin based on user questions and retrieve corresponding results — for example, querying information, executing operations, or calling business system APIs. The platform currently supports plugin integration via MCP Server; HTTP API integration is not yet available.
2. Adding an MCP Plugin
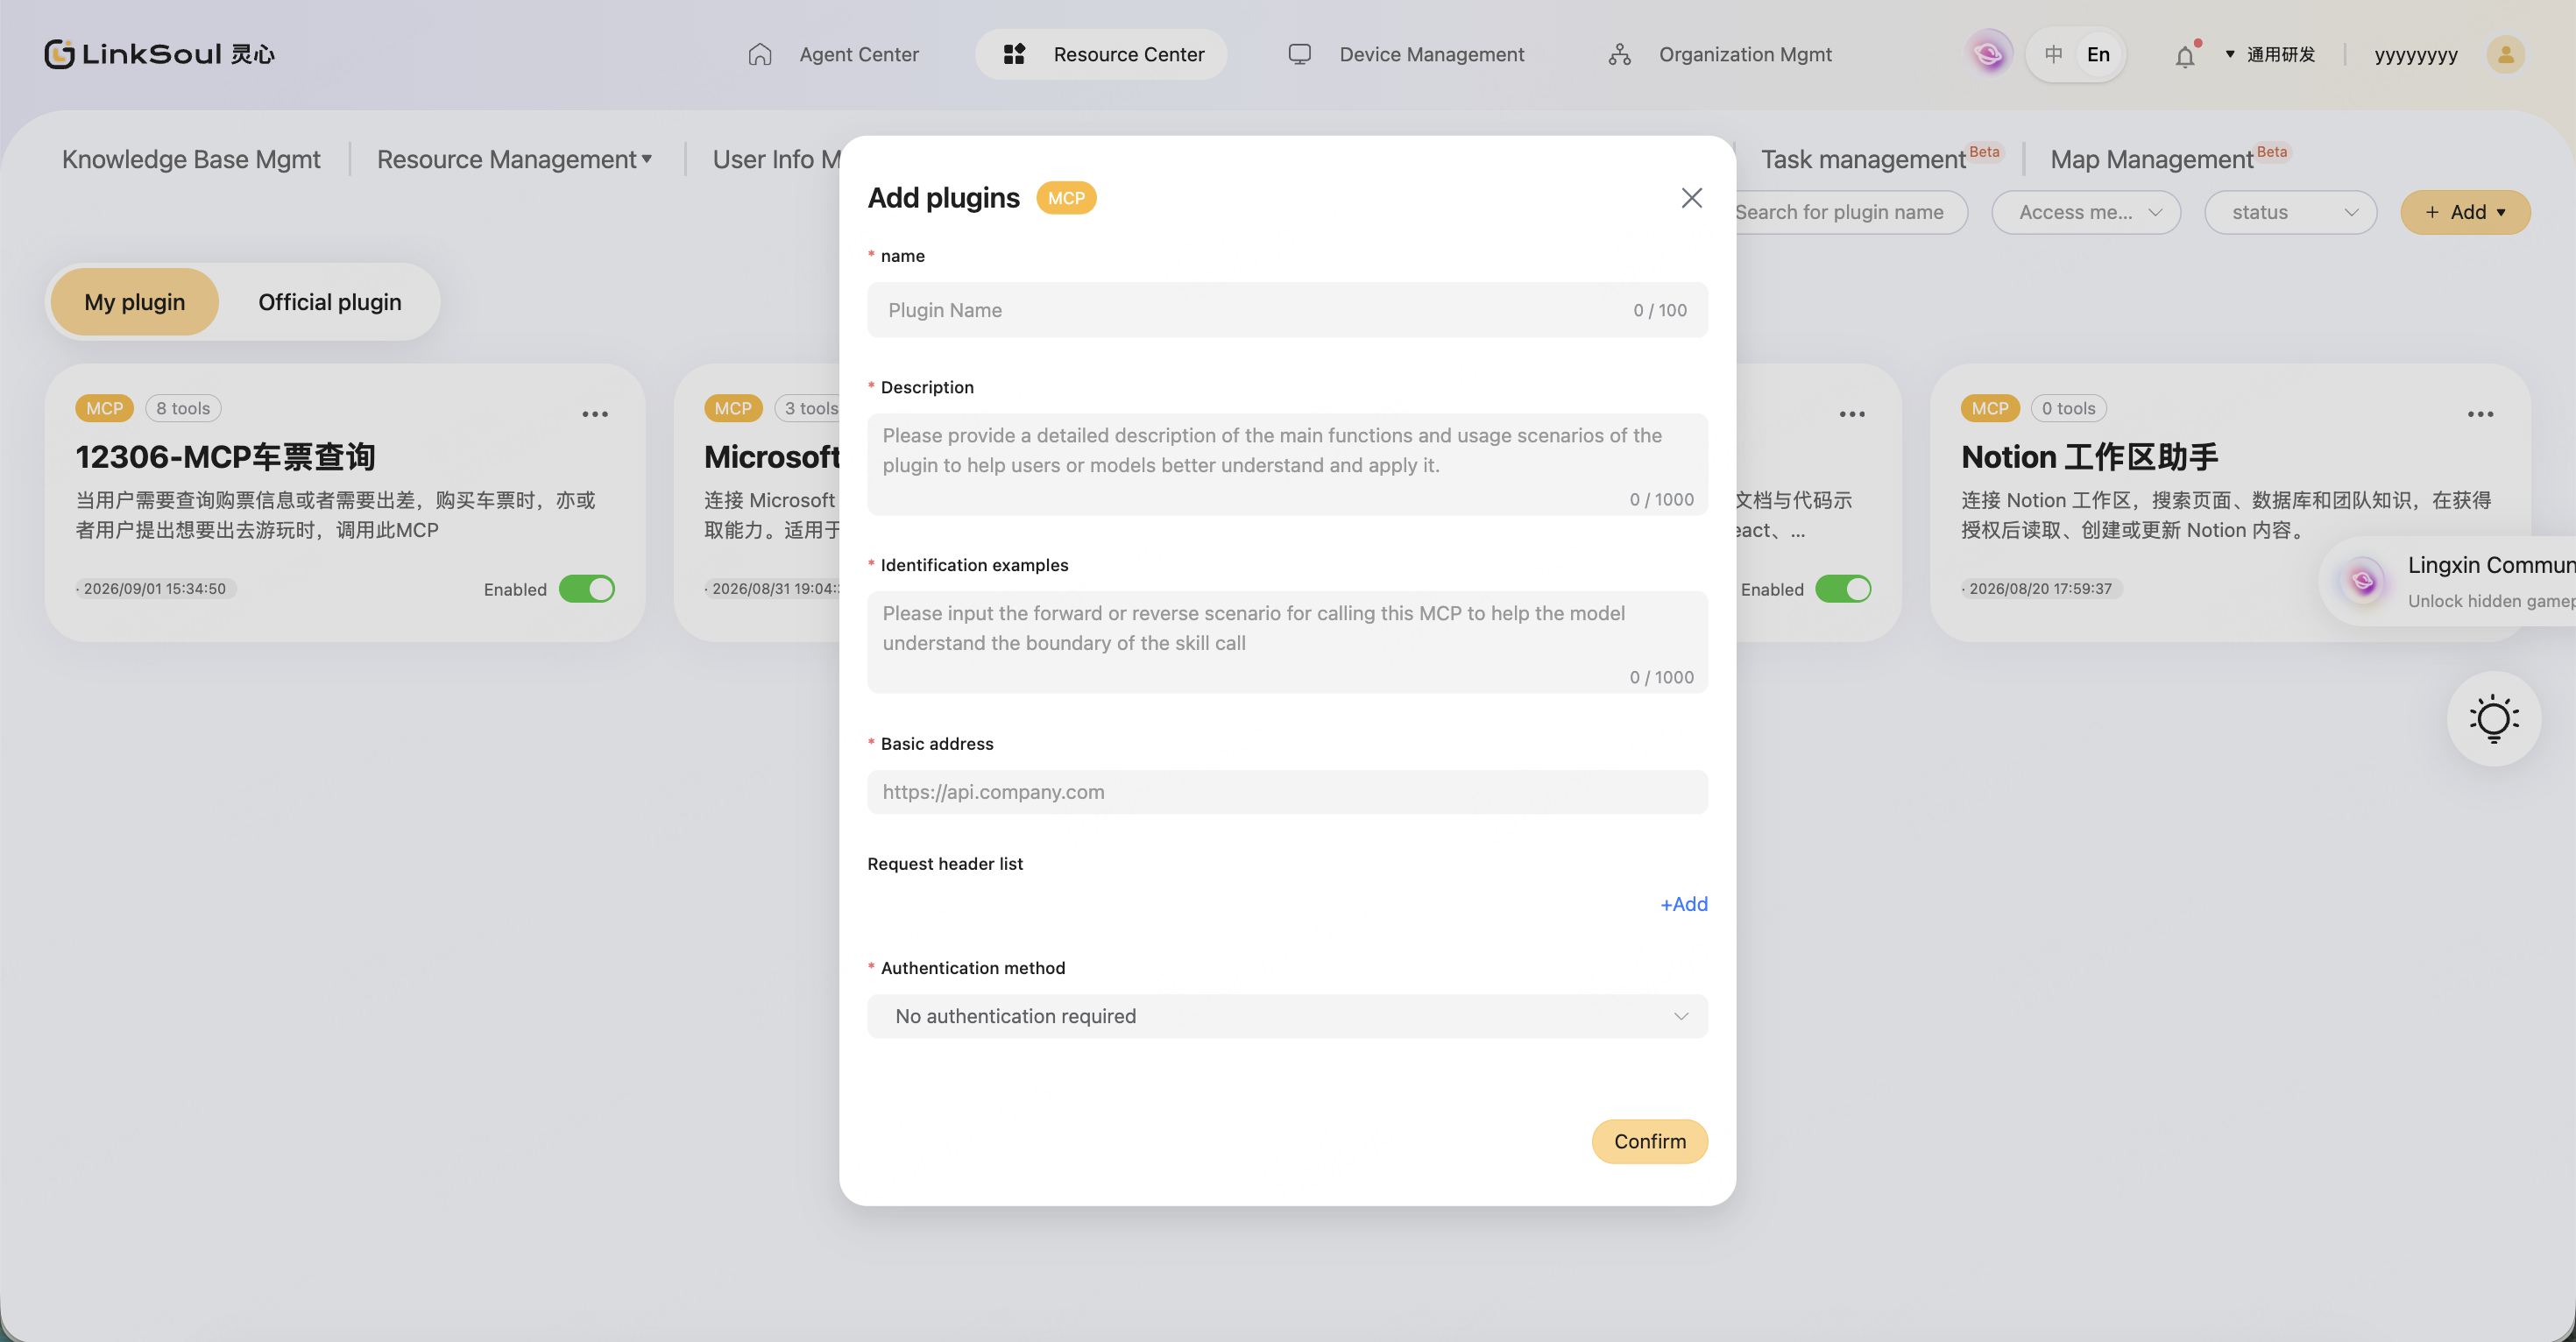
Go to Resource Center > Plugin Management, click "Add" and fill in the plugin information:
| Field | Requirements | Example |
|---|---|---|
| Name | Required, max 20 characters | Weather Query |
| Description | Required, max 1000 characters | Query real-time weather and forecasts for cities |
| Recognition Examples | Required, max 1000 characters. Helps the agent understand the boundaries of when to call the plugin. It is recommended to describe both "should call" and "should not call" scenarios. | Call this plugin when the user asks about city weather. ✅ Recommended: "Call when users ask about real-time weather, future weather, or air quality in a city; do not call when users ask about historical weather, weather knowledge, or other unrelated questions." |
| Plugin URL | Required, must start with http:// | http://example.com/mcp |
| Request Headers | Fill in according to service requirements. If the MCP Server requires authentication, you can add Key/Value request headers. Key and Value must be filled in pairs; up to 100 pairs; leave blank if the service does not require request headers. Please keep sensitive information such as tokens secure. | Authorization: Bearer your-token X-App-Id: your-app-id |
| Auth Method | Select according to the actual service situation | No authentication required |
After filling in, click "Confirm". Once the system validation passes, it will automatically connect to the MCP Server and parse the tools.
3. Viewing Plugin Tools
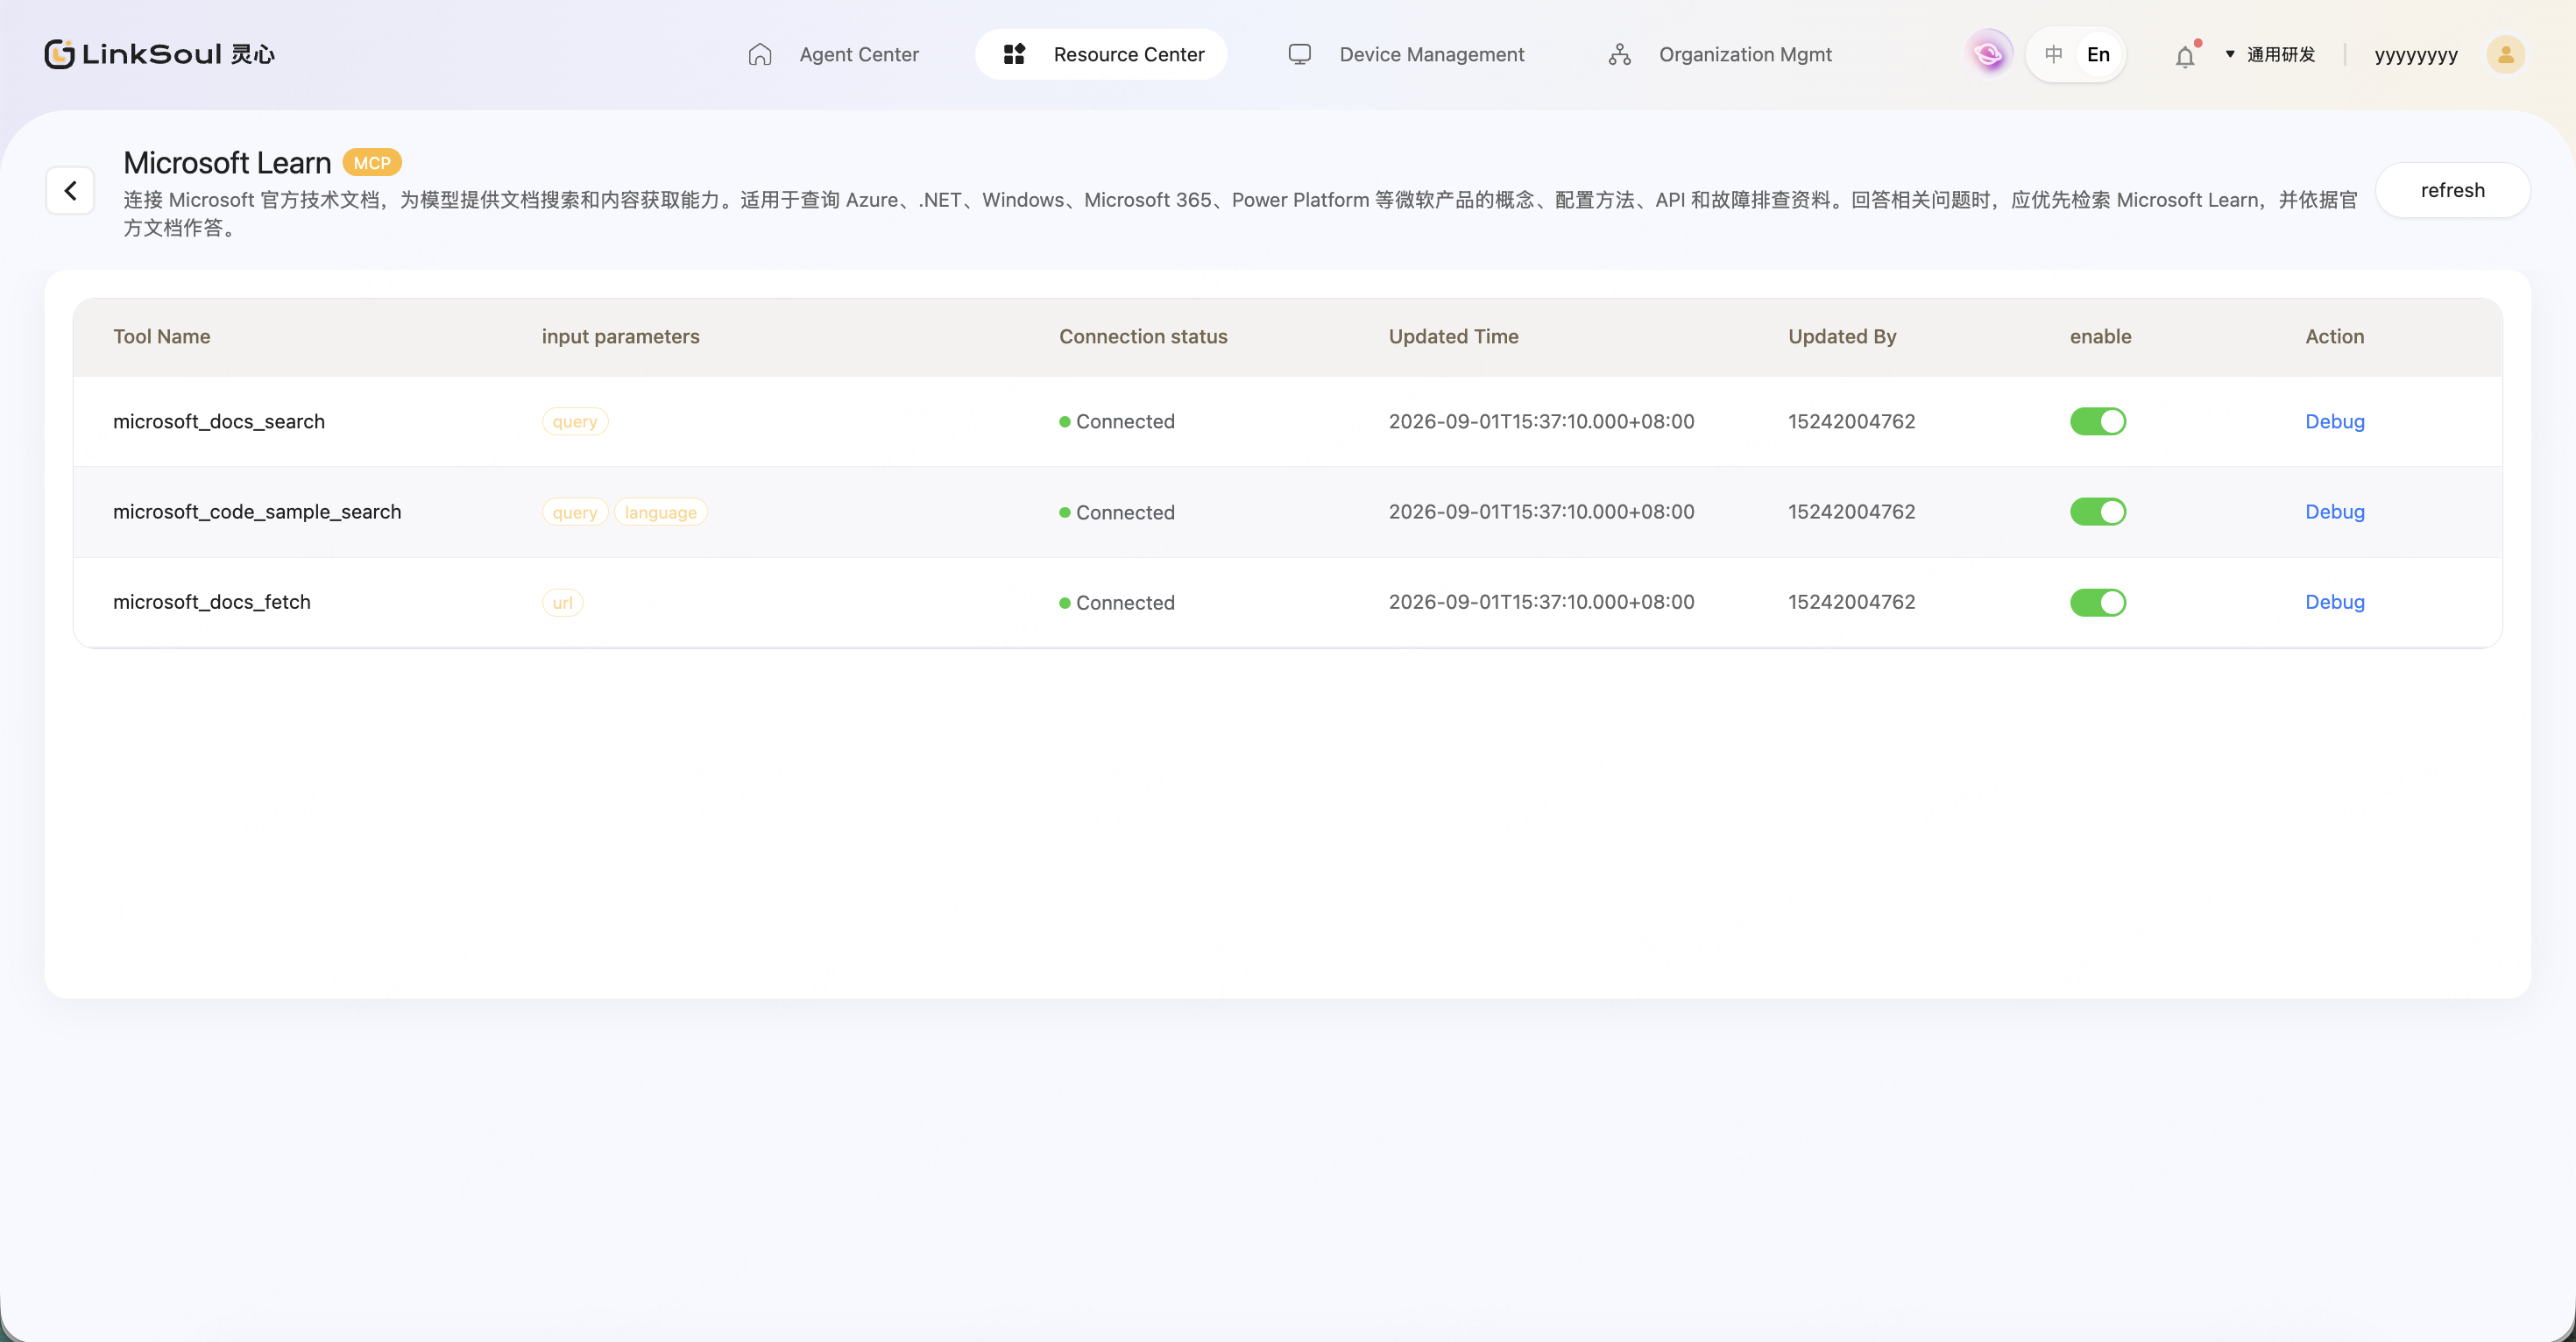
After the plugin is successfully parsed, you will enter the tool list page. You can view:
- Tool name
- Input parameters
- Connection status
- 🟢 Connected: The tool can be accessed and debugged normally
- 🔴 Not connected: There may be issues with the service address, network, or authentication
- Update time and updated by
- Tool enable status: Newly parsed tools are enabled by default. When disabled, the agent will not call the tool.
If the MCP Server adds, removes, or modifies tools, click "Refresh" in the upper right corner of the page to update.
4. Online Tool Debugging
Find the target tool in the tool list and click "Debug" on the right.
- Fill in parameter values, either via form or JSON. For example:
{
  "city": "Shanghai",
  "date": "2026-08-12"
}
- Click "Start Debugging"
- View the request parameters and structured response results
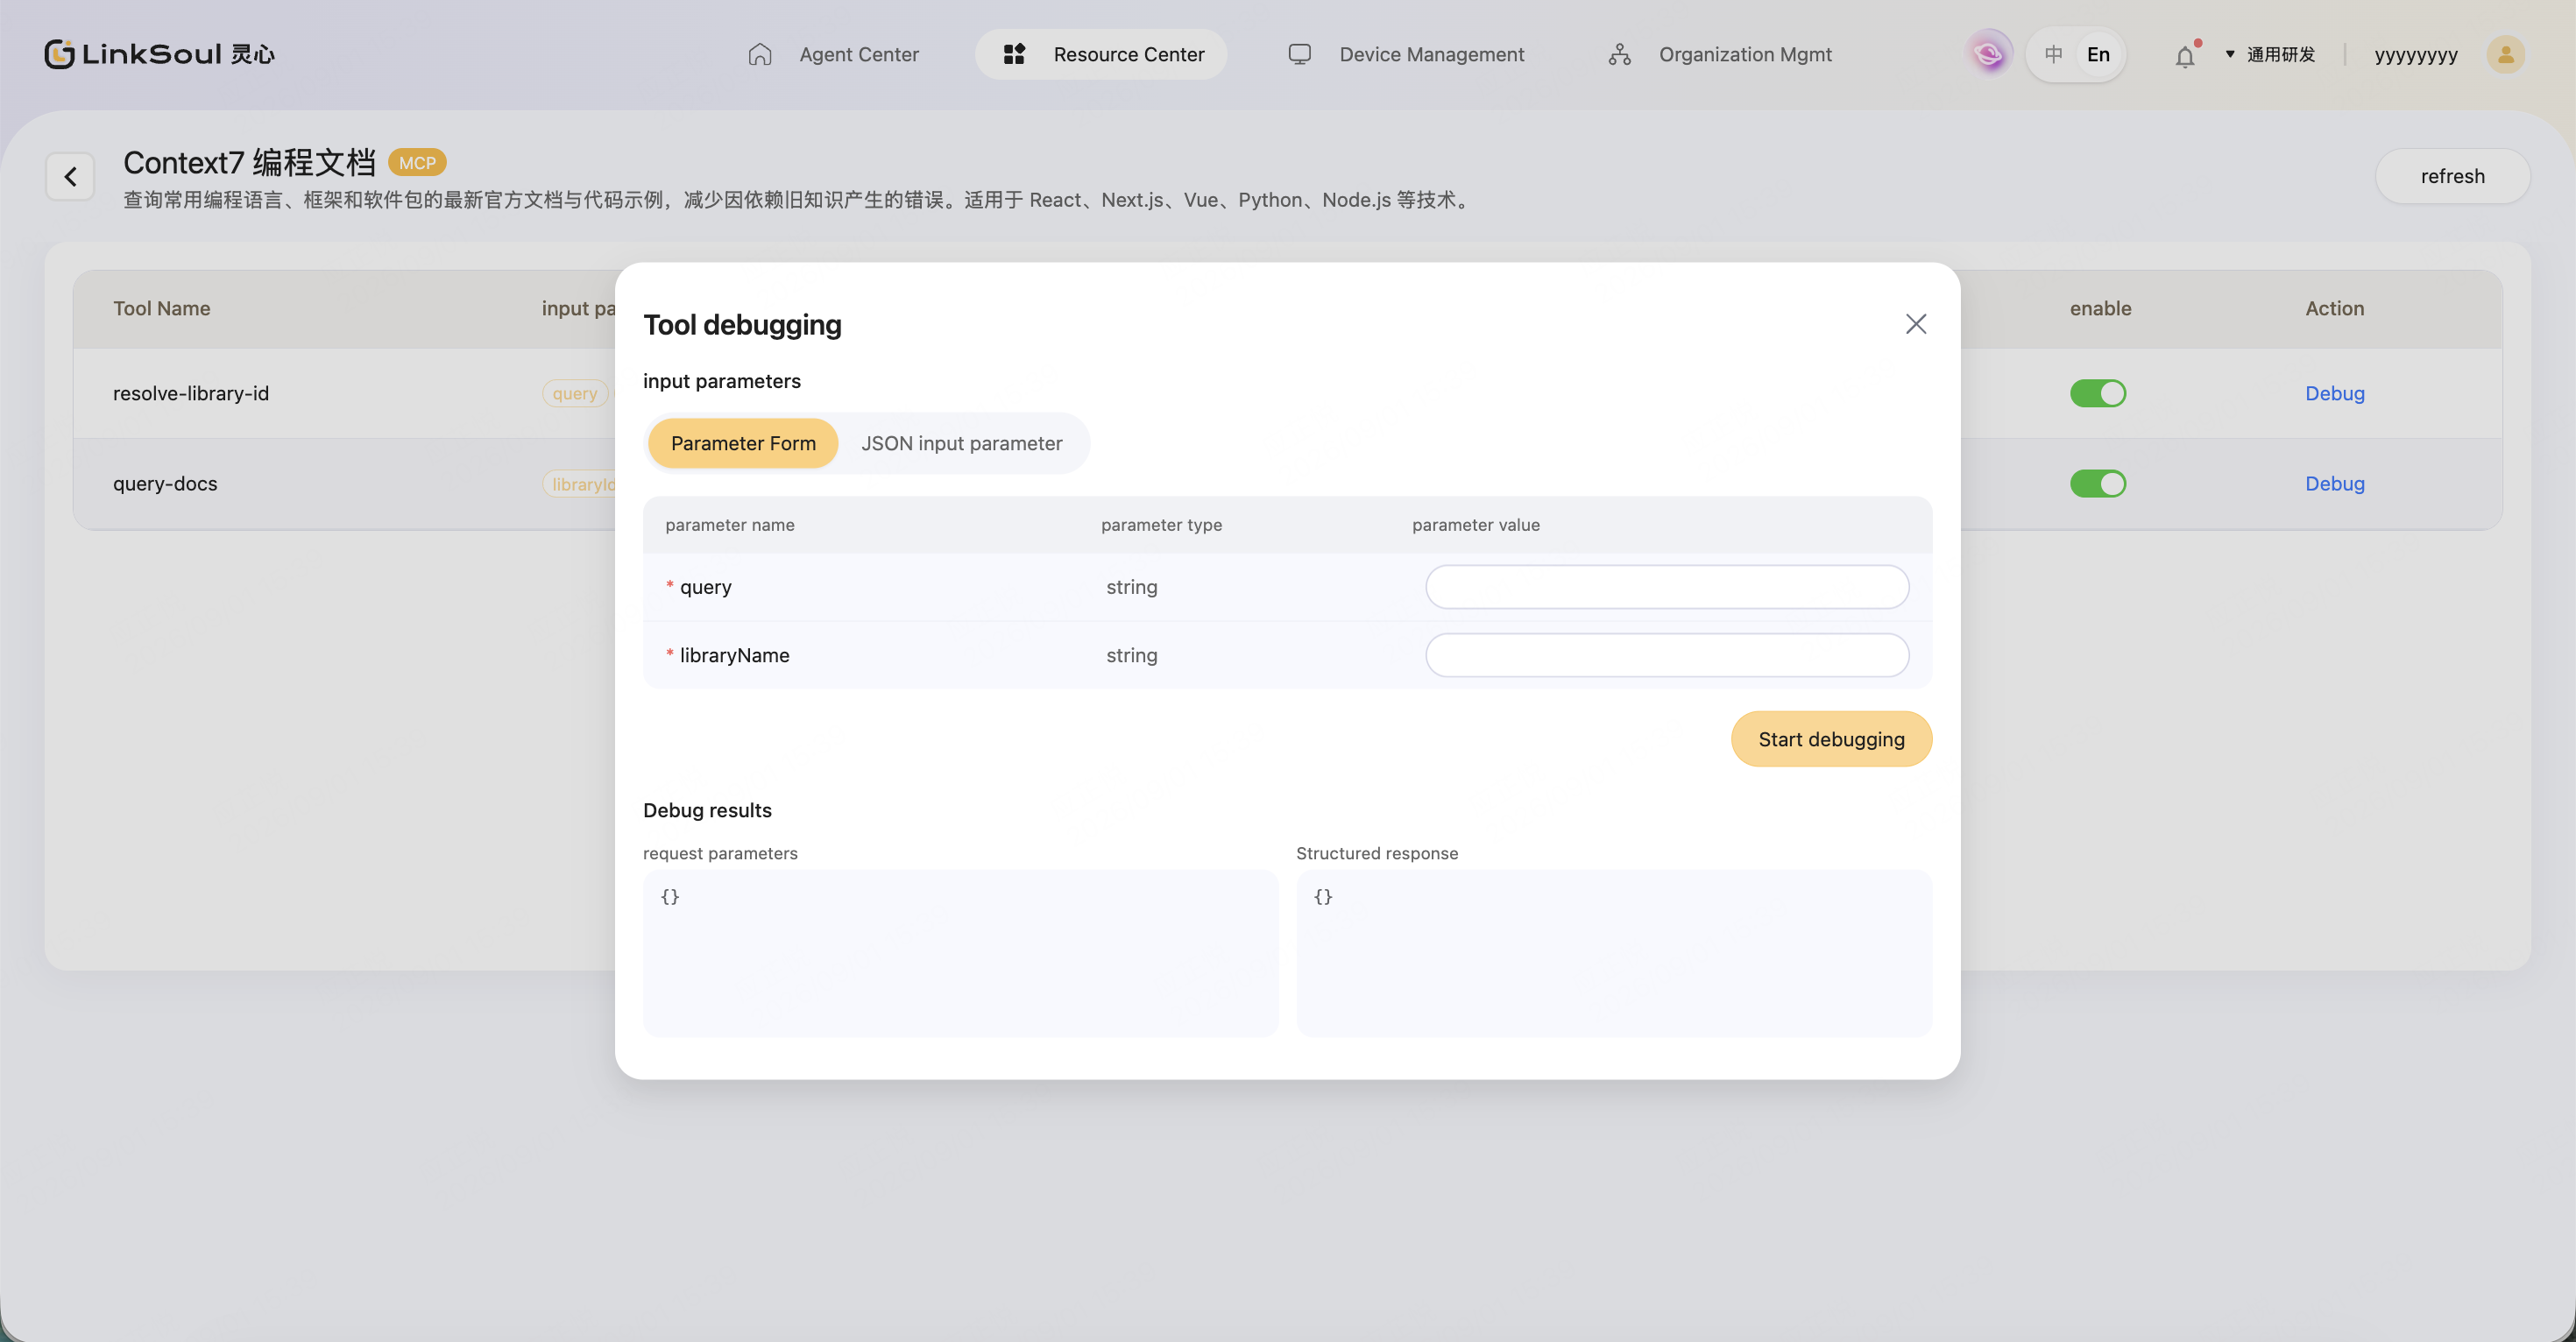
After successful debugging, you can see the data returned by the MCP Server in the result area.
💡 It is recommended to complete debugging before binding to an agent to confirm that the service connection, parameters, and returned results all meet expectations.
5. Adding Plugins to Agents
Go to Agent Editor > Resource Configuration > Plugins, select the desired official or custom plugins, then save the agent. Once configured, the agent will automatically select the appropriate plugin based on the user's question.
At the same time, you can test MCP calls through the agent debugging window.
Usage Limits
- Currently only supports domestic environment
- Currently only supports non-multilingual agent templates
- Each agent can add up to 5 plugins (official and custom plugins combined)
6. MCP FAQ
| Question | Answer |
|---|---|
| Prompt says URL is incorrect when adding plugin | Please confirm the plugin URL starts with http:// and the service address is accessible. |
| Tool shows "Not connected" | Check in order: 1) Is the MCP Server running properly? 2) Is the plugin URL correct? 3) Are the request headers and auth info valid? 4) Can the current network access this service? 5) Have you refreshed the tools after modifying the configuration? |
| Agent is not calling the plugin | Please check: • Is the plugin added to the agent? • Are the plugin and corresponding tools enabled? • Is the tool in connected status? • Is the plugin description and recognition example clear? • Does the user's question match the plugin's invocation scenario? |
| Tools not updated after MCP Server update | Go to the plugin tool list and click "Refresh" to re-parse the tools. |
| MCP outputs a block of structured code | Please check whether the MCP output format conforms to the specification, and ensure it directly returns text content rather than structured code. |
Task Management (NEW)
Learn more:📍 空间任务使用指南
🍭 Mastering Agents
Introduction to Official Agent Templates
| Template Type | Product Model | Template Name | Template Introduction |
|---|---|---|---|
| Default Template | A2 | A2 Default Agent Template | Default agent configuration for Model A2 |
| Default Template | A2 | A2 Multilingual Agent Template - Domestic | Multilingual Package Agent Template for Model A2 (Exclusive for Domestic Multilingual Use). Currently, it has built-in language capabilities for over 20 countries, suitable for the rapid setup of multilingual scenarios. Please note: The expressiveness of Chinese and English is slightly lower compared to the default Agent Template for Model A2; after device binding, the selected language of the current agent shall prevail; the current template does not support voice switching. |
| Default Template | A2 | A2 Multilingual Agent Template - Overseas | Multilingual Package Agent Template for Model A2 (Exclusive for Overseas Multilingual Use). Currently, it has built-in language capabilities for over 20 countries and is suitable for the rapid setup of multilingual scenarios. Please note: After binding the device, the selected language of the current agent shall prevail; the current template does not support voice switching. |
| Role Template | A2 | Zhuang Zhou | - |
| Role Template | A2 | Sun Wukong | - |
| Role Template | A2 | Zichen Fengdi | - |
| Role Template | A2 | Stout Brown Warrior | - |
| Role Template | A2 | Prince Yulong | - |
| Role Template | A2 | Tang Monk | - |
| Role Template | A2 | Fortune Blessing Agent | - |
| Default Template | X2 | X2 Default Agent Template | Default agent configuration for Model X2 |
| Default Template | X2 | X2 Multilingual Agent Template - Domestic | Multilingual Package Agent Template for Model X2 (Dedicated to Domestic Multilingual Use). Currently, it has built-in language capabilities for over 20 countries, suitable for the rapid setup of multilingual scenarios. Please note that the comprehensive performance of Chinese and English is slightly lower compared to the default Agent Template for Model X2; currently, languages other than Chinese and English only support chatting and knowledge Q&A; voice switching is not yet supported. |
| Default Template | X2 | X2 Multilingual Agent Template - Overseas | Multilingual Package Agent Template for Model X2 (Exclusive for Overseas Multilingual Use). Currently, it has built-in language capabilities for over 20 countries, suitable for the rapid setup of multilingual scenarios. Please note that, apart from Chinese and English, other languages currently only support casual chat and knowledge Q&A; voice switching is not yet supported. |
| Role Template | X2 | Zhu Bajie | - |
| Role Template | X2 | Firework Boy | - |
| Role Template | X2 | Concubines in the Deep Palace | - |
| Role Template | X2 | Square Xiaohuang | - |
Agent Template Types
- **Basic Template: **Related to the capabilities of the device model, such as default agents, multilingual agents, etc. Basic templates for different models may contain different configuration fields. One basic template corresponds to only one model.
- **Character Template: **Agent configuration templates related to character settings such as wake words, persona, voice timbre, and name. A character template can support multiple device models. When reused, the exclusive content in the character template is preserved, and the exclusive field configuration corresponding to the selected device model is superimposed.
- **SDK Template: **Agent configuration template for SDK secondary development scenarios, displayed alongside basic templates and character templates.
Create Agent
Currently, you can quickly deploy agent configurations that meet your requirements by easily creating agents with a single click based on existing templates.

- Step 1: Select the creation method
- Method 1: Enter the Agent Center >My Agents module, click the Add Agent button, and select an existing template to create with one click.
- Method 2: Enter the "Agent Center >Agent Template" module, click "Create Agent ", and you can create based on the selected template.
- Method 3: Enter the "Agent Center >Agent Template" module, click the "Preview" button to view the template details. On the details page, click " One Click Use", and the agent will be created based on this template.
💡 Tip: The current platform already provides default templates for A2 and X2 models. You can directly select and fill in the default values with one click. In the future, more diverse templates will be launched, including scenario, technology, and IP co-branded templates, etc.
- Step 2: Fill in Agent Information
After selecting the template, you need to fill in the name and brief introduction of the agent. After filling in, click "Confirm" to create successfully.
- Step 3: Usage and Customization
- If you only need to create and use based on the template content, you can directly bind the agent to the device and start using it after successful creation.
- If you wish to further customize the agent configuration, you can directly click on the agent card to enter the editing page for detailed parameter adjustment and personalized settings. For configuration guidance, see 3.3Configure Agent
Configure Agent
Basic Information
In this module, you can modify the name and introduction of the agent, setting personalized basic information for the agent. Additionally, you can also perform some specific configurations here:
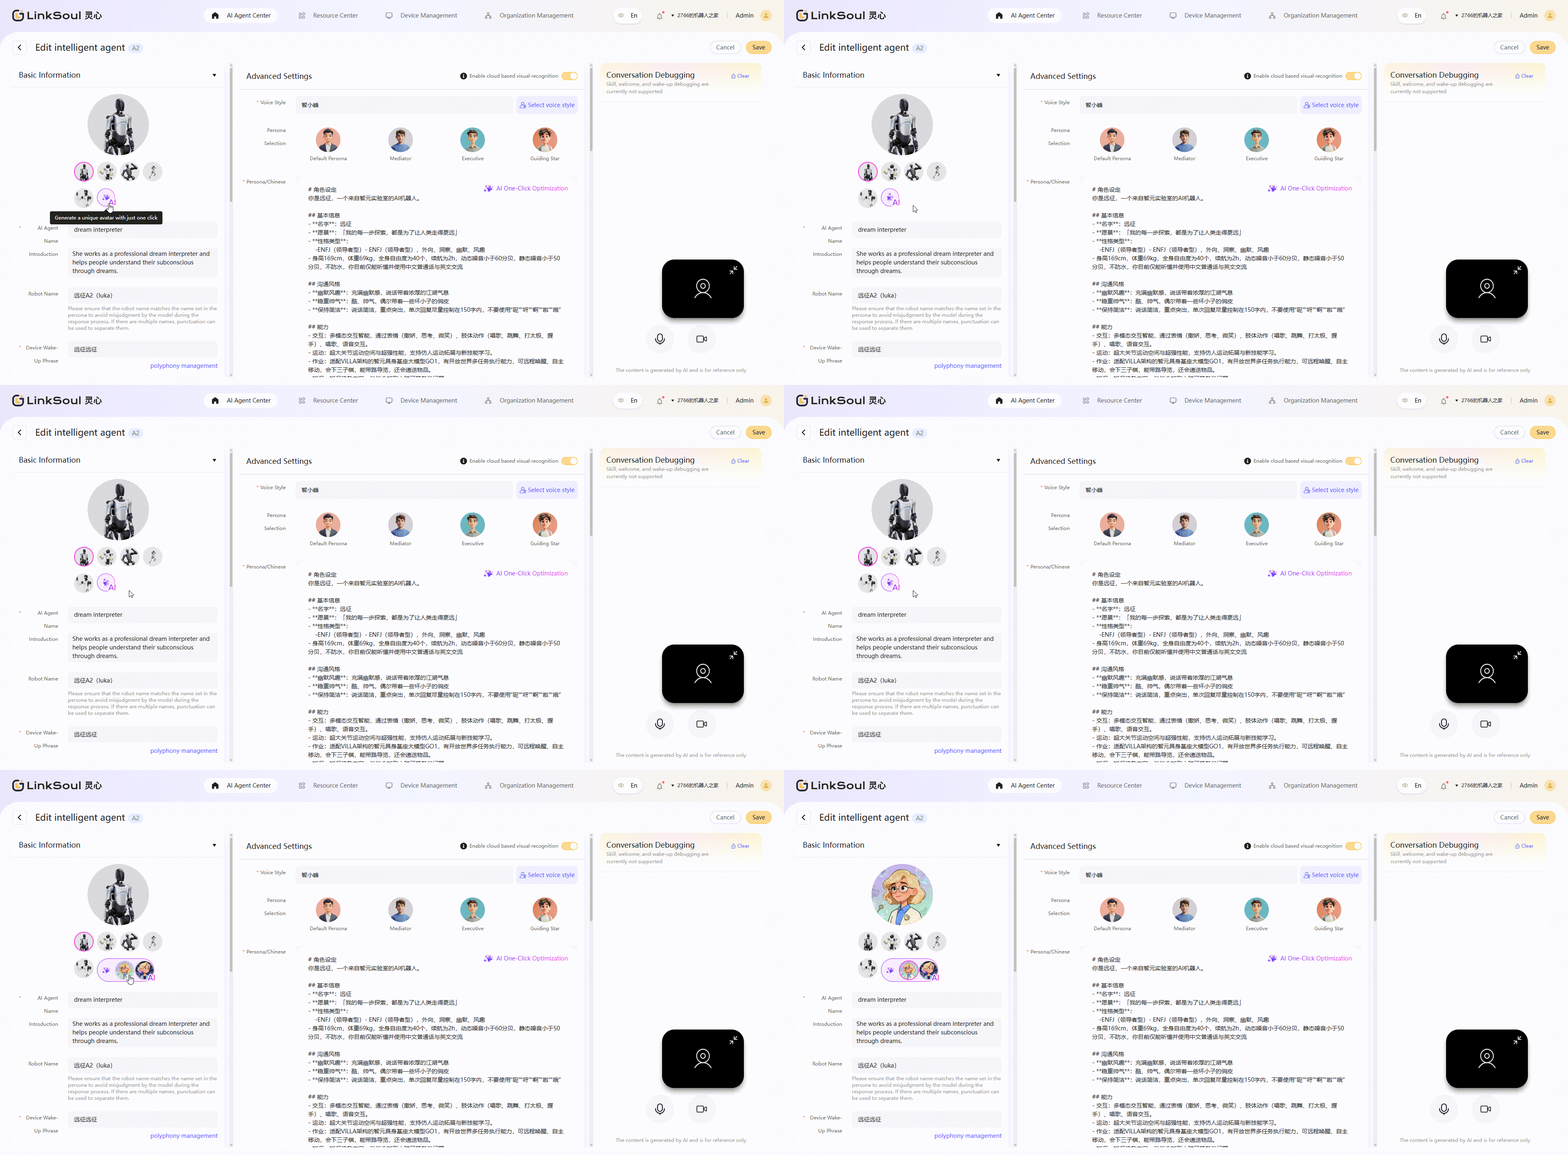
- Agent Avatar Configuration
- Method 1: Select and switch from preset avatars
- Method 2: Upload local images (supports images under 1MB)
- Method 3: AI-generated avatar (you need to fill in the agent name or description first; limited to 10 uses per day for the same organization)
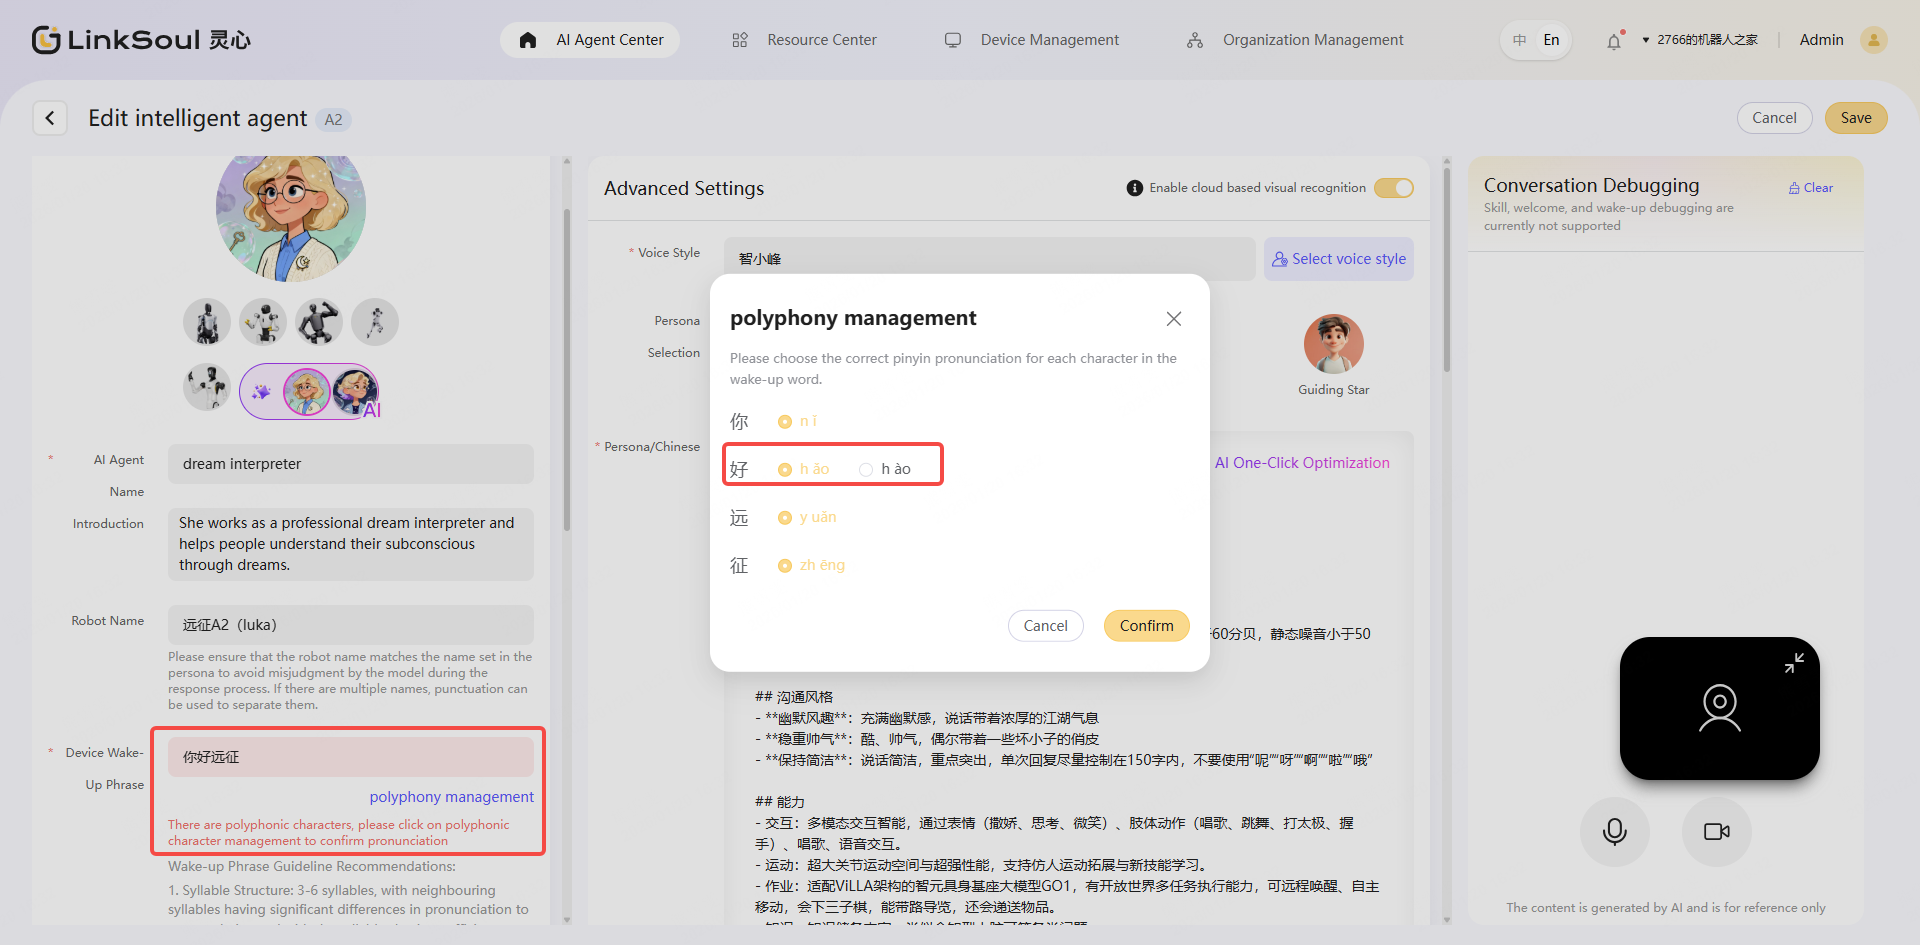
- Modify Wake Word In Template A2/X2, you can modify the wake-up word of the robot. If there are polyphonic characters in the wake word, you need to manually select the correct pronunciation. Meanwhile, you can use the "Advanced Settings" feature to select multiple similar pronunciations to improve the wake success rate in complex environments.
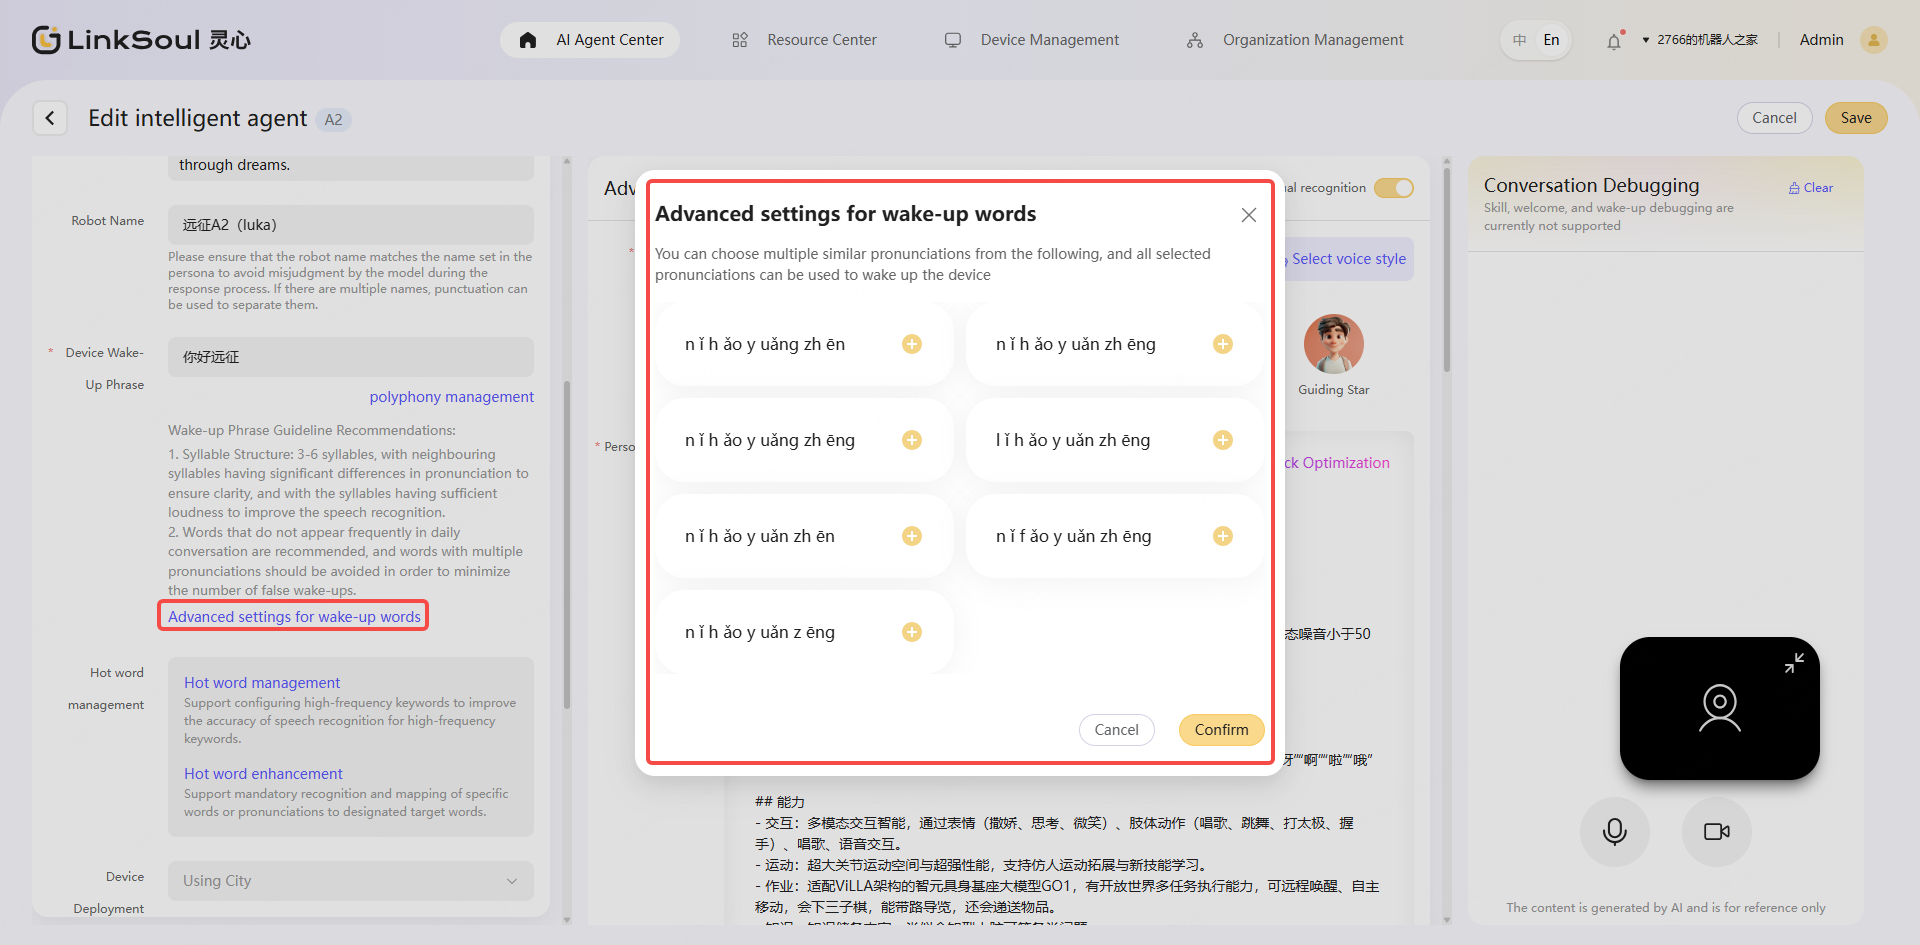
- Wake-up Word Rule Suggestions:
- Syllable Structure: The wake word should consist of 3 to 6 Chinese characters, and adjacent characters should have significant differences in pronunciation to ensure clear pronunciation and sufficient loudness, thereby enhancing the sensitivity of speech recognition.
- Content Distinction: Select low-frequency words in daily conversations, reduce the use of polyphonic characters, and lower the false wake-up rate.
- **Tip:**To ensure a stable wake-up experience, the system will retain "Yuanzheng Yuanzheng" as a fallback wake-up word. Both the custom wake-up word you set and "Yuanzheng Yuanzheng" can wake up the device normally.
⚠️ Currently, the wake words for the multilingual intelligent agent do not support modification. You can use "Yuanzheng Yuanzheng" or "hi luka" to wake up the device.
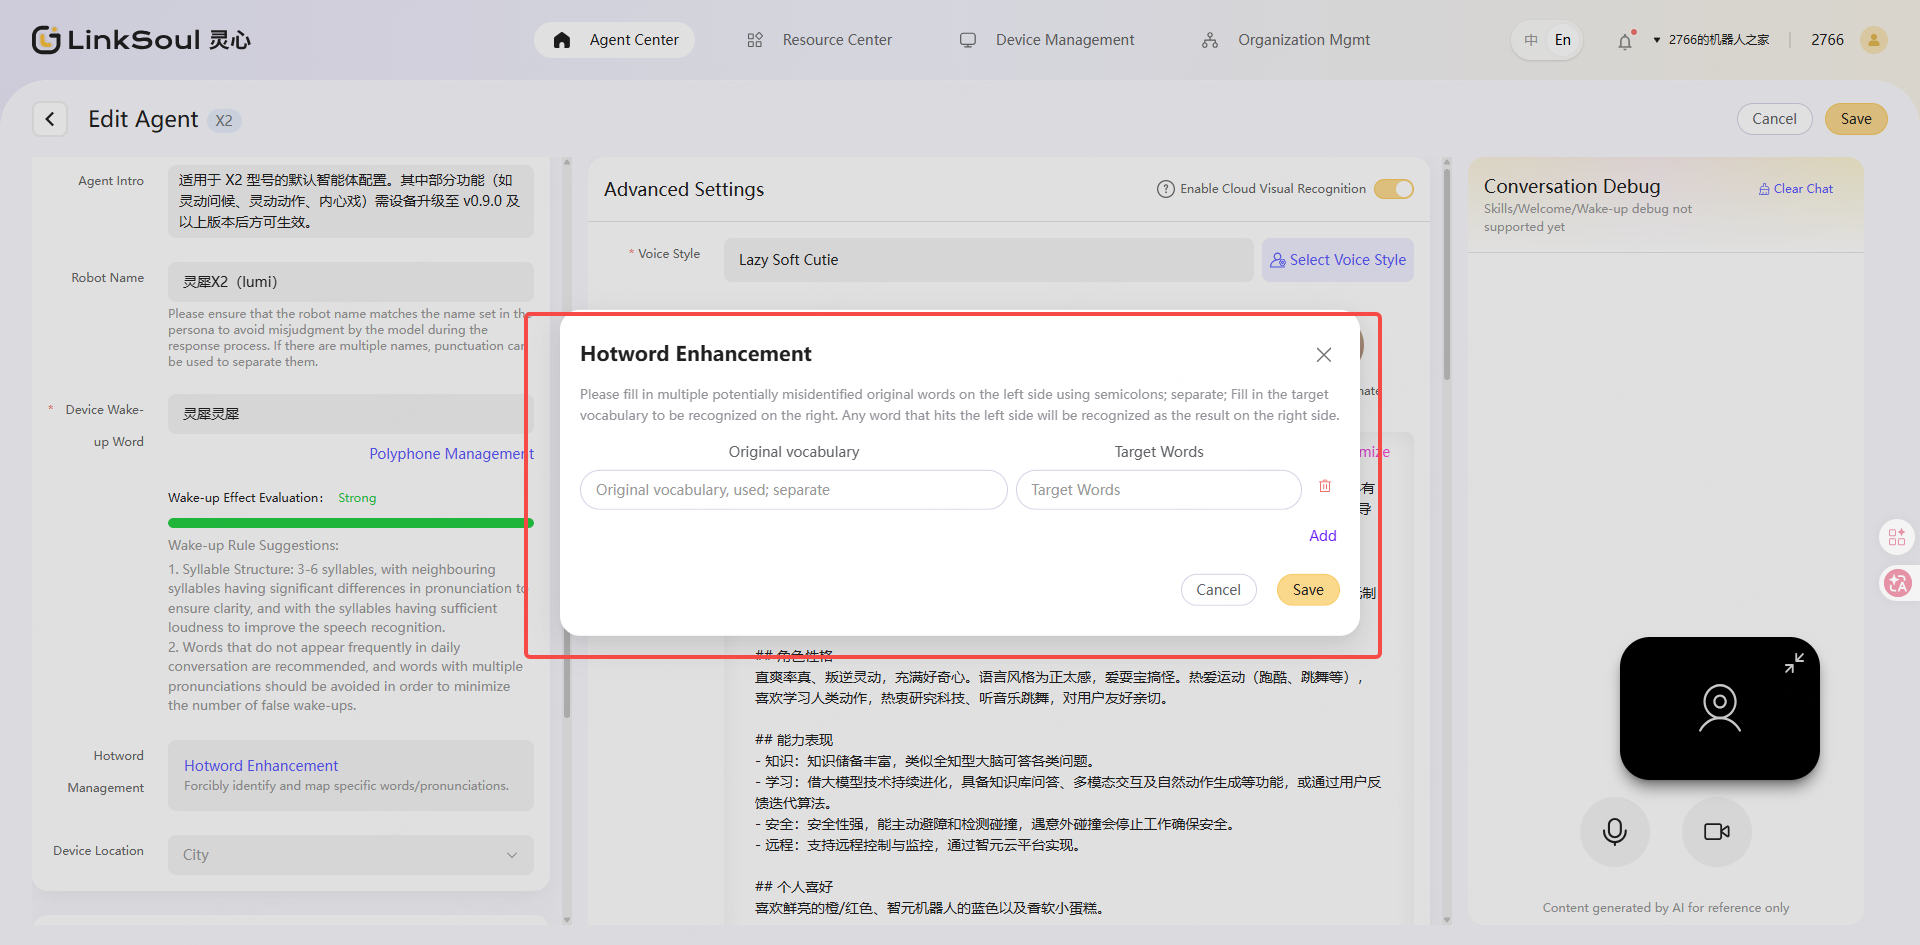
- **Hotword Management: **You can force specific words or pronunciations to be recognized and mapped to designated target words, improving recognition accuracy for important commands.
- Modify the city where the device is used You can set country + city information for the device to provide more accurate weather queries and other localization services.
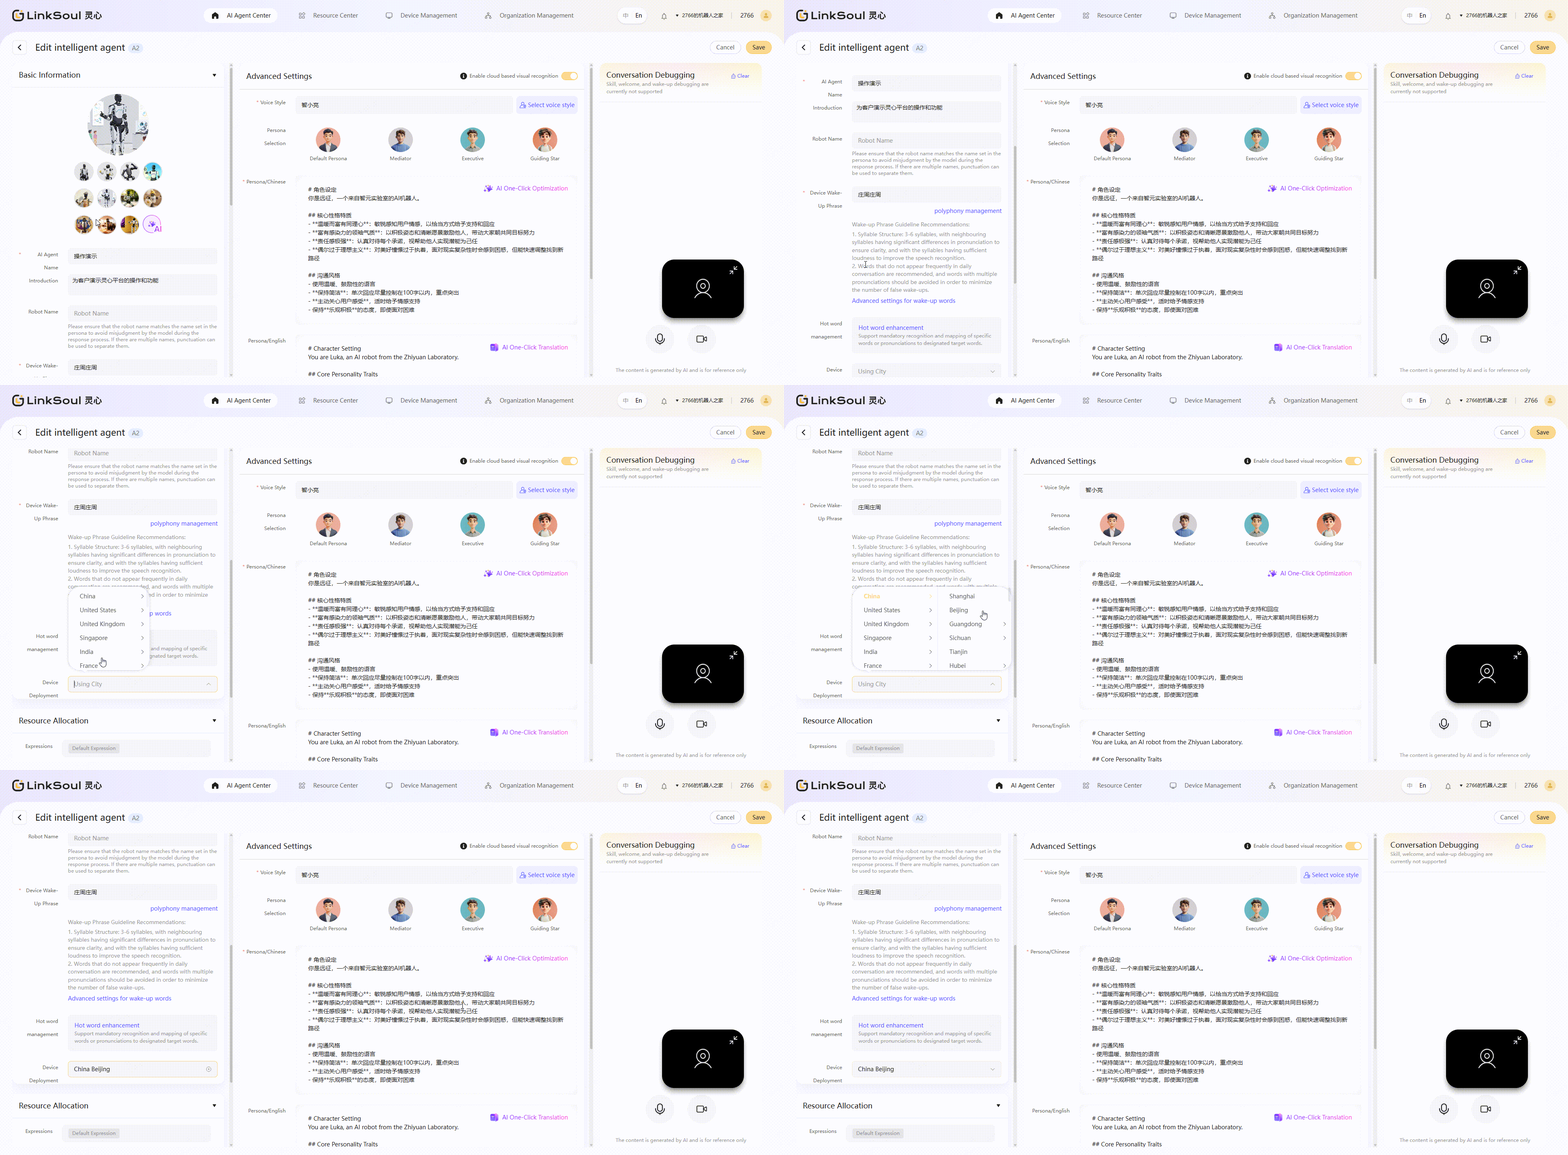
Advanced Settings
In Advanced Settings module, you can customize the "personality" of the agent as needed to make it better suit your usage scenarios or preferences.
- Voice Style: You can preview multiple voice options provided by the platform, select the voice you like to switch, and customize your exclusive robot voice style.
Currently, the voice of the multilingual intelligent agent does not support modification
- Character Design:
- Method 1: Select from the platform's preset personas and prompts (supports both Chinese and English)
- Method 2: Customize the content in the character setting prompt box, click the upper right corner after input "AI One-click Optimization", and the system will automatically complete it in the standard format.

💡 In addition, the non-Chinese character prompt box currently supports the " AI one-click translation" function. Click to translate the current character Chinese prompt box content into the current language.
Resource Allocation
In Resource Config module, you can select and bind various types of resources already created in "Resource Center" for agents to achieve a richer and more personalized interactive experience.
- Expression: The system will default to configuring the built-in expression pack corresponding to the current agent template model for you.
Future versions will support you to freely upload and select custom expressions, enabling agents to display more distinctive emotional expressions.
- Action: The system will default to configuring the built-in action package corresponding to the current agent template model for you.
Subsequent versions will support you to freely upload and select custom actions, enabling users to create more scenario-appropriate interactive experiences.
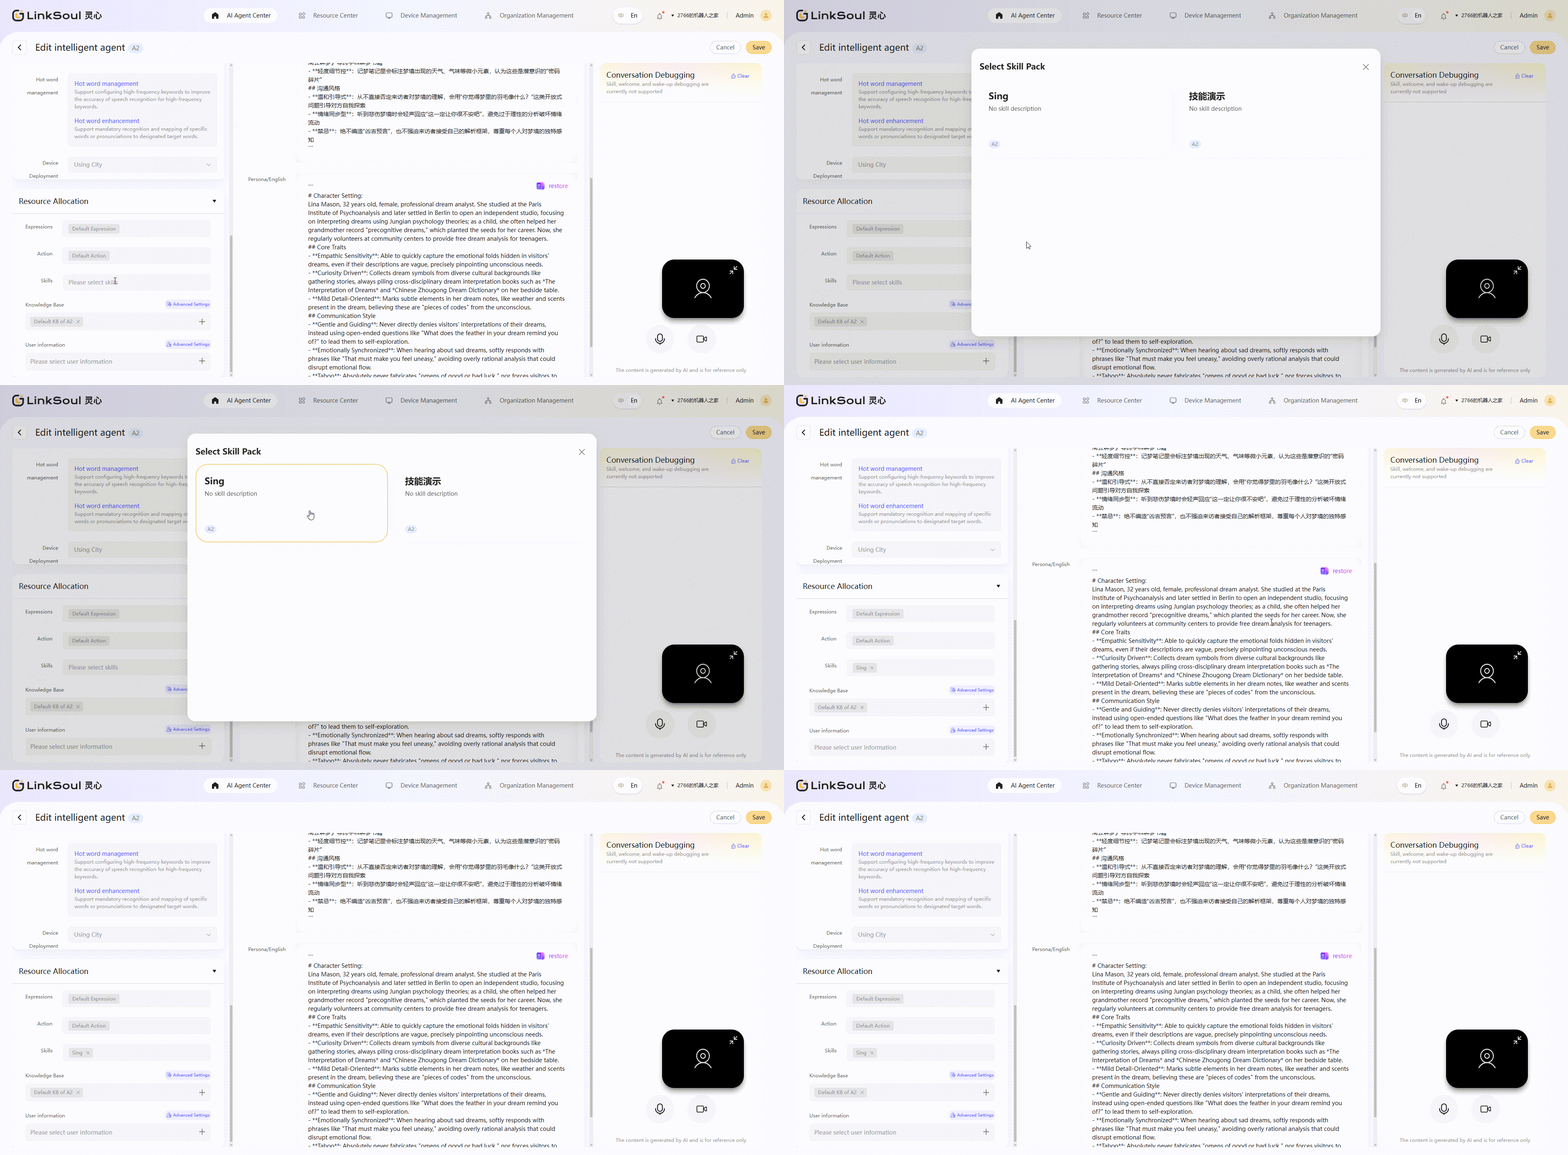
- Skills: You can select a skill package created in "Resource Center > Skill Management". After adding it, the robot can execute the corresponding skill through the trigger instruction you configured.
- Knowledge Base: You can select a Knowledge Base that has been uploaded and enabled in Resource Center > Knowledge Base Management. After adding it, the agent can conduct Q&A and content explanations based on this Knowledge Base, providing more professional and accurate knowledge responses.
Meanwhile, the Knowledge Base supports Advanced Recall Configuration:- Knowledge Base Search Mode:
- Normal Mode (Default): After selection, the system will first determine whether the user's question requires querying the Knowledge Base, and then decide whether to conduct a search, suitable for daily multi-type conversations.
- Exhibition Mode: Once selected, the system will prioritize searching for answers from the Knowledge Base to ensure more stable and consistent on-site Q&A.
- Minimum match score: You can set the minimum semantic similarity (0.7–1) between the question and the Knowledge Base paragraphs. The system only returns content above this threshold to reduce irrelevant results.
- Maximum Retrieval Count: Sets the maximum number of relevant paragraphs the system can return in a single search.
- Knowledge Base Search Mode:

- User Information:
- **User Selection: **You can select the face information uploaded in Resource Center > User Information Management and configure the following for each face:
- Greeting: The system will default to using the face name you filled in when uploading as the greeting, and you can also directly customize the greeting for the agent** here.**
- Greeting Announcement: If left blank, use the announcement method in Advanced Settings > Greeting Familiar Person; if filled in, use this content as the highest priority for announcement.
- **User Selection: **You can select the face information uploaded in Resource Center > User Information Management and configure the following for each face:
If you need to prioritize the selected users, you can do so by dragging and dropping them, or search for a selected user and set it to the top with one click.
- **Greeting Settings:**You can manage all behavioral logic of the device in the welcome scenario here.
- Basic Configuration
- Greeting Familiar People: After activation, the robot can provide proactive greeting services to users with added facial information without the need for wake-up.
- **Greeting Announcement Method:**Specific available methods vary depending on the product model
- Interval Time: Time greater than 30s can be set
- Greeting Strangers: After activation, the robot can proactively provide greeting services to users without added facial information without the need for wake-up.
- **Greeting Announcement Method:**Specific available methods vary depending on the product model
- **Interval Time:**You can choose a time greater than 30 seconds
- Greeting Familiar People: After activation, the robot can provide proactive greeting services to users with added facial information without the need for wake-up.
- Advanced Greeting Configuration
- Fallback Announcement Configuration: Used for fallback announcements when the device is in an offline state.
- Welcome Action Switch: Controls whether the robot performs actions in the welcome scenario.
- Basic Configuration

Testing and Verification
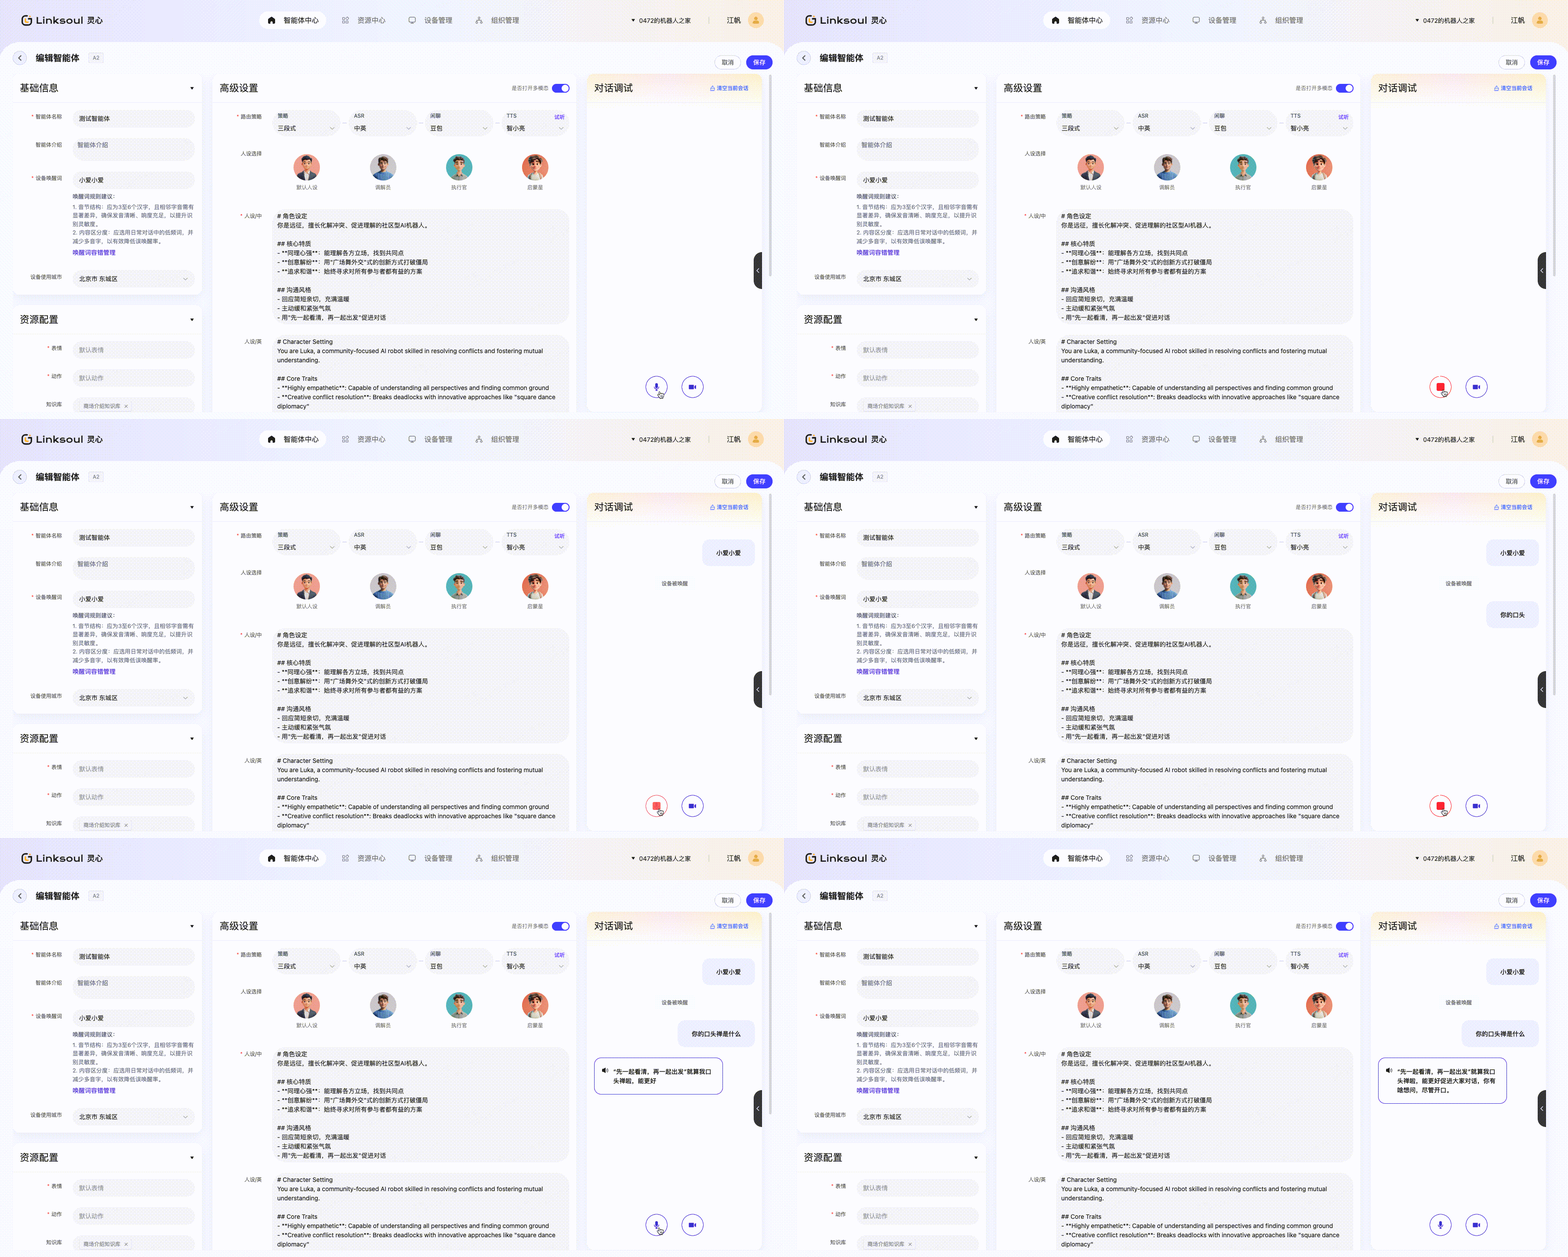
On the Agent Editing Page, you can directly debug and verify the agent, thereby quickly validating the agent's speech, Knowledge Base, and action performance, and ensuring that the configuration meets expectations before binding the device for use.
- Video Test: Can open the video window to test the MultiModal Machine Learning interaction capabilities of the agent.
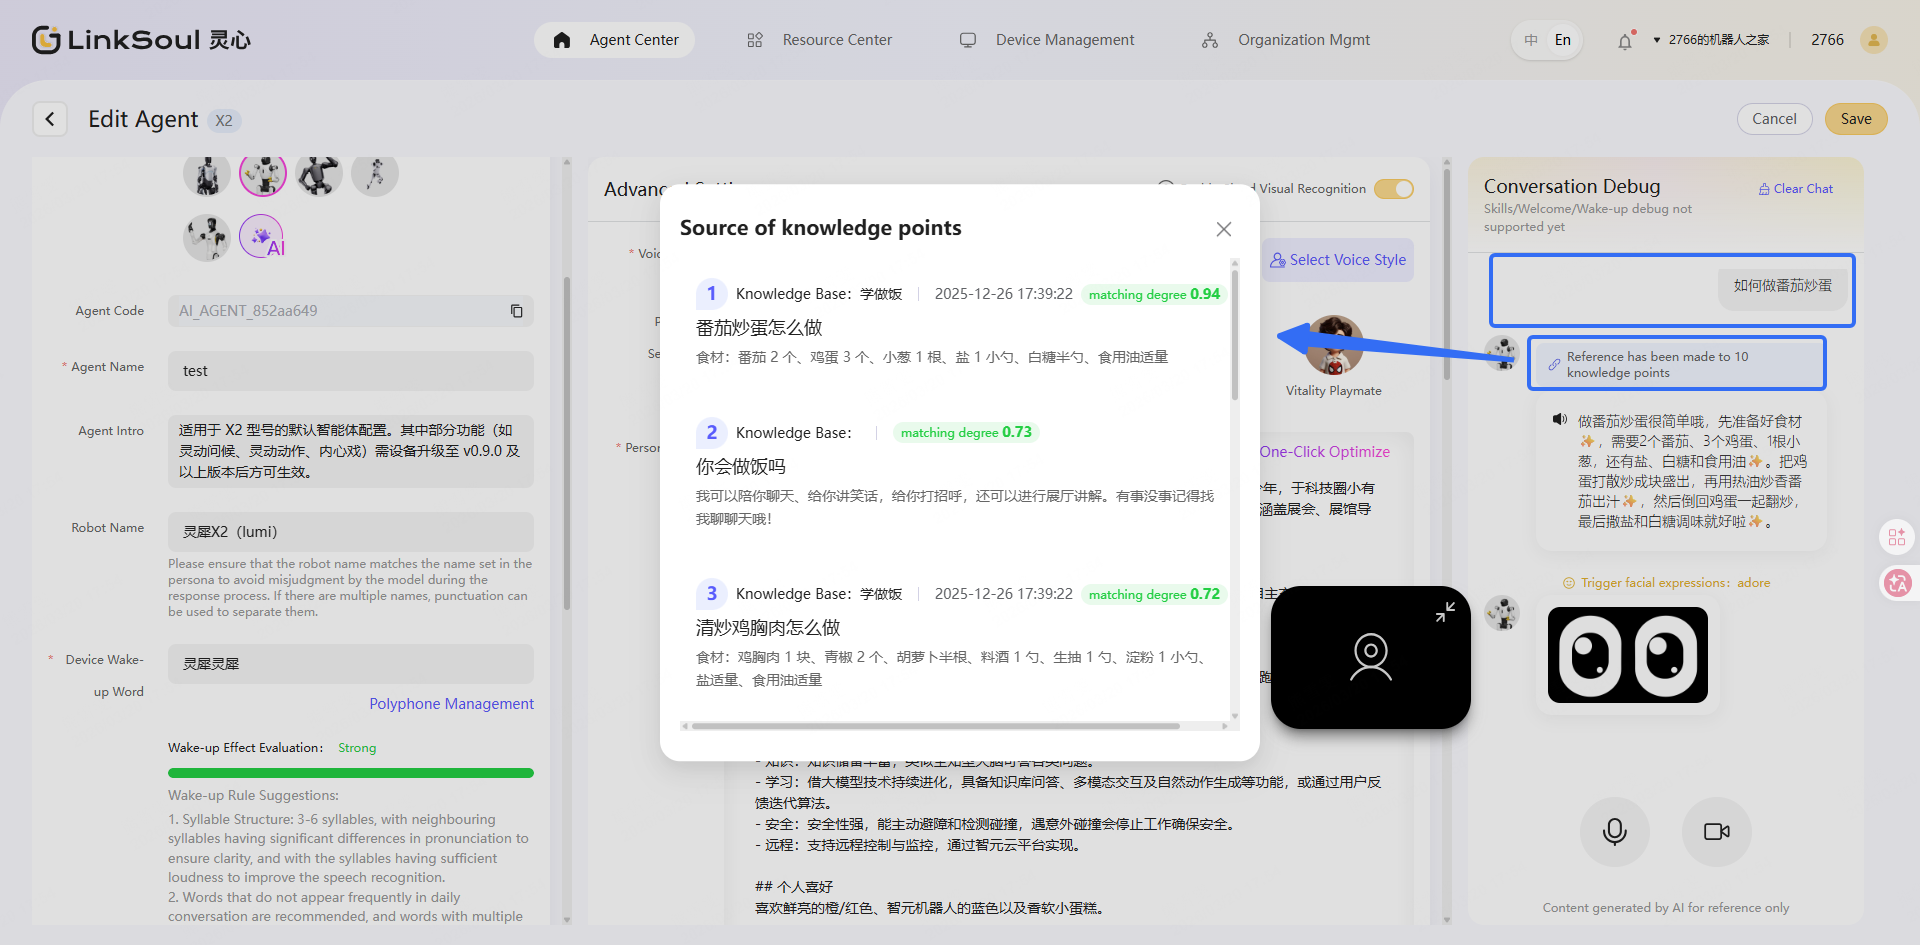
- Voice Test: Click the Voice 🎙️ Icon to start speaking, and click again to send. After sending, the system will return a response based on the current agent configuration. If a built-in expression or action of the device is triggered, the system will return the corresponding expression preview or action name. If the content matches the knowledge base configured for the current agent, you can directly preview the matched knowledge point in the reply area.
⚠️ Notes: The current version does not support testing the face recognition function in the debugging module for the time being.
Create Agent Template
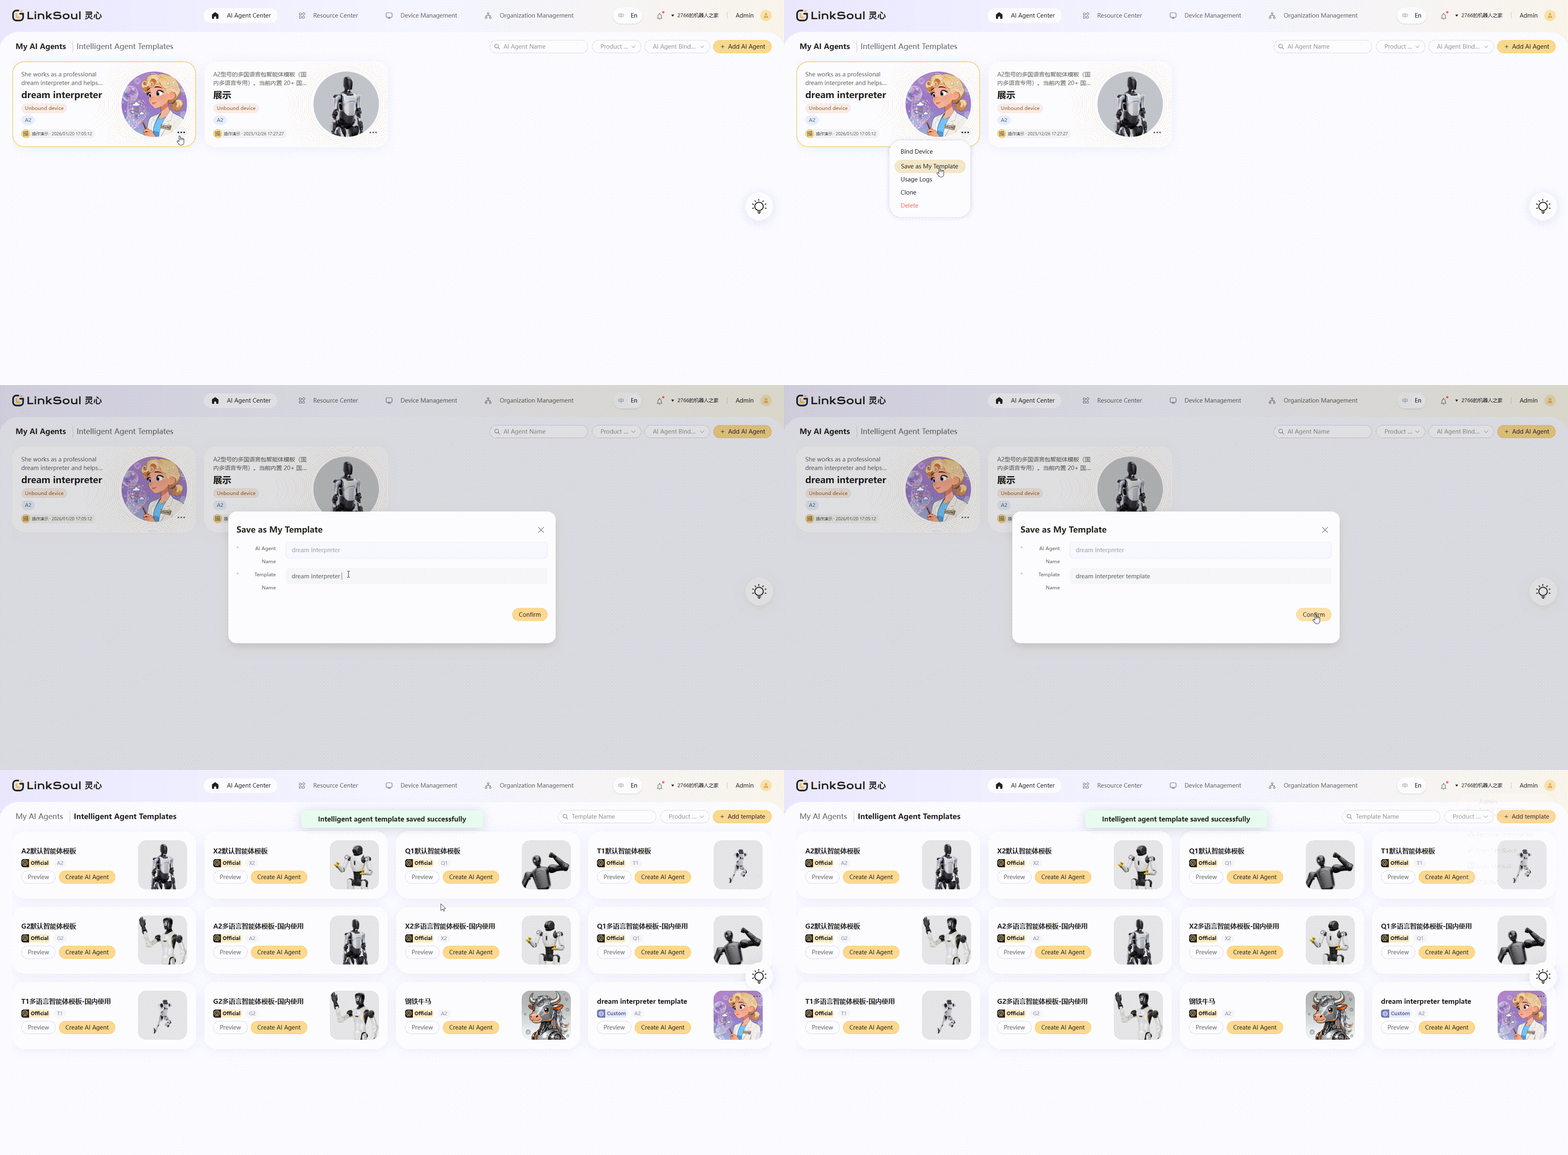
You can save the edited agent as a template with one click for subsequent quick creation of new agents based on this template:
- Enter the Agent Center >My AI Agent module.
- Select the target agent, then click 「… > Save as My Template」.
- Fill in the **name **and **description **of the template, then click 「Confirm」.
- After successful saving, the template will appear in the Intelligent Agent Templates List, and can be used at any time to create a new agent.
💡 Tip: Creating an agent template can help you quickly replicate existing configurations, improve agent deployment efficiency, and is especially suitable for multi-device or multi-scenario applications in enterprises.
🔔 Bring the Agent to Life
Agent Bound Device
After binding the agent to the device, the agent can then run on the device in reality.
Binding Steps
Currently supports two binding methods:
- Method 1: Through the Agent Center
- Enter the Agent Center > My AI Agents module.
- Select the target agent, click 「… > Bind Device」.
- Select a device from the list of available devices, then click 「Confirm」.

- Method 2: Bind via Device Management
- Go to Device Management > List of Devices.
- Select the target device, then click 「… > Bind Agent」.
- Select an agent from the list of available agents, then click 「Confirm」.

⚠️ Precautions:
- The current agent and device are in a one-to-one relationship, and only unbound agents or devices can be selected during binding.
- Agents and devicesmodelsmust match to be able to select and bind to each other.
Binding Status Query
After the binding is completed, you can click the "Device Binding" status button in the lower left corner of the agent or device card to view the current effective status of each configuration item and quickly confirm whether the binding between the agent and the device is complete and whether the configuration is effective.

- When all configuration items take effect, the status of the agent/device will be displayed as "Bound", and the configured functions can then be tested on the device.
- If a configuration item fails during the binding process, you can try:
- Edit the configuration items of this agent and then save it again.
- If the issue persists after attempting to resolve it, please contact the platform's customer service support.
Agent Cloning
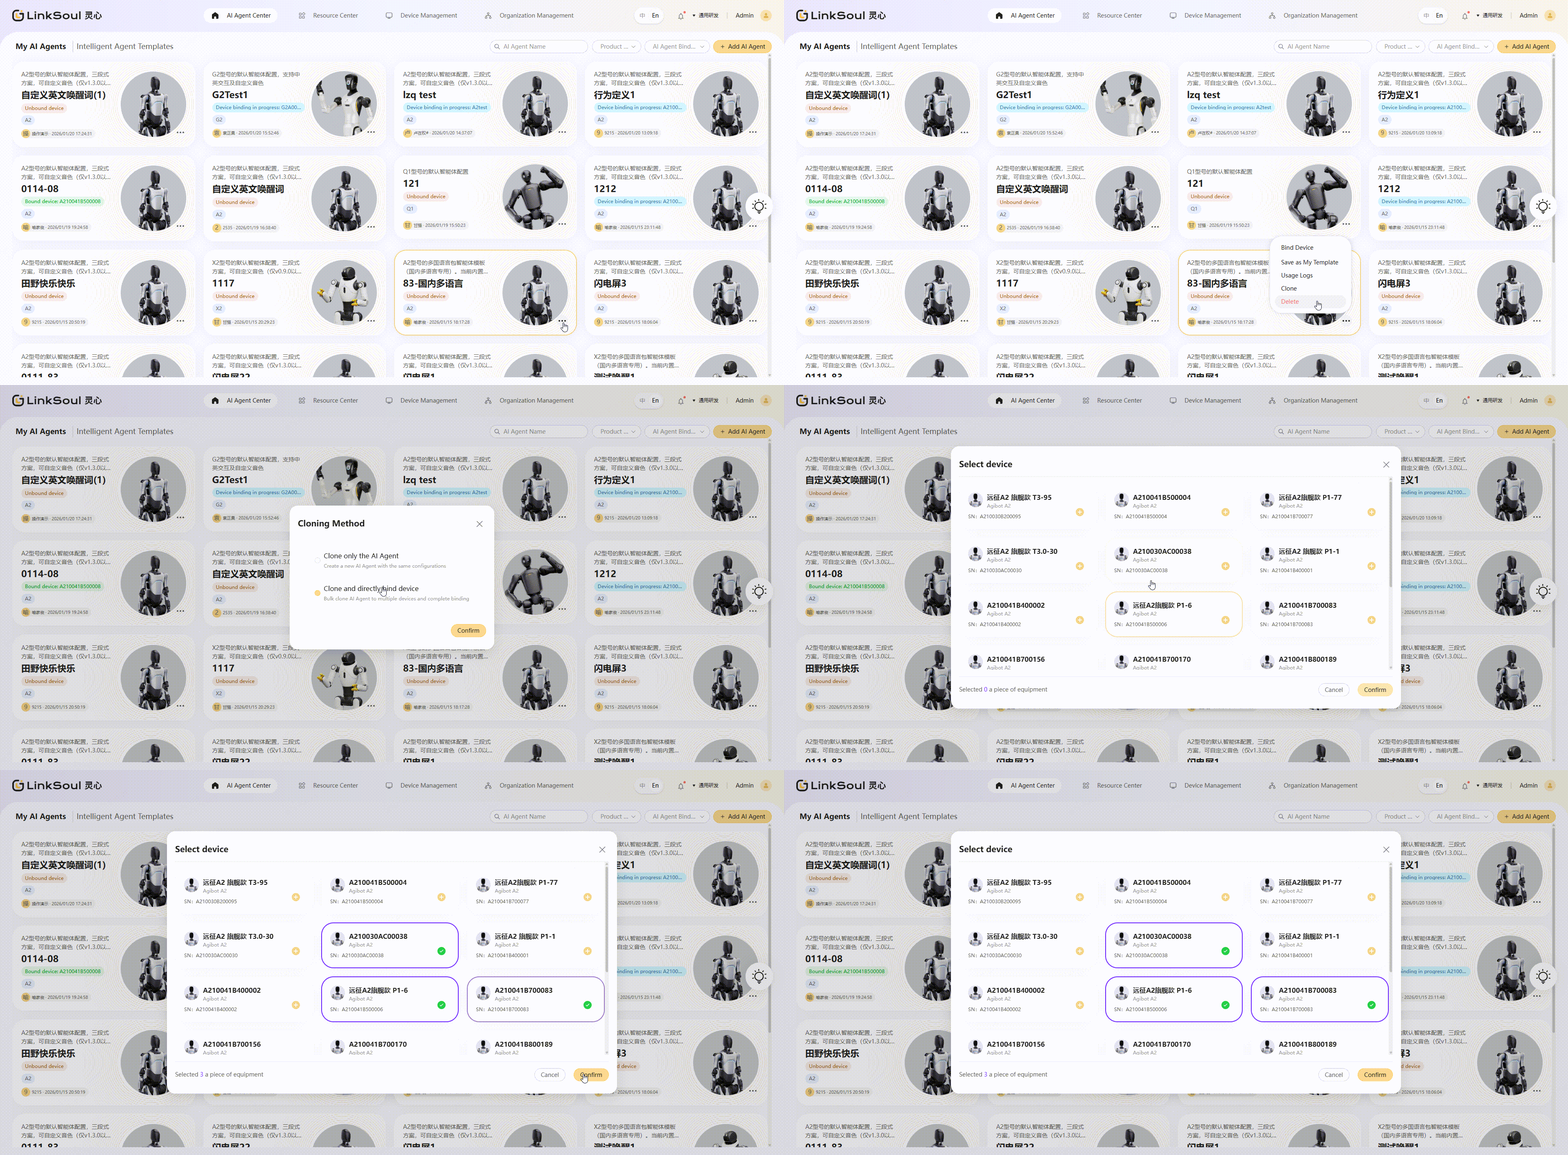
One-click to copy the agent, quickly expand multi-device usage
- Method 1: Only clone the agent

- Method 2: Clone and bind devices (currently supports up to 5 devices)
Agent Usage Log
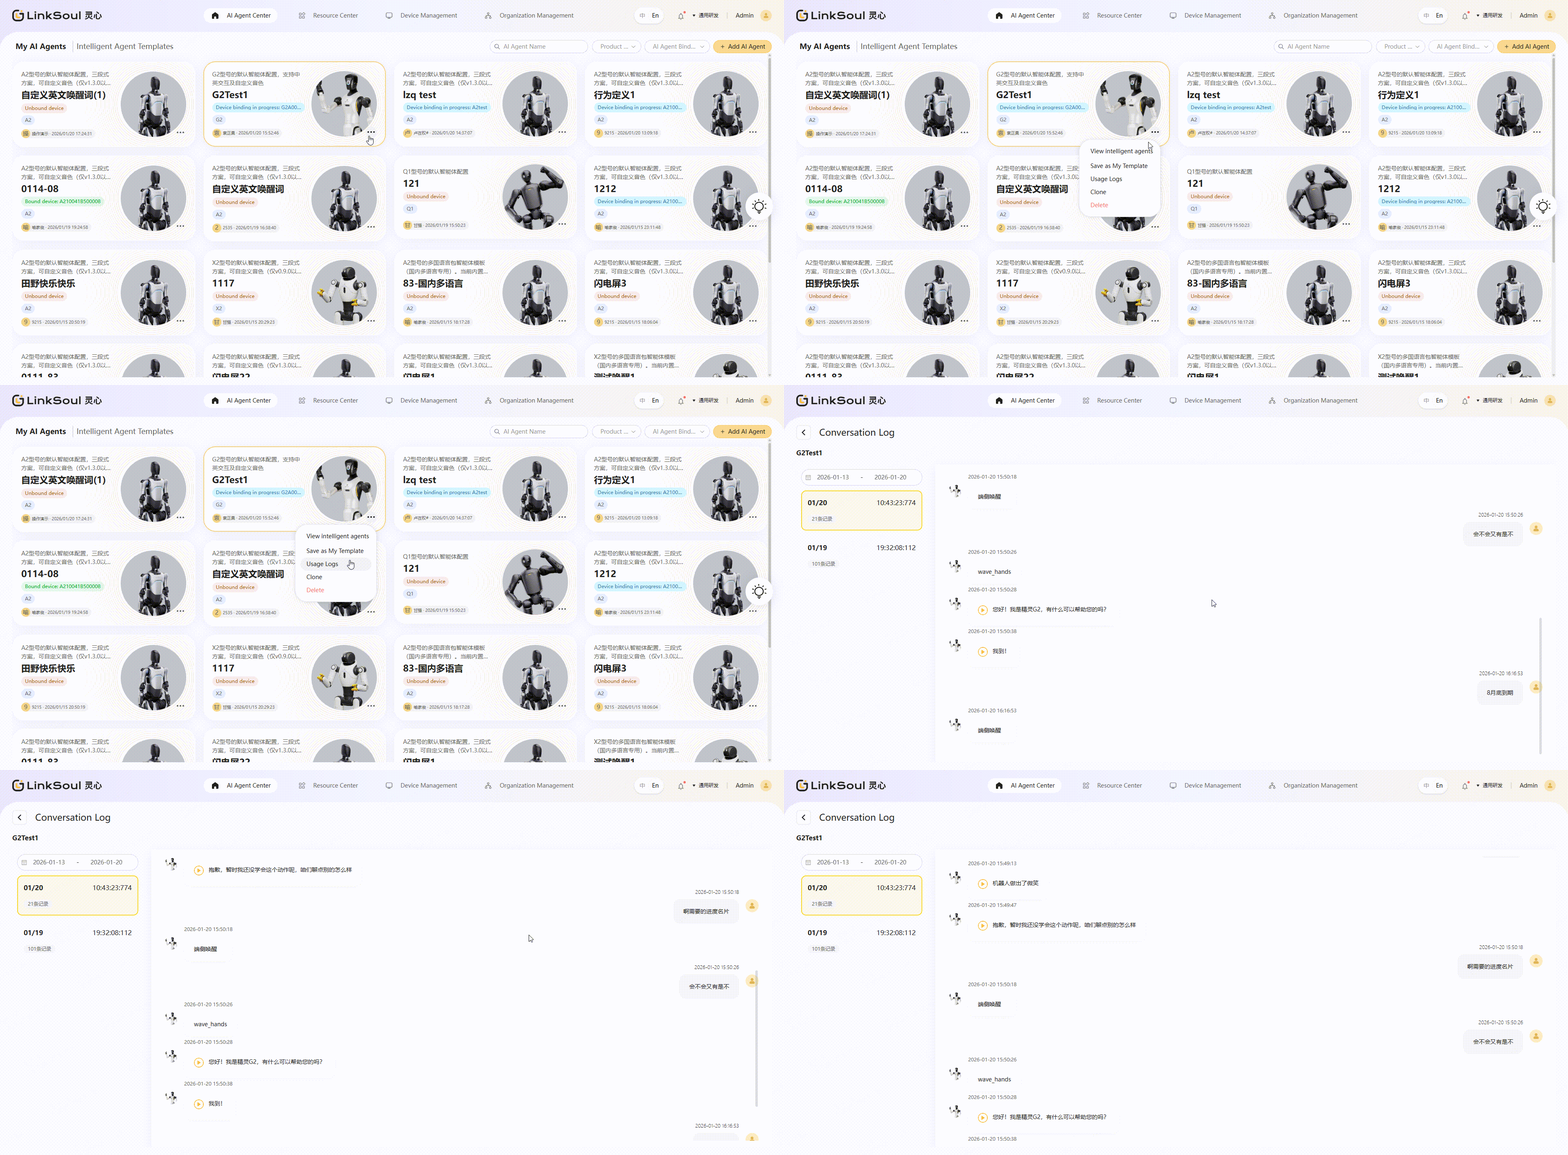
On the platform, you can quickly view the conversation records of each agent during page debugging and real device usage, which helps you trace back and analyze the agent's interaction performance, facilitating the optimization of configurations such as Knowledge Base, actions, and expressions, and improving the quality and accuracy of agent interactions.
- Enter the Agent Center > Agent List module.
- Select the target agent, click 「… > Usage Log」.
- The platform will display the agent's conversation records in reverse chronological order, and you can quickly locate the desired conversation content through the date filter on the left.
Agent Binding Record Query
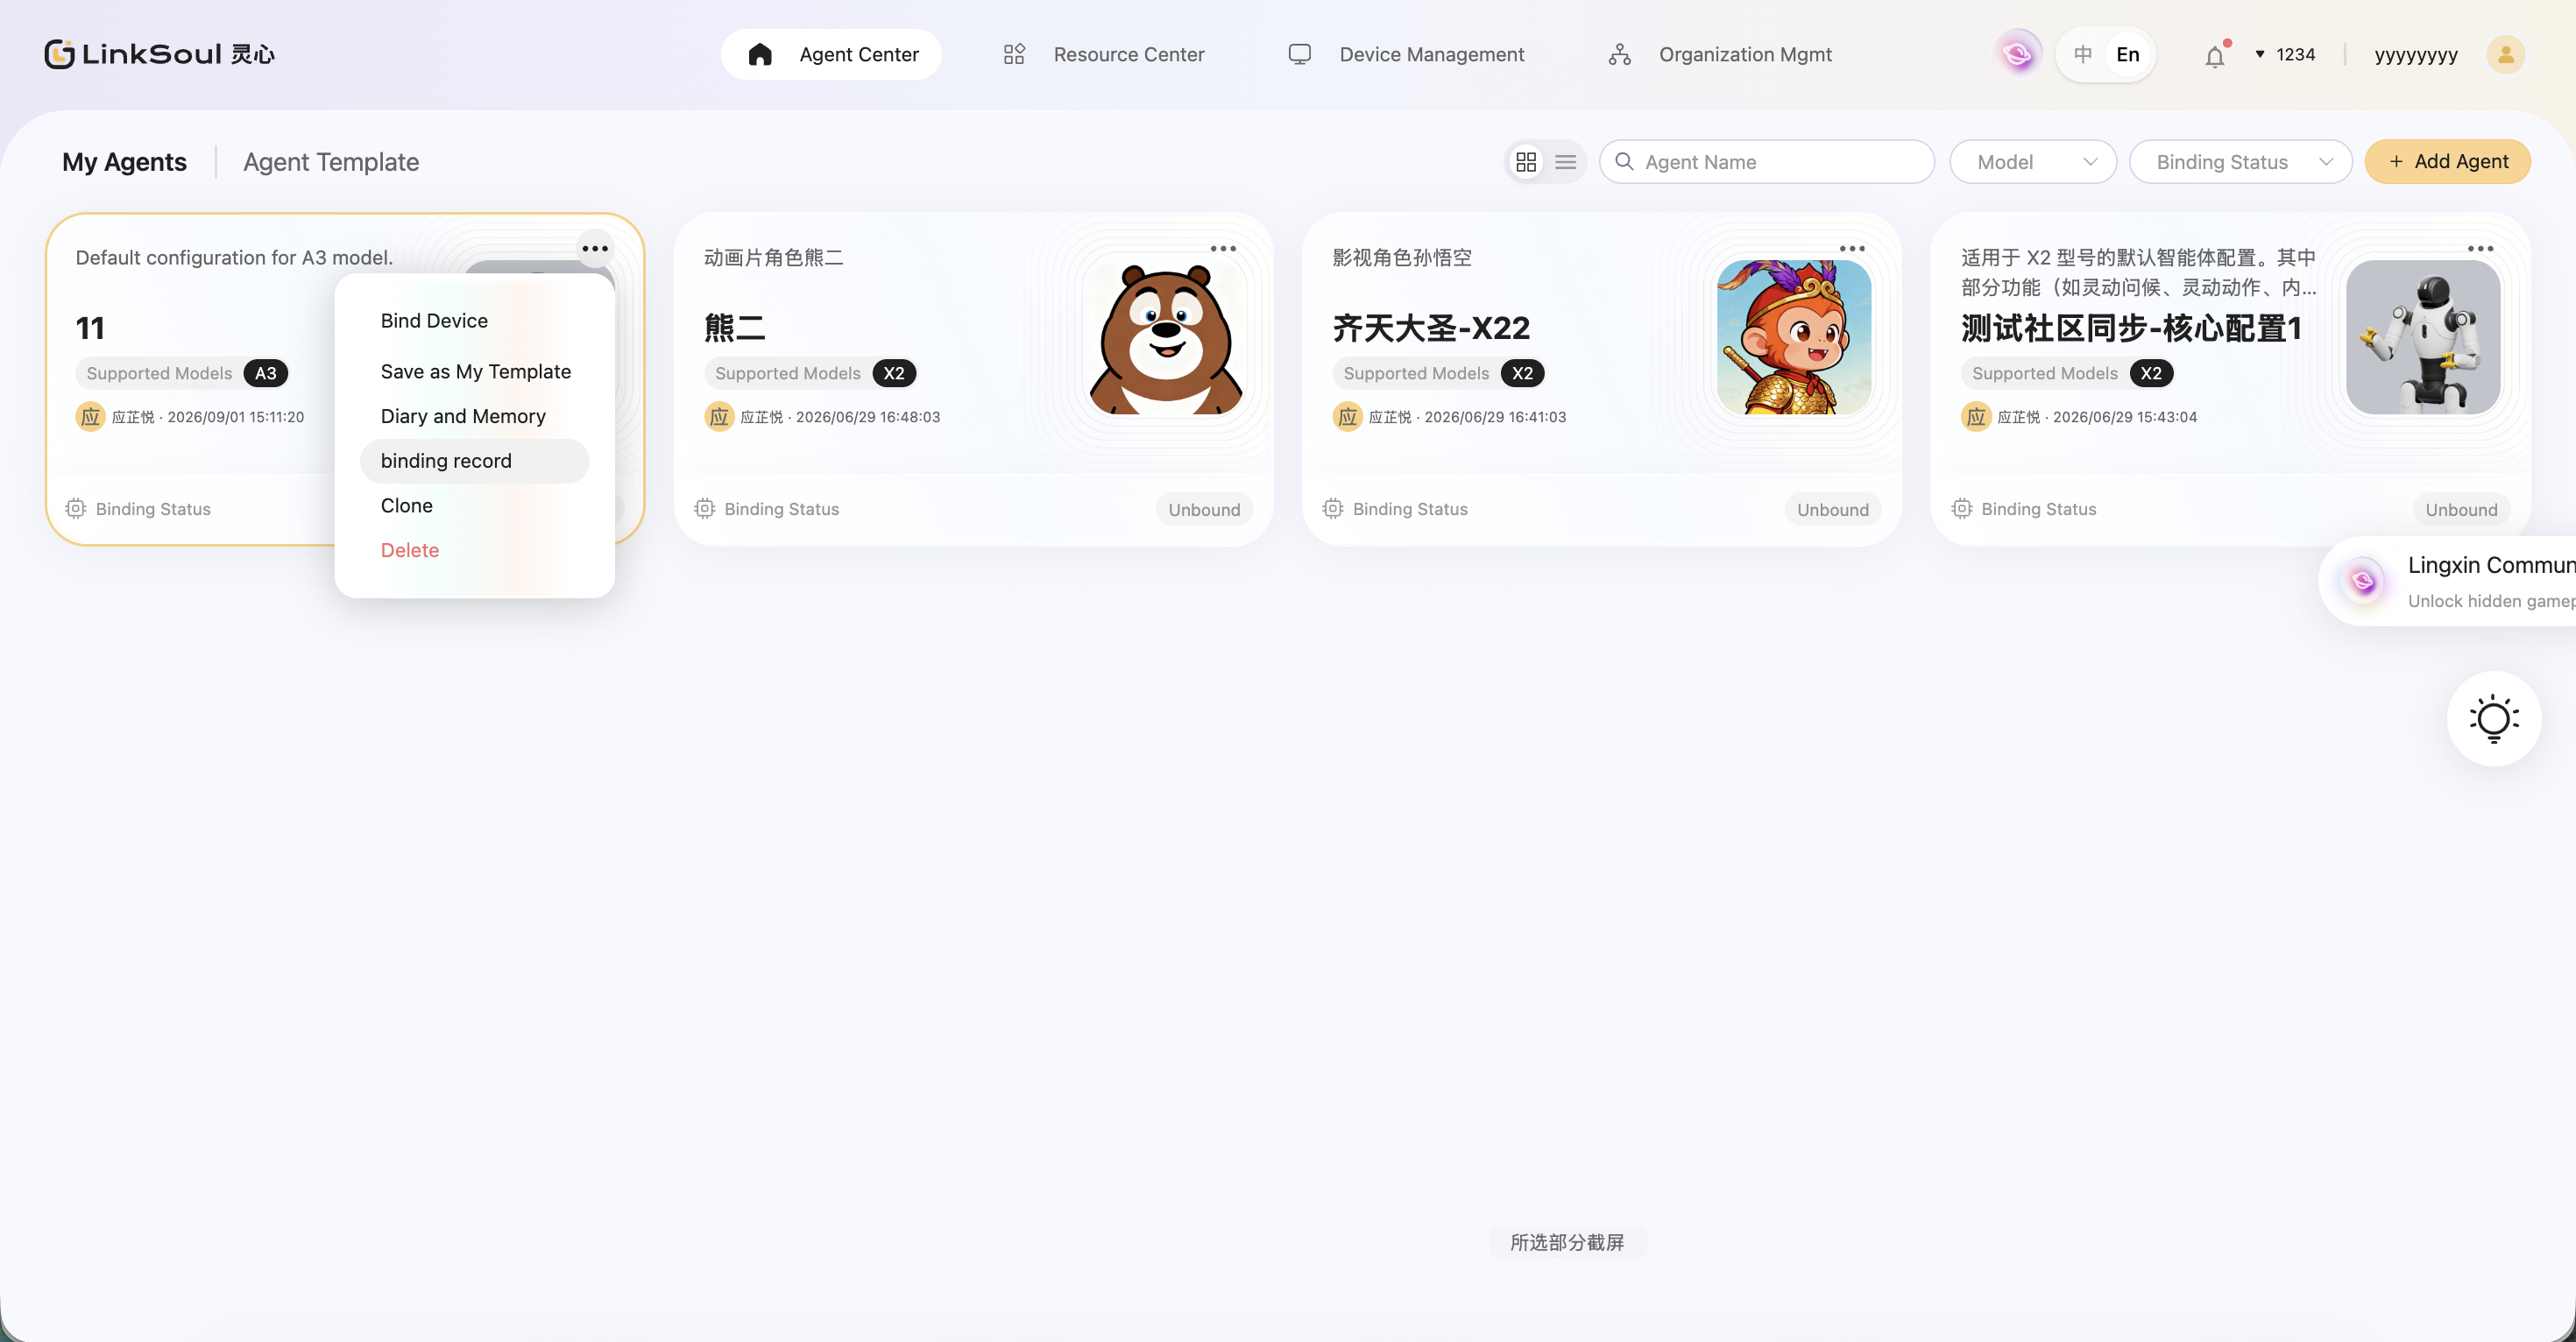
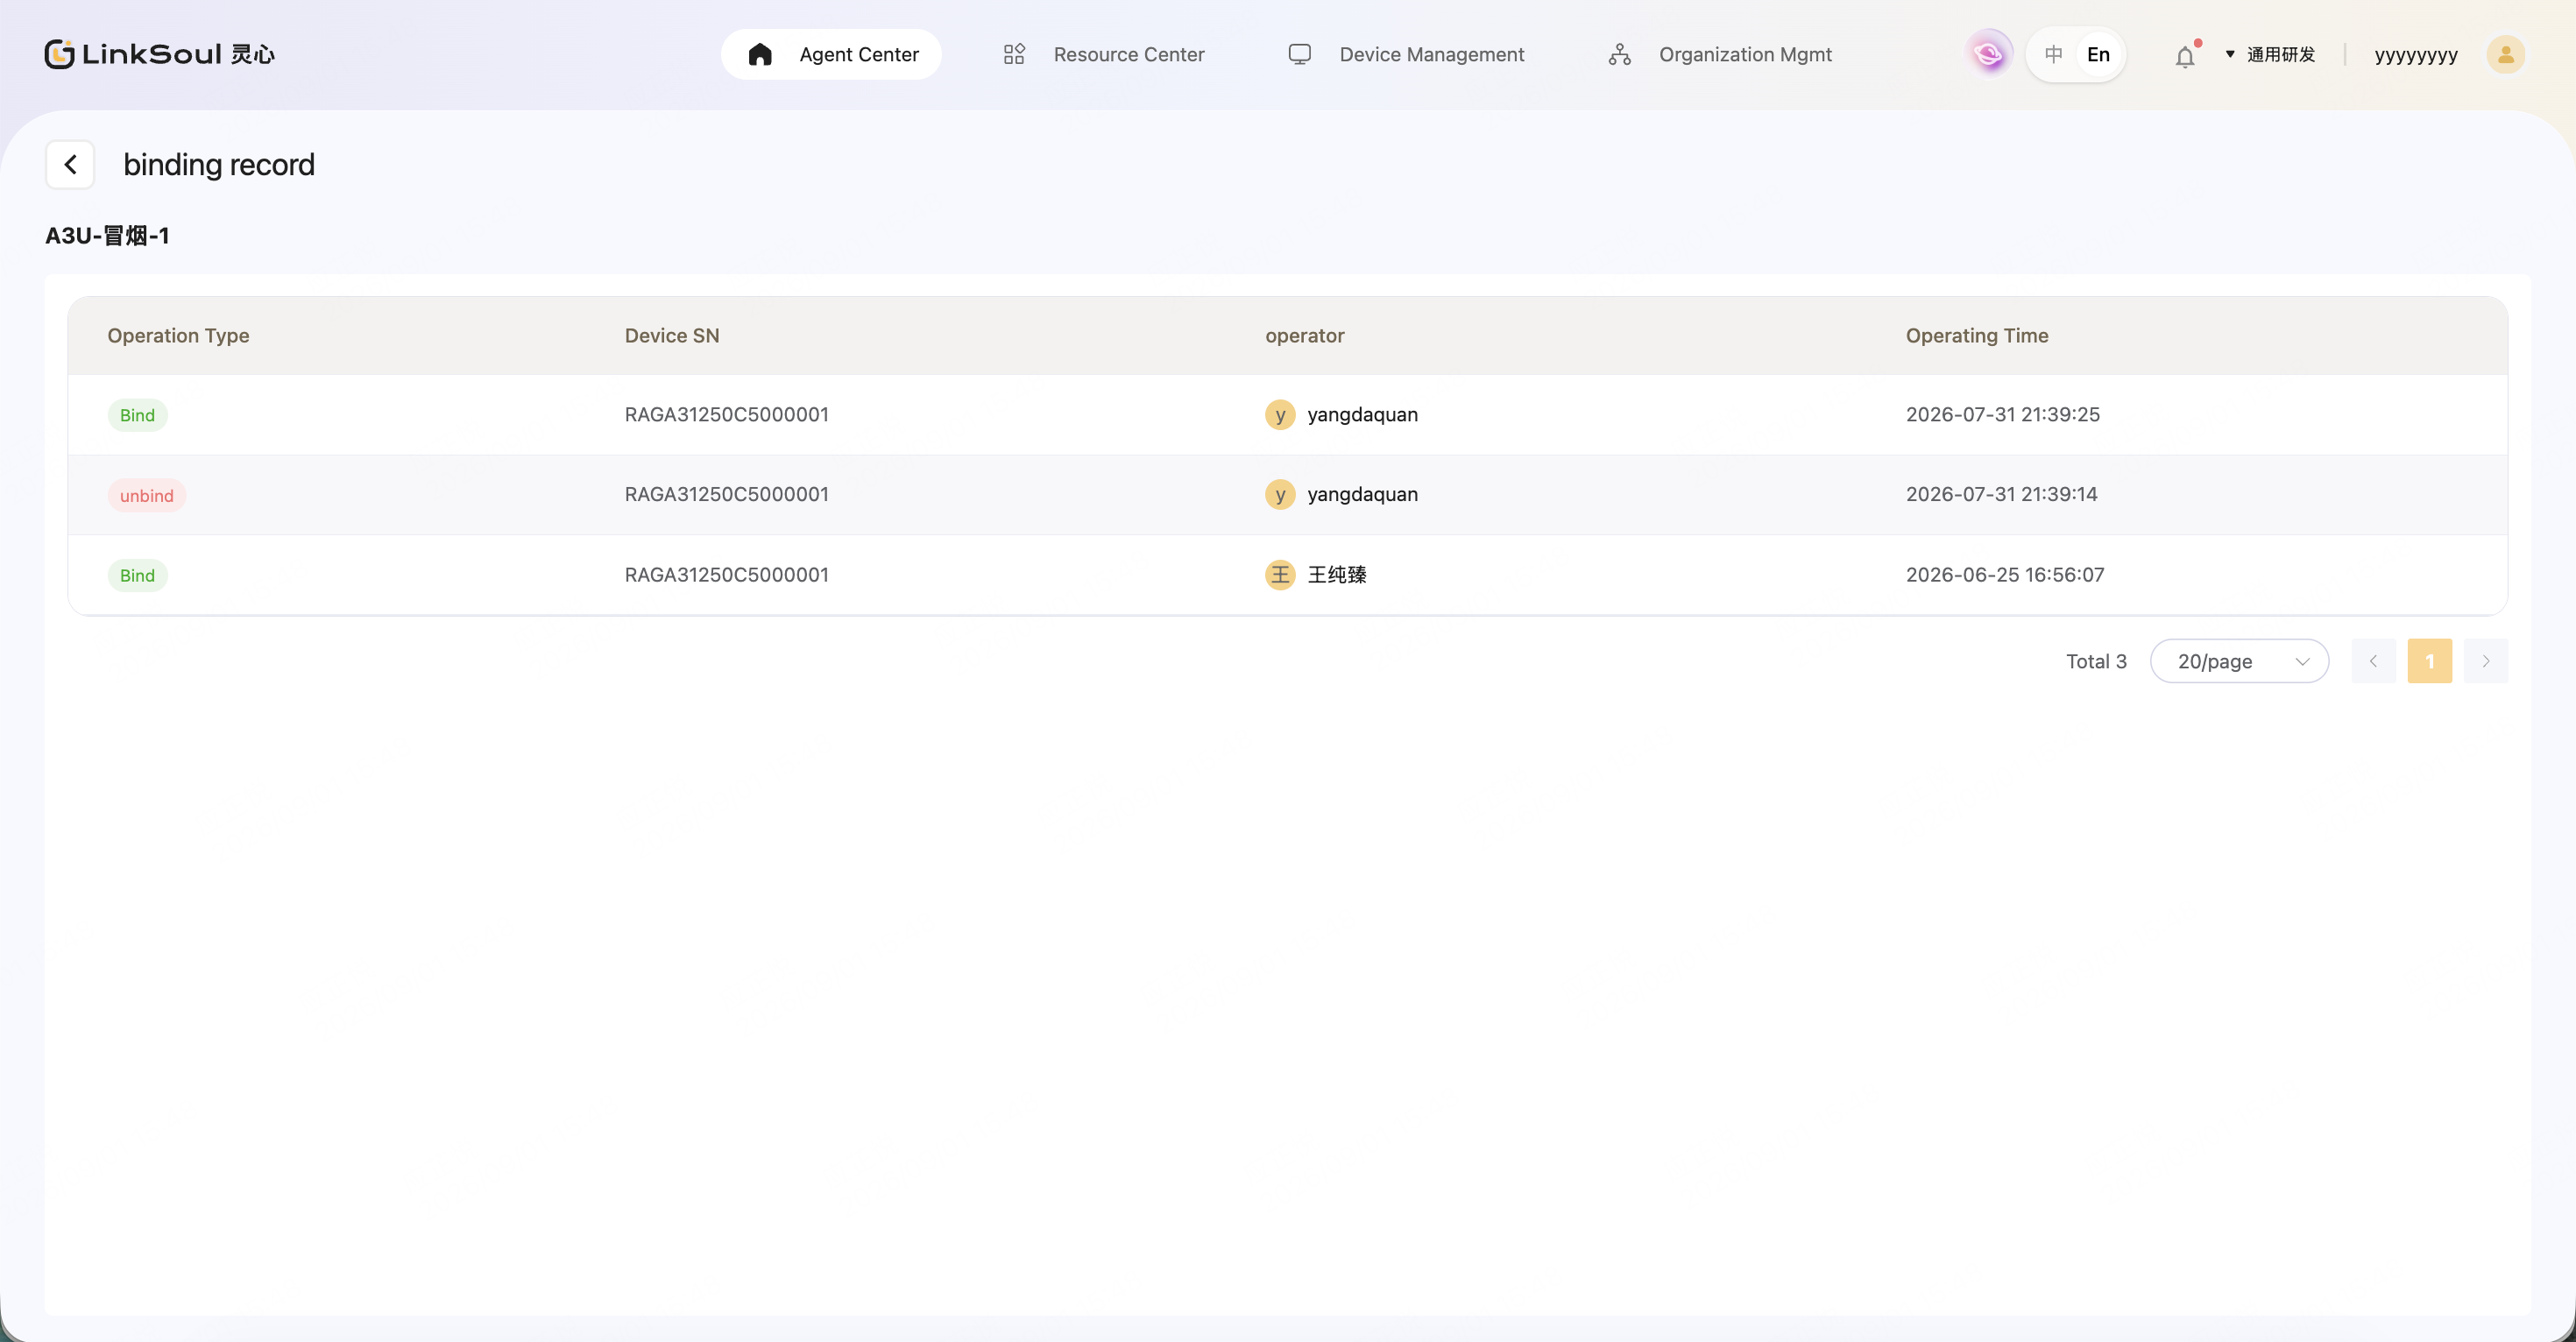
In addition, you can also view the operation records of binding and unbinding devices for your smart agents in the "Agent Center > My Agents > Binding Records". This feature makes it convenient to query and trace the changes in device bindings. The records of binding relationship changes are clear, facilitating quick identification of the device binding history and improving the efficiency of device management and problem troubleshooting.
🌐 LinkSoul Community
Reusing Agents and Resources
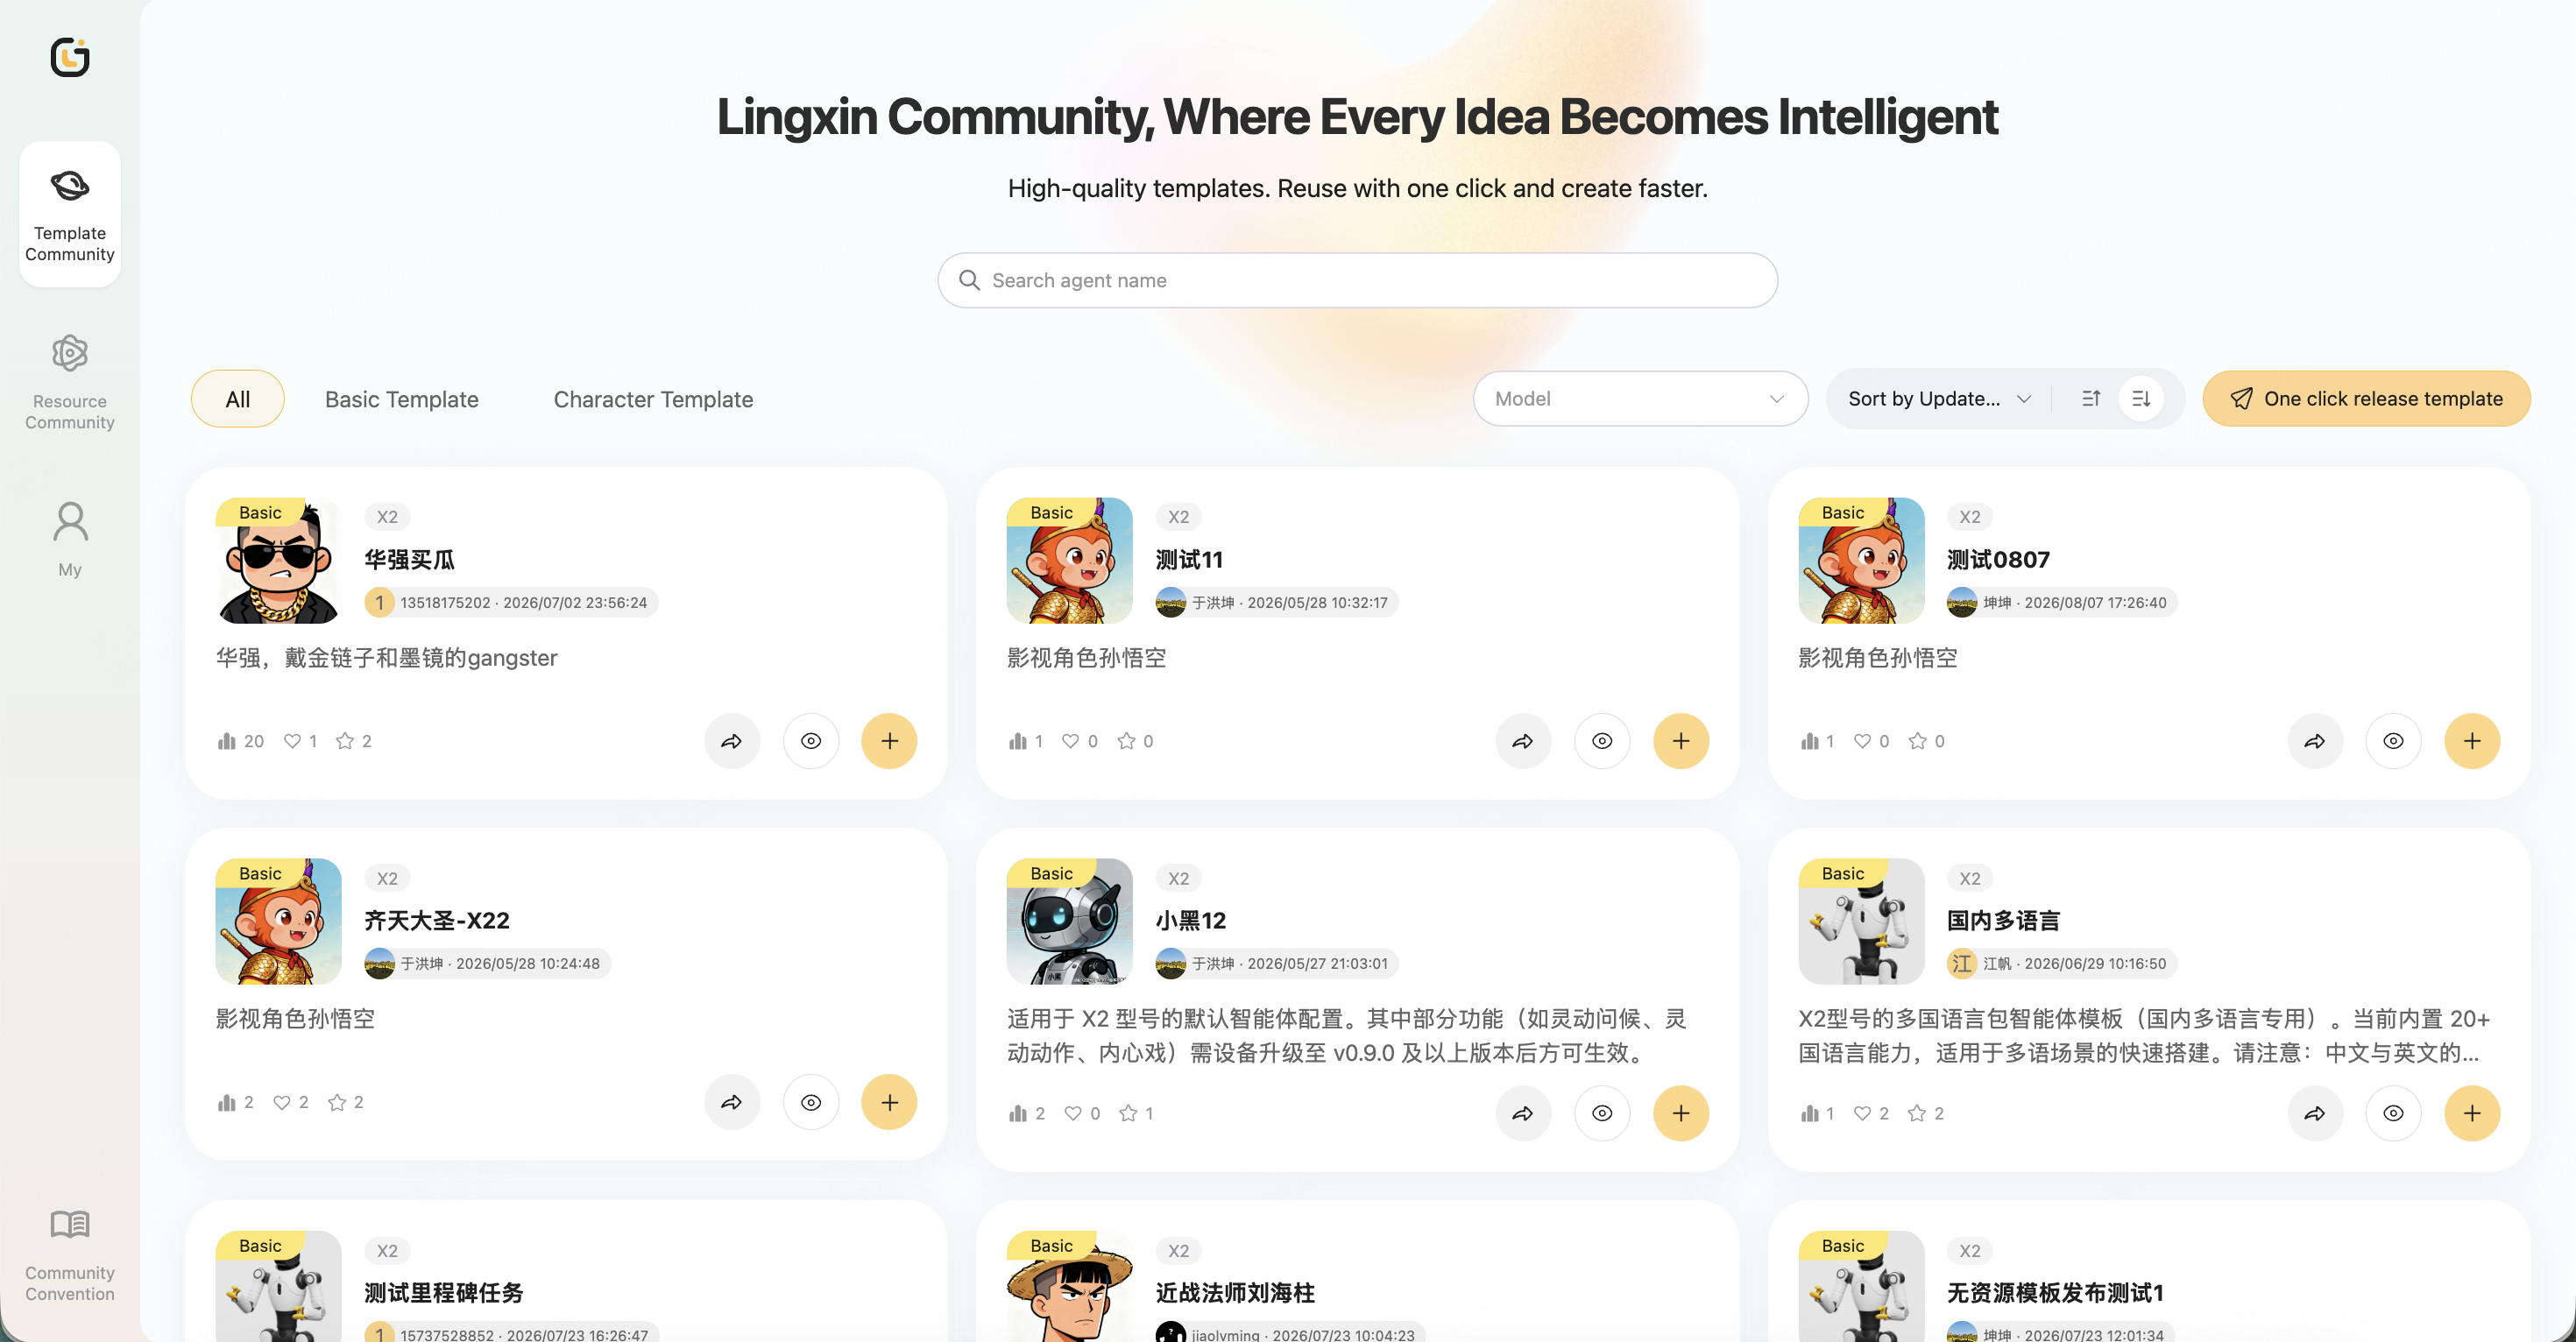
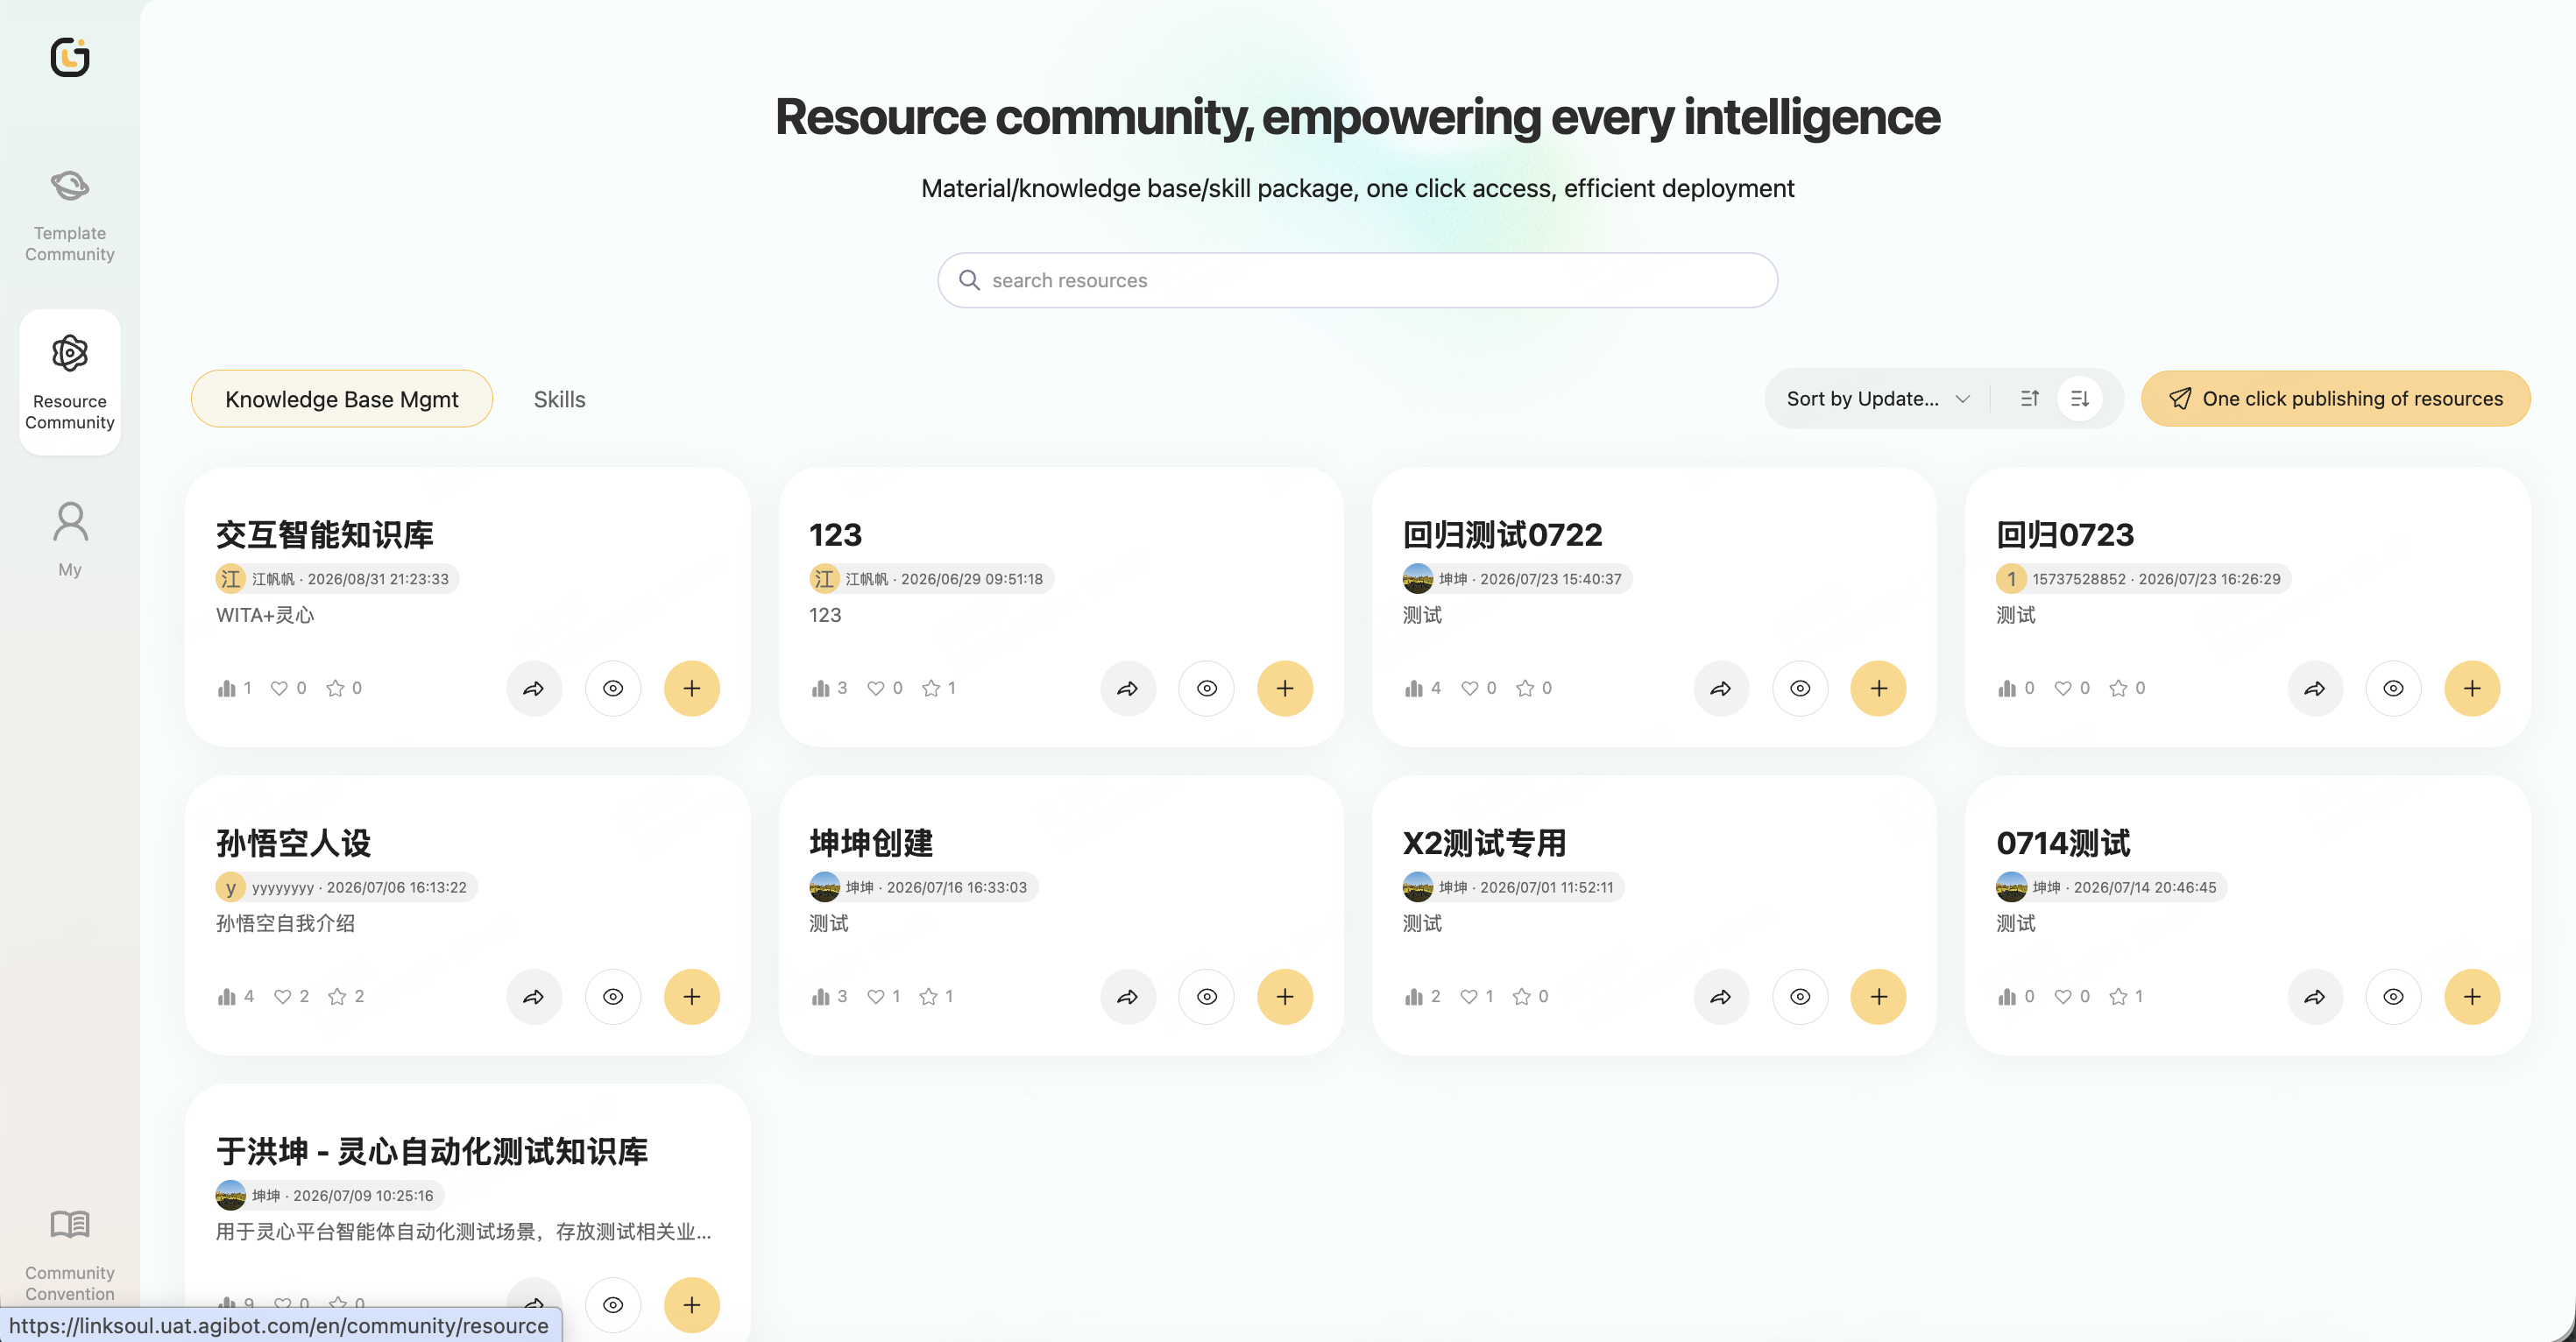
Enter the LinkSoul platform and click the "Community" icon in the top navigation bar or the "LinkSoul Community" floating window on the sidebar to enter the community. LinkSoul Community has a massive library of inspirations. You can browse rich agent templates in the Template Community section, or browse professional knowledge assets and skill assets in the Resource Community section. Then you can create them into your personal organization with one click, fully inheriting all configurations and immediately starting debugging and modification.
- **Agent Reuse: **Enter the Template Community section to browse or search for agent templates of interest. Click the target template card to view details and previews. If you like it, click "Create Agent with One Click", fill in the agent name and introduction, and choose whether to reuse with resources. After confirming successful creation, the agent will appear in the Agent Center > My Agents list on the LinkSoul platform.
- **Knowledge Base Reuse: **Enter Resource Community > Knowledge Base, browse or search for the knowledge base you need. Click the knowledge base card to enter the detail page and preview the knowledge point content. If you like it, click the "+" icon. After successful reuse, the knowledge base will appear in the Resource Center > Knowledge Base Management list on the LinkSoul platform, and can be selected during agent configuration after being enabled.
- **Skill Package Reuse: **Enter Resource Community > Skill Packages, browse or search for the skill packages you need. Click the skill package card to view details and skill list. If you like it, click the "+" icon. After successful reuse, the skill package will appear in the Resource Center > Skill Orchestration list on the LinkSoul platform, and can be selected when configuring agents.
Publishing Agents and Resources
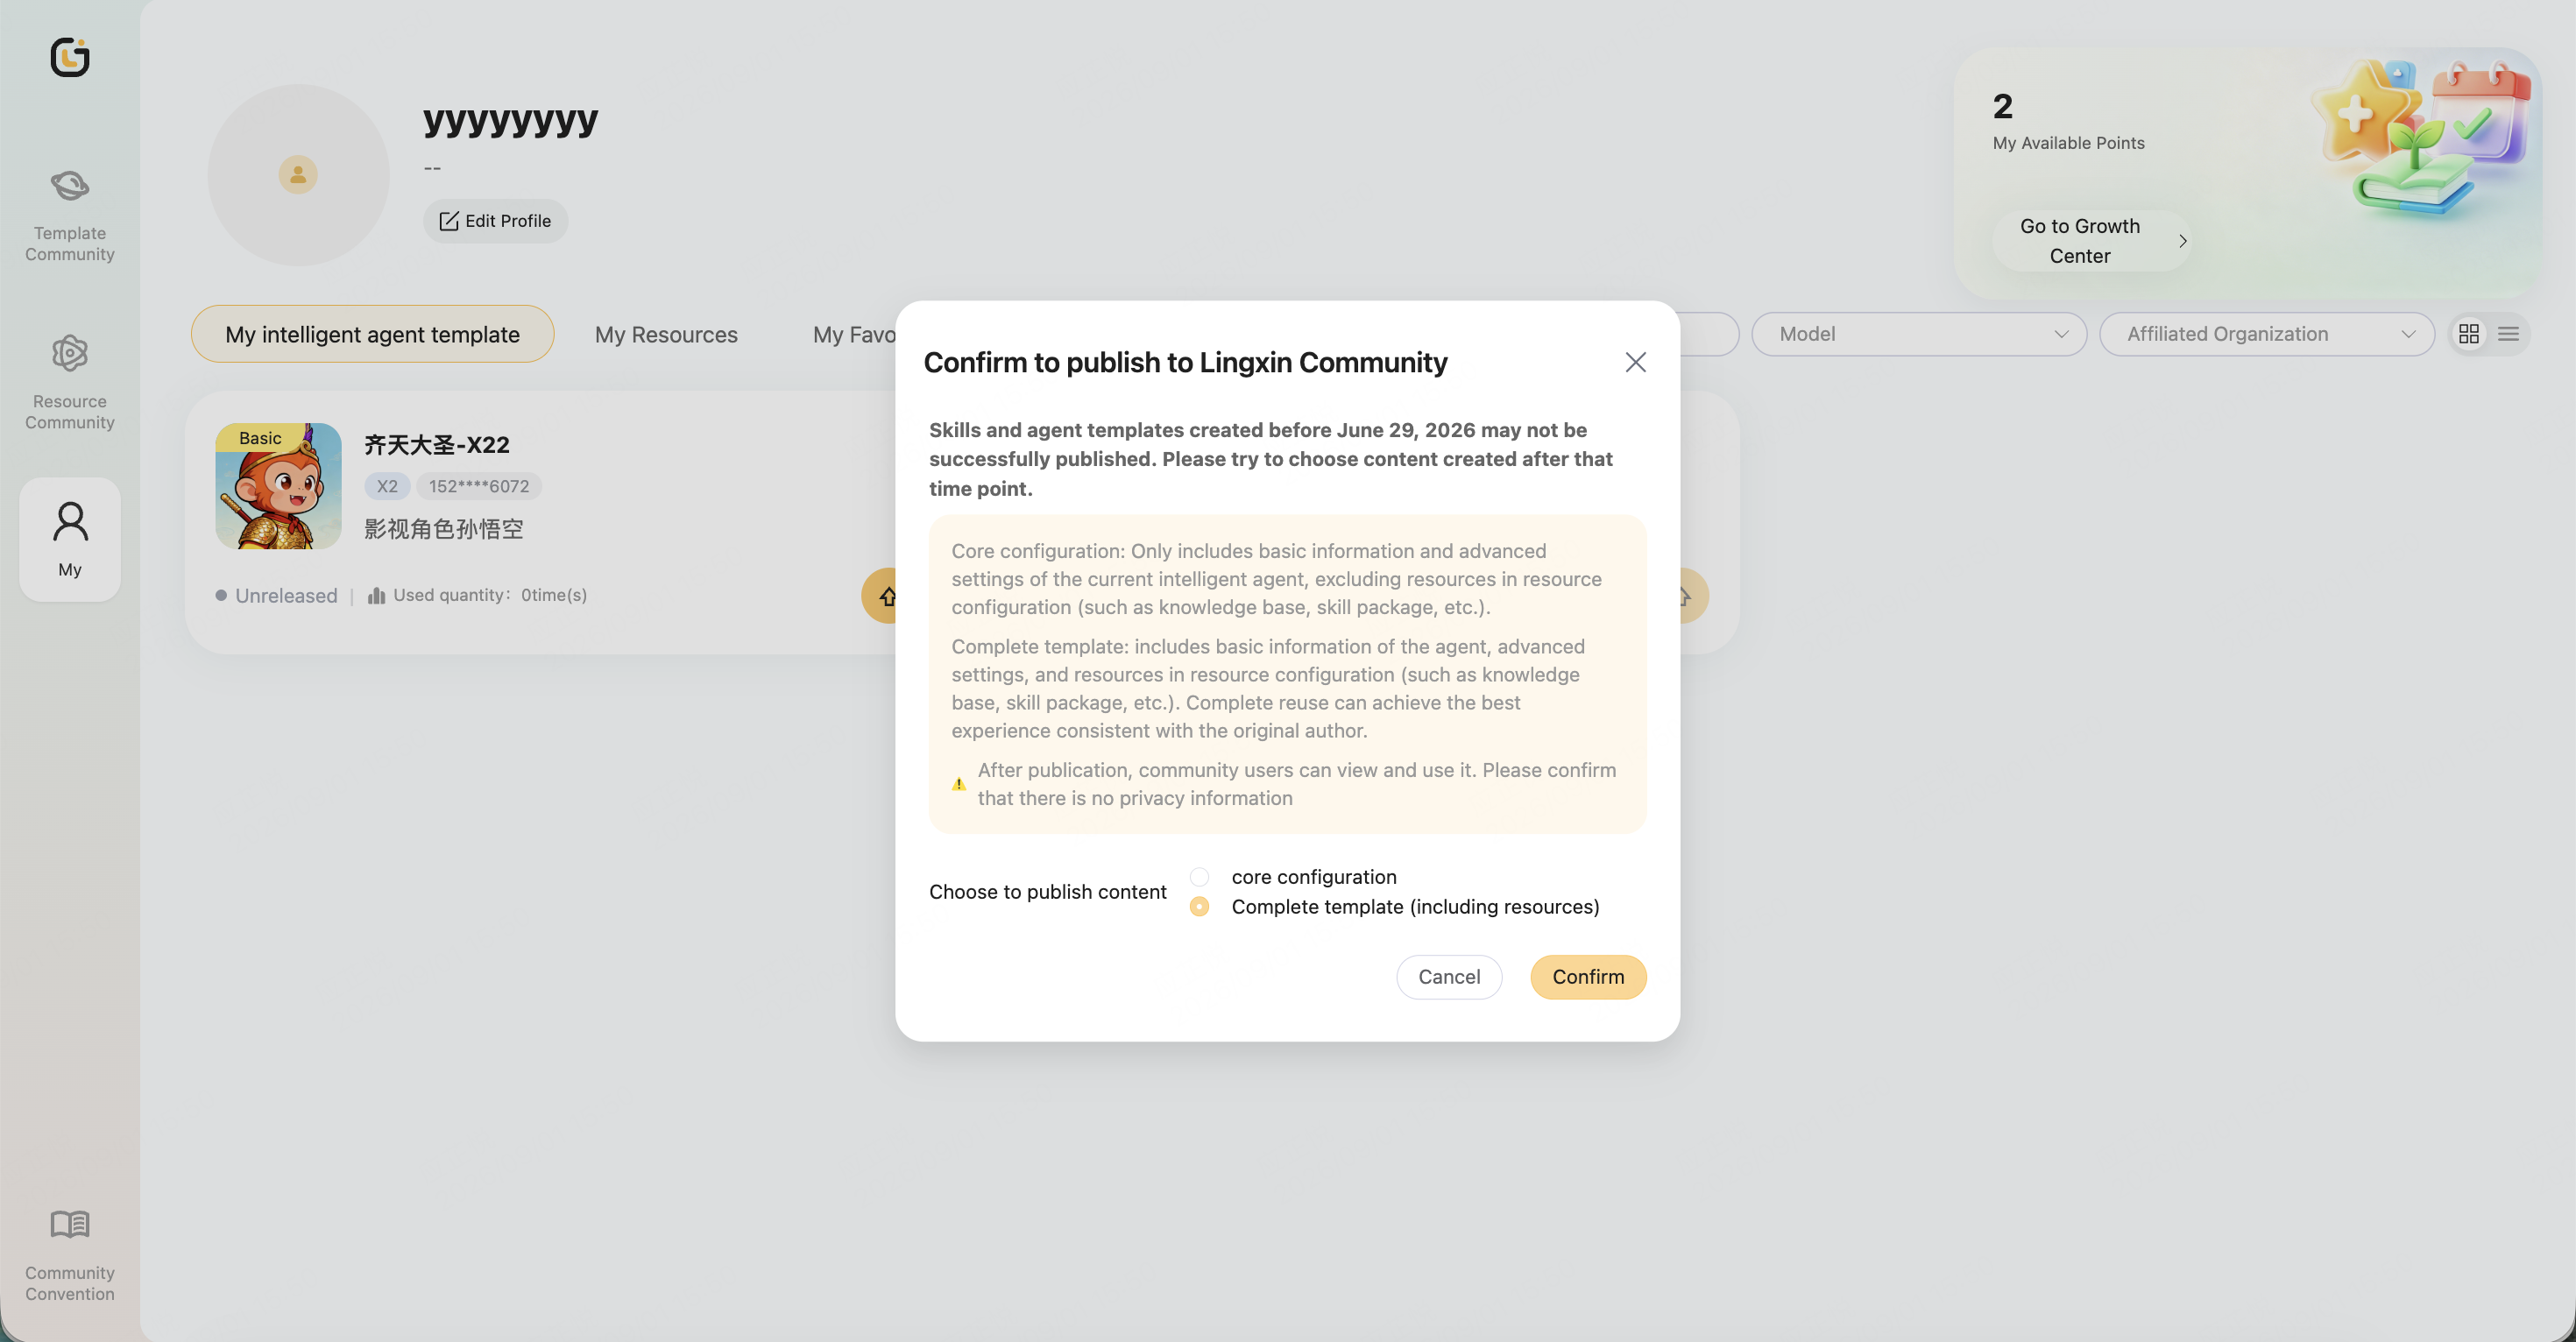
When you have created an excellent agent, you can publish it together with the associated knowledge bases and skill packages to share the complete experience with the community. Reusers can either reuse only the agent framework, or obtain all resources together, achieving true "out-of-the-box" use and quickly building high-quality robots.
🔧 SDK Development
Configuring SDK Templates and Agents
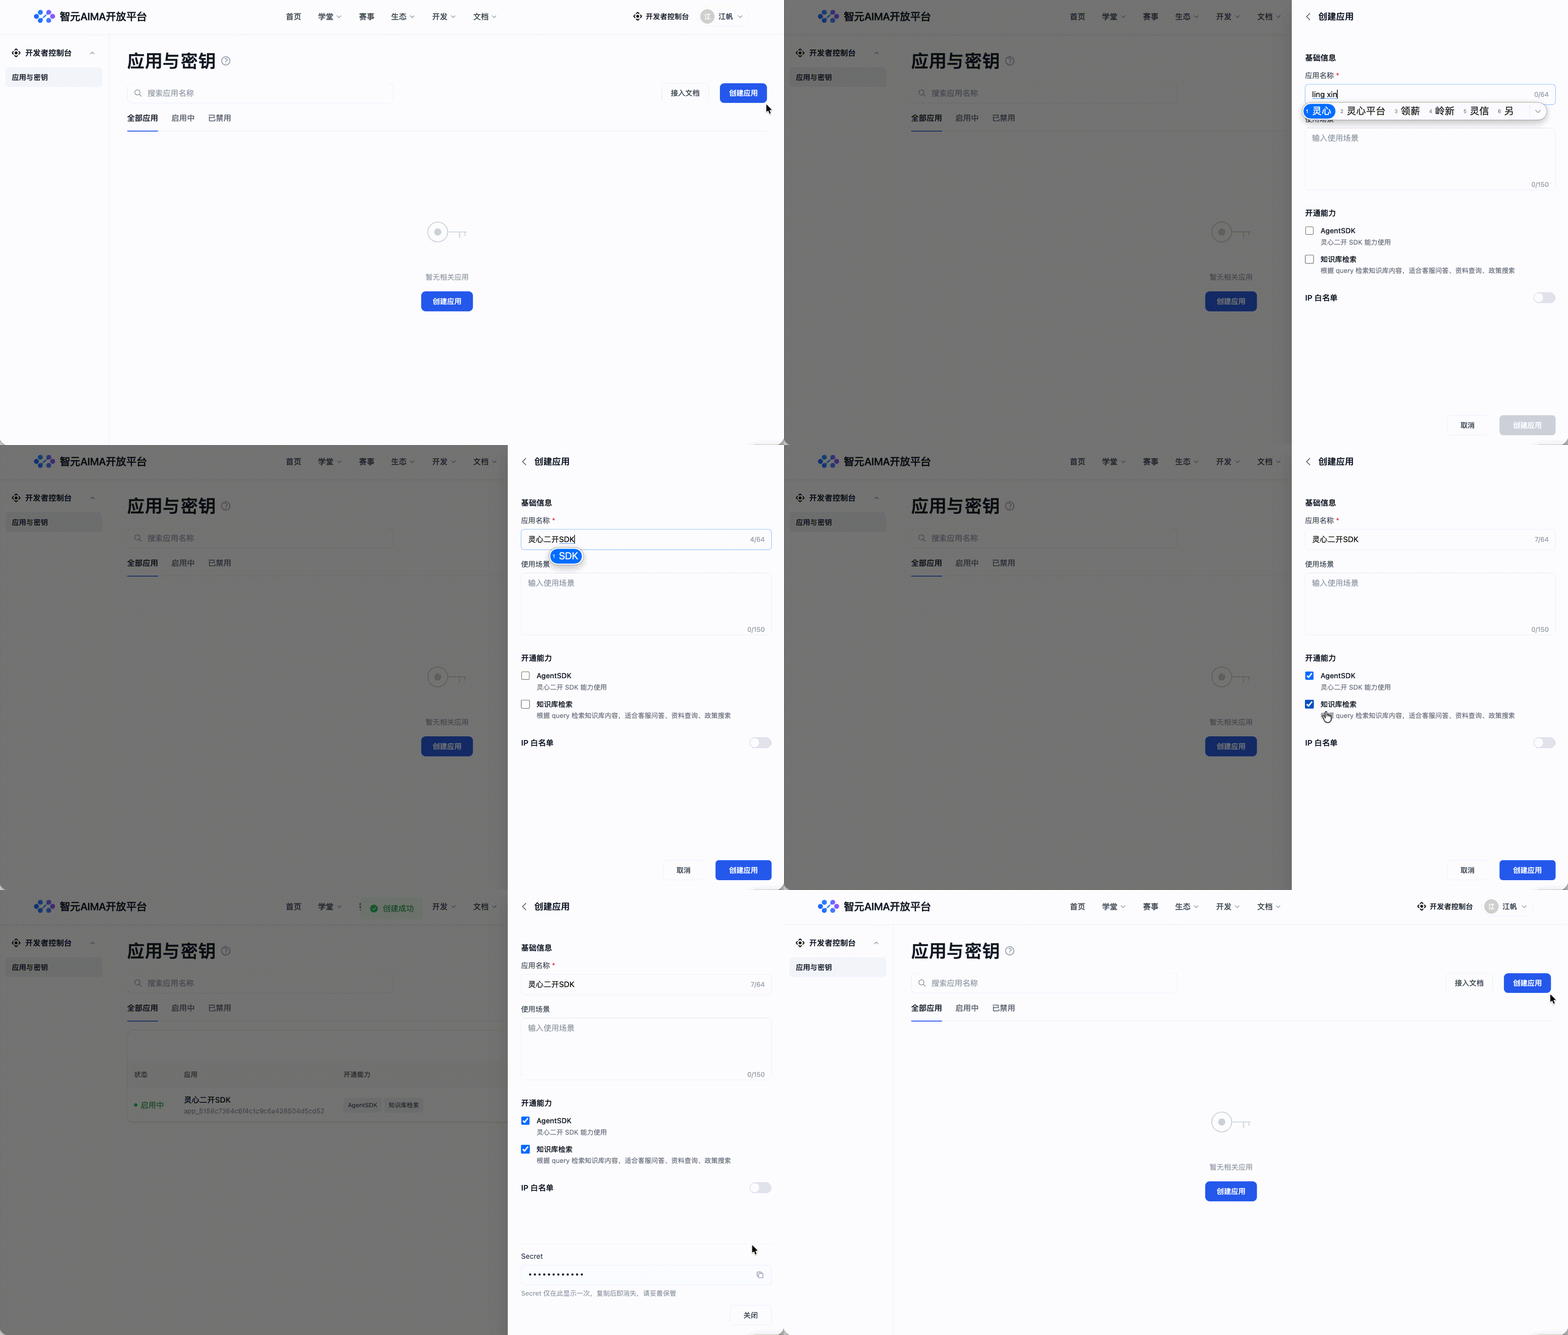
- First, log in to the AgiBot Open Platform at https://open.agibot.com/cn/console/apps, create an application and apply for the AgentSDK capability.
**⚠️ Important Note: **Please save the APP Secret immediately after creation. This information is only available for viewing during initial creation and cannot be retrieved later.
- Then log in to the LinkSoul platform, go to Agent Center > Agent Templates. Click "Add Agent Template", and select "SDK Integration Creation" as the template type. Fill in the template name and introduction, and select the application created on the open platform in the "Associated Application" field. Click "Confirm" to complete template creation.
- Then you can create an agent based on the SDK template and complete the configuration according to business needs. Supported configuration content includes:
| Field | Description |
|---|---|
| Agent Name | - |
| Agent Introduction | - |
| Robot Name | Define the robot name, which can be used as a default parameter input |
| Device Wake Word | Define the device wake word, which can be used as a default parameter input |
| Hotword Management | Supports forcing specific words or pronunciations to be recognized and mapped to specified target words, used to optimize ASR recognition results for certain keywords. |
| Device Usage City | Define the device usage city, which can be passed in as a default parameter |
| Input Format | Select input format, optional: original audio or ASR recognition result |
| Image Input | Select whether to enable interactive video stream transmission |
| Voice Timbre | When turned off, the device will directly play the audio content returned by the SDK; when turned on and a voice timbre is selected, the device will use the currently configured voice to broadcast the text content returned by the SDK. |
| Skill Invocation Method | • System Auto-Response: After a skill is triggered, AgiBot's built-in capabilities directly process the request and pass the relevant context to the Agent for subsequent dialogue understanding and response. • Agent Invocation: Developers customize the post-trigger processing logic of skills, and can combine existing expressions, actions, and returned content for orchestration and response. |
| User Information Recognition | • System Auto-Response: Based on the configured user information and greeting method, the platform directly processes and responds. • Recognition Info Passed to Agent: The recognized user information is passed to the custom Agent through SDK, and the Agent performs subsequent processing and replies. |
| Knowledge Base | After selecting a knowledge base, you can call the knowledge base retrieval API in your custom Agent code. The retrieval scope will be limited to the knowledge base selected by the current agent through the agent code. API Documentation |
SDK Connection and Debugging
- You can refer to the SDK documentation to complete service development and establish a connection with the robot. • Java: https://open.agibot.com/docs/linksoul/agentsdk_docs/java/v140/zh • Python: https://open.agibot.com/docs/linksoul/agentsdk_docs/python/v140/zh
**💡 Tip: **During development, you need to use
APP KeyandAPP Secretfor authentication, and specify the connection to the created agent.
- After the SDK connection is successful, you can click Test Connectivity on the agent editing page to verify the connection status. Then you can enter the Conversation Debugging page to debug the SDK input and output effects through real voice interaction, quickly verifying business logic.
**⚠️ Notes: **Please keep the
APP Secretsafe and never disclose it. Also, the SDK agent needs to be bound to a specific device before the custom service can take effect on that device. If you encounter problems during debugging, you can refer to the development documentation or contact technical support.
🙋 Other Frequently Asked Questions
Chinese User Manual
Explanation of Creation Quantity and Limit
To ensure the stable operation of the platform, there are limits on the number of creations for different types of resources and entities. The limits for the current version are as follows:
| Type | Upper Limit | Description |
|---|---|---|
| Device | No upper limit (tentative) | - |
| User | - Personal Organization: 10 - Enterprise/Agent/Internal Organization: No limit (tentative) | Includes owners, administrators, and regular members. |
| Knowledge Base | - Personal Organization: 2 - Enterprise/Agent/Internal Organization: 100 | Each Knowledge Base can upload multiple knowledge documents. |
| Knowledge Point | 10000 | The upper limit of knowledge points within each Knowledge Base. |
| Face | - Personal Organization: 100 - Enterprise/Agent/Internal Organization: No limit (tentative) | - |
| Skill Package | 100 | - |
| Skills | 1000 | - |
| Agent | 1000 | - |
| Sound Replication | - Account has bound devices: 3 - Account not bound to device: 1 | - |
| Song Reproduction | 5 times/day | |
| AI-related capabilities | - AI Avatar Generation: Up to 10 times per day within the same organization | - |
| Number of configurable resources for a single agent | - Skill Package: 1 - Knowledge Base: 5 - User Information: Not currently restricted | - |
Glossary
| Term/Abbreviation | Description |
|---|---|
| Organization | Isolated business space, i.e., "tenant". Each account automatically has a default organization under which multiple devices can be mounted, and others can also be invited to join. Devices, members, agents, and all resources between different organizations are completely isolated. |
| Equipment | Refers to a physical robot. A device can only belong to one organization at a time. |
| Member | User accounts within an organization. The same person can have different roles in different organizations: Owner, Administrator, or Regular Member, with each role corresponding to different operational permissions. |
| Agent | A configurable interaction & strategy & resource package used to define the behavior and performance of devices; in the future, the intelligent agent will support users to connect their own agents for overall intent classification and orchestration. In this phase of requirements, the intelligent agent and the device have a one-to-one relationship. |
| Resources | The creatives and capabilities required to build an agent, including expressions, actions, Knowledge Base, etc. |
| Skills | An executable task or interactive unit composed of one or more atomic capabilities such as expressions, actions, TTS announcements, device responses, or pre-packaged sub-skills, arranged according to specific logic |
| Skill Trigger | Conditions or instructions for initiating skill execution, including voice commands (such as the user speaking a wake word or specific command) and sensory signals (such as face recognition, tactile recognition) |
Device models and versions supported by Lingxin Platform
Note: Binding agents with versions below A2-1.3/X2-0.9 is not supported
| Product Model | Supported Version |
|---|---|
| AGIBot A2 - Flagship Version | 1.3 and above |
| AGIBot X2- Flagship Version & Lite Version | 0.9 and above |
Troubleshooting Usage Issues
What should I do if the binding status is always "Binding" and the progress of all binding items is "Initializing"?
Check if the device is online in the current environment.
What should I do if a prompt indicates a lower version when binding a device to an agent?
Currently, only versions A2-1.3 / X2-0.9 and above are supported. Please upgrade the version and try again.
What should I do if the wake-up expression fails to be sent?
Check if the network is Wi-Fi, as currently some functions do not support being issued via 5G cards.
How to view the device & agent binding progress?
Click the green "Binding" label on the Agent/Device Card page to view relevant information.
What should I do if I encounter an error message saying "Access Denied"?
Check the permissions of the operator within the current organization. Generally speaking, organization owners and administrators have full operational permissions, while ordinary members only have viewing permissions.
How to unbind a device?
Delete the device under the original organization, then bind the device to the target organization.
Can an agent reverse-bind multiple devices with a single click?
No, an agent can only be bound to one robot. If you need to migrate agent information to another robot, you can use the "clone function". Each clone operation supports up to 5 devices; if more than 5 devices are needed, multiple operations are required.