
Custom Motion Control Development and Deployment Guide
1. Custom Motion Control Model Training on the Development Machine
https://github.com/Link-U-OS/rl_training
Note that this training code has only undergone basic adaptation. The reward parameters and training algorithms do not guarantee a robust and stable walking model, and you will need to adjust the training methods and reward parameters yourself.
Future versions will continuously update the training methods and parameters to strive for providing a usable baseline walking algorithm.
2. Custom Motion Control Simulation Debugging on the Development Machine
https://github.com/Link-U-OS/rl_deploy
You can use this deployment framework to perform mujoco sim2sim simulation debugging on the development machine. This deployment framework can be directly deployed to the real robot.
3. Custom Motion Control Module Deployment Based on A2 Body and Commercial Software
This tutorial is specifically for the Raise A2 robot V1.3/V2.0 systems. Please confirm the robot software version via AimMaster or SSH command line before proceeding.
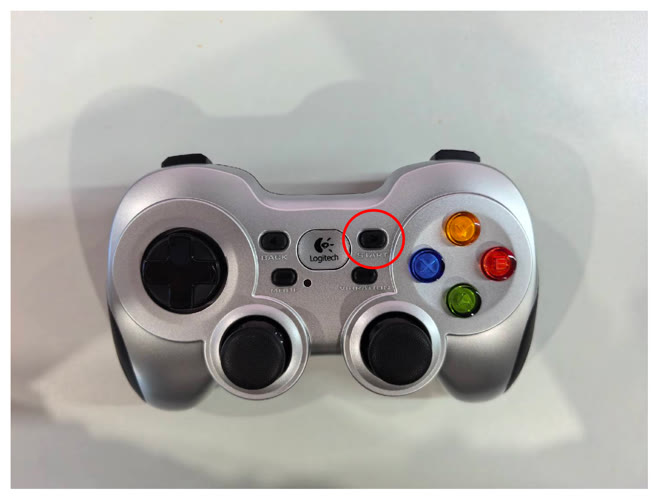
Real-world deployment requires the use of an Xbox series controller hardware, such as Logitech F710, Betop, XBOX, Feizhi, etc.
3.1 Robot Configuration Modification
The Raise A2 robot's onboard software system already includes a built-in motion control module. Before deploying a new motion control system, you need to disable the original motion control module and change the Hal communication backend to ROS2 so that the new motion control system can communicate with it.
Ensure the robot is powered on and suspended in a safe state before proceeding with the following steps.
3.1.1 Disable the Built-in Motion Control Module
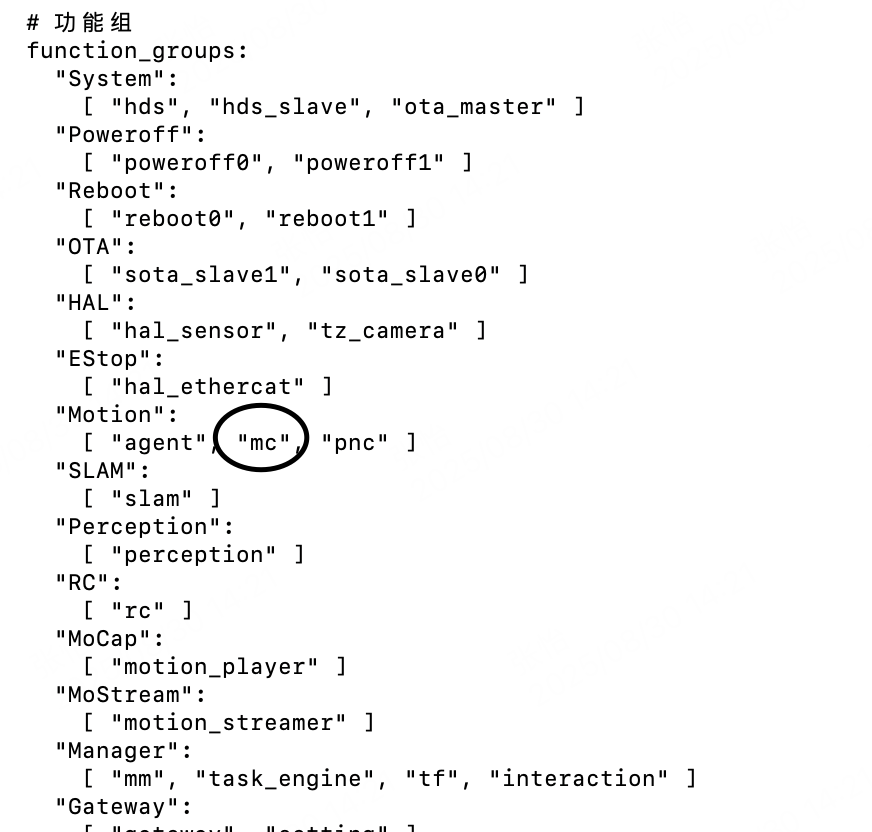
Modify /agibot/software/v0/entry/bin/cfg/sm.yaml on the X86, removing "mc" as shown in the image below.
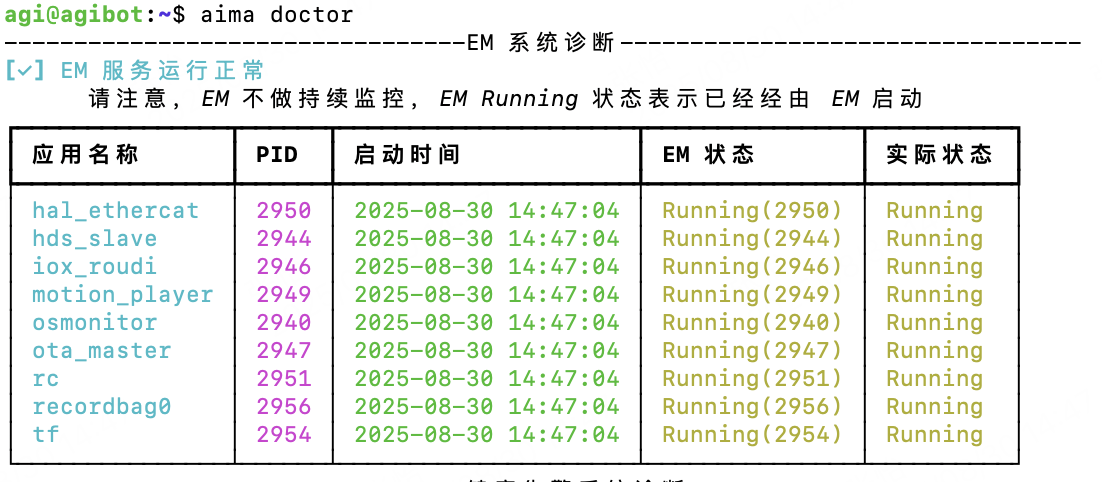
After modification, restart the robot. Wait for the robot to complete initialization, then use the following command on the x86 to confirm that the mc process has not started:
aima em doctor
Expected output (no MC):
3.1.2 Modify Hal Ethercat Communication Backend【Optional】
This step is optional. If using Iceoryx communication backend, this step is not required. As of 2026/01/23, the communication backend for SDK and framework deployment has been modified to Iceoryx, so this step is not required.
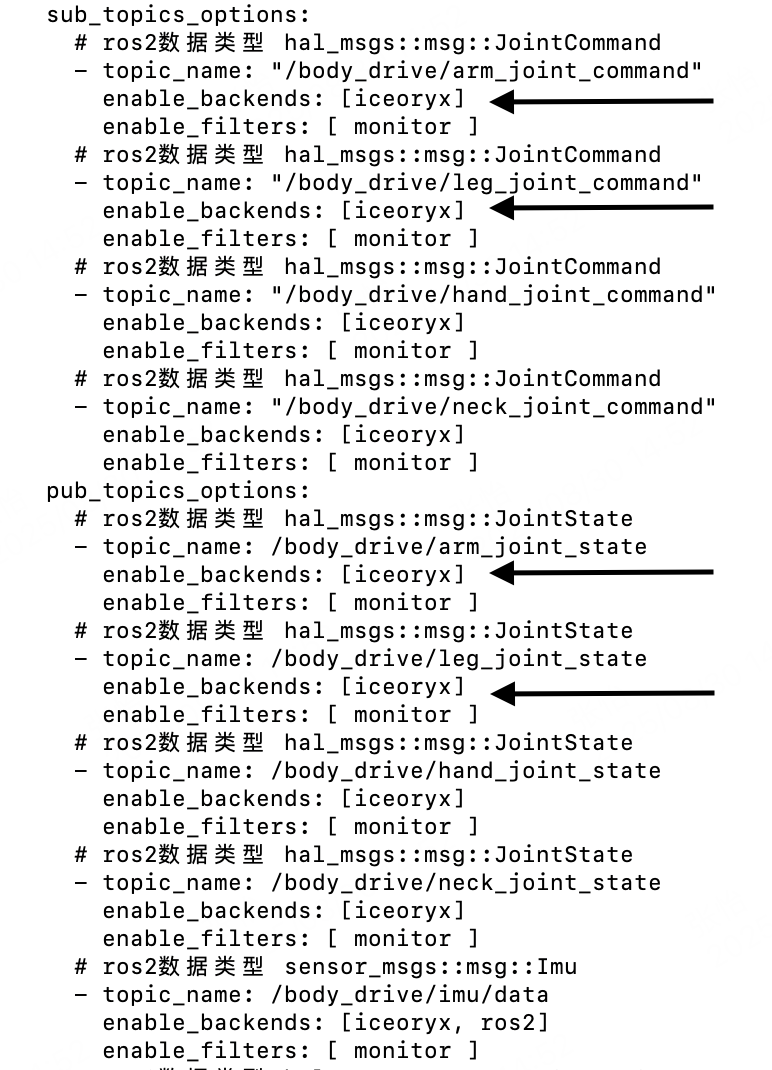
Modify /agibot/software/v0/config/hal_ethercat/hal_ethercat_t3d1_flagship_cfg.yaml on the x86.
Change the part indicated by the arrow from iceoryx to ros2, four places in total.
After modification, you can use the following command on the x86 to restart hal_ethercat and make it effective.
aima em stop-app hal_ethercat
aima em start-app hal_ethercat

After hal_ethercat is closed, the robot may falsely report low battery and flash a red alarm light. Do not panic; the alarm will automatically disappear after a successful restart.
You can use the following command on the x86 to check if the corresponding ros2 topic is being published:
ssh agi@192.168.100.110 # login to orin

aima topic hz /body_drive/leg_joint_state
As of 2026/01/23, the
rl_deployrepository provides a Python SDKaimrl_sdkfor deploying motion-control inference in Python. See the aimrl_sdk README. The tutorial below will distinguish between Python and C++ deployment paths.
3.2 Docker Installation and Image Push (C++ only)
Modification of the robot's x86 and ORIN industrial PC environments is strictly prohibited. Since the C++ motion-control deployment program requires additional dependencies, it must be deployed using Docker.
The Python deployment path does not require a container. You can skip this section and go to 3.3.2 and 3.5.2.
3.2.1 Docker Installation
Installation is only permitted via the downloaded .deb package method. Please refer to the tutorial:https://docs.docker.com/engine/install/ubuntu/#install-from-a-package。
- On the x86 system, create the /agibot/data/home/agi/Desktop directory. The onboard disk cleanup module periodically frees up space; this specific folder is on the whitelist and will not be cleaned.
mkdir -p /agibot/data/home/agi/Desktop - Docker Installation
Download the deb files (Docker Engine, CLI, containerd, and Docker Compose packages) from the official repository:
containerd.io_1.7.20-1_amd64.deb
docker-ce_28.0.0-1~ubuntu.22.04~jammy_amd64.deb
docker-ce-cli_28.0.0-1~ubuntu.22.04~jammy_amd64.deb
docker-buildx-plugin_0.21.0-1~ubuntu.22.04~jammy_amd64.deb
docker-compose-plugin_2.35.1-1~ubuntu.22.04~jammy_amd64.deb
Transfer these files to the /agibot/data/home/agi/Desktop directory on the x86. Execute the following commands in that path:sudo dpkg -i ./containerd.io_1.7.20-1_amd64.deb \ ./docker-ce_28.0.0-1~ubuntu.22.04~jammy_amd64.deb \ ./docker-ce-cli_28.0.0-1~ubuntu.22.04~jammy_amd64.deb \ ./docker-buildx-plugin_0.21.0-1~ubuntu.22.04~jammy_amd64.deb \ ./docker-compose-plugin_2.35.1-1~ubuntu.22.04~jammy_amd64.deb - Add the current user
agito the docker group and refresh the user group to make the changes take effect immediately.sudo groupadd docker sudo usermod -aG docker $USER newgrp docker - Modify the default storage path for Docker
The default storage path for Docker is /var/lib/docker, but the disk partition space under the x86 root directory is small, so the default storage path needs to be modified.
# stop Docker service
sudo systemctl stop docker

# change Default Storage Path
sudo mv /var/lib/docker /agibot/data/home/agi/Desktop

# modify Docker Configuration
sudo vim /etc/docker/daemon.json
Add the following to the configuration file:{ "data-root": "/agibot/data/home/agi/Desktop/docker" }
restart docker:sudo systemctl start docker
Docker configuration is complete.
3.2.2 Image Push
First, save the image as a compressed package on your local PC (assuming you have completed the image build step in the previous simulation process).
docker save -o a2-deploy-image.tar a2-deploy-image
After saving, use the following command to push it to the x86 industrial PC (please replace the IP address with the actual IP address of the robot's x86 industrial PC):
scp a2-deploy-image.tar agi@192.168.xxx.xxx:/agibot/data/home/agi/Desktop
Remotely connect to the robot's x86 industrial PC and load the image.
docker load -i /agibot/data/home/agi/Desktop/a2-deploy-image.tar
After loading, you can use the docker images command to view the list of currently loaded images.
3.3 Upload and Start (C++ container / Python host)
This section provides C++ (Docker) and Python (no container) steps side-by-side.
3.3.1 C++: Upload deploy and start the container
In the deployment repository directory on your local PC, execute the following command to upload the program to the robot's x86 industrial PC (replace the IP address as needed):
rsync -avz --progress deploy agi@192.168.xxx.xxx:/agibot/data/home/agi/Desktop/
SSH into the robot's x86 industrial PC and use the following command to start the image:
docker run -it \
--name=a2_deploy \
--privileged \
--net=host \
--ipc=host \
--pid=host \
-v /tmp:/tmp \
-v /run/dbus/system_bus_socket:/run/dbus/system_bus_socket:ro \
-v /agibot/data/home/agi/Desktop/deploy:/home/agi/deploy \
-v /dev/input:/dev/input \
-d a2-deploy-image
Verify whether the low-level state data is being published (choose one based on the backend)
- Default Iceoryx backend (recommended / default): no ROS 2/DDS environment variables are needed. You can check
/body_drive/leg_joint_stateon ORIN viaaima topic:
ssh agi@192.168.100.110 # login to orin

aima topic hz /body_drive/leg_joint_state
- If you manually switched the backend to ROS 2 in 3.1.2: you can check with
ros2 topicinside the container (DDS env vars are only needed in this case):
# enter the container
docker start a2_deploy && docker exec -it a2_deploy /bin/bash

# source the ROS 2 environment
source /opt/ros/humble/setup.bash
source /home/agi/deploy/install/setup.bash

# ROS 2 backend only (adjust/omit as needed)
export ROS_DOMAIN_ID=232
export ROS_LOCALHOST_ONLY=0
export FASTRTPS_DEFAULT_PROFILES_FILE=/home/agi/deploy/ros_dds_configuration.xml

ros2 topic list | grep body_drive
ros2 topic echo /body_drive/leg_joint_state
3.3.2 Python: Upload aimrl_sdk and run on x86 directly (no container)
In the deployment repository directory on your local PC, upload aimrl_sdk to the robot x86 industrial PC:
rsync -avz --progress aimrl_sdk agi@192.168.xxx.xxx:/agibot/data/home/agi/Desktop/
SSH into the robot x86 and run the aimrl_sdk example directly (no Docker required):
cd /agibot/data/home/agi/Desktop/aimrl_sdk

# Enter the whitelisted directory (to avoid disk cleanup)

# Create virtual environment and install SDK (directly using whl)
python3 -m venv .venv
source .venv/bin/activate
pip install https://github.com/Link-U-OS/rl_deploy/releases/download/aimrl_sdk_v0.1.0/aimrl_sdk-0.1.0-cp310-cp310-linux_x86_64.whl

# run the example (replace --cfg/model path as needed)
python examples/rl_deploy_basic.py --cfg examples/configs/agibot_a2_dof12.yaml --joystick /dev/input/js0
3.4 Connect the Physical Controller
After starting the robot, you need to use a controller for control. Only Xbox-type game controllers are supported, such as Logitech F710, Betop, XBOX, Feizhi, etc. The receiver should be plugged into the USB debug port on the right side of the robot's maintenance compartment (connected to the x86 industrial PC).
After inserting the receiver, SSH into the x86 industrial PC and find the /dev/input/js0 file. You can use cat /dev/input/js0 and press the controller buttons to see if the input is received.
Additionally, you may need to set device permissions under /dev/input for the environment that runs your program (inside the container), otherwise joystick readers may not be able to access the device.
sudo chmod 666 /dev/input/*
3.5 Start the Deployment Framework
Before starting the deployment framework and debugging, ensure that the robot's emergency stop device is fully charged and can be triggered at any time, and the robot must be in a protected state.
3.5.1 C++: start the ROS 2 deployment framework
# enter the container
docker start a2_deploy && docker exec -it a2_deploy /bin/bash

# start the deployment framework
cd /home/agi/deploy/install/deploy_assets/scripts
./start_rl_control_real.sh
3.5.2 Python: run the aimrl_sdk example
For Python deployment, use
aimrl_sdk/examples/rl_deploy_basic.pyas a baseline and replace the ONNX model and config as needed. See the aimrl_sdk README for more details.
# run on x86 directly, no container
cd /agibot/data/home/agi/Desktop/aimrl_sdk

# first run: create virtual environment and install SDK (directly using whl)
python3 -m venv .venv
source .venv/bin/activate
pip install https://github.com/Link-U-OS/rl_deploy/releases/download/aimrl_sdk_v0.1.0/aimrl_sdk-0.1.0-cp310-cp310-linux_x86_64.whl

# run the example (replace --cfg/model path as needed)
python examples/rl_deploy_basic.py --cfg examples/configs/agibot_a2_dof12.yaml --joystick /dev/input/js0
3.6 Controller Operation Logic
Please read the following content carefully to ensure you understand the controller operation logic before running on the real robot.
3.6.1 Controller Operation Process
Before operating, ensure that the robot's emergency stop handle is fully charged and can be pressed at any time- Press the "start" button on the controller to put the robot into startup mode.
- The running terminal on the robot (in the container or on the x86 host) should display "start control".
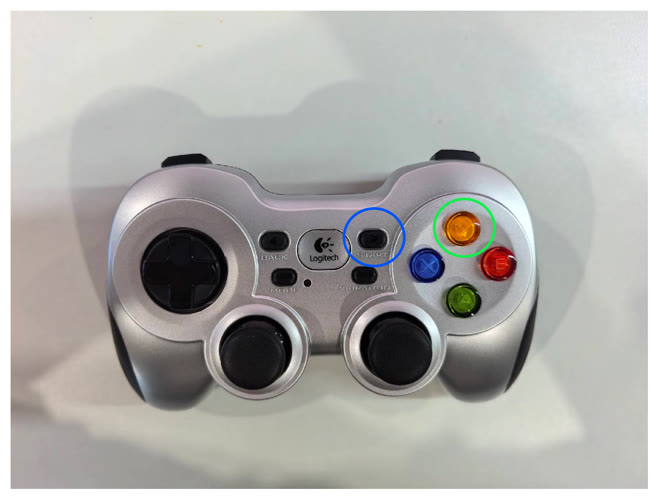
- Press the "LB" and "A" buttons simultaneously to put the robot into position control mode.
- The running terminal on the robot (in the container or on the x86 host) should display "lie2stand".
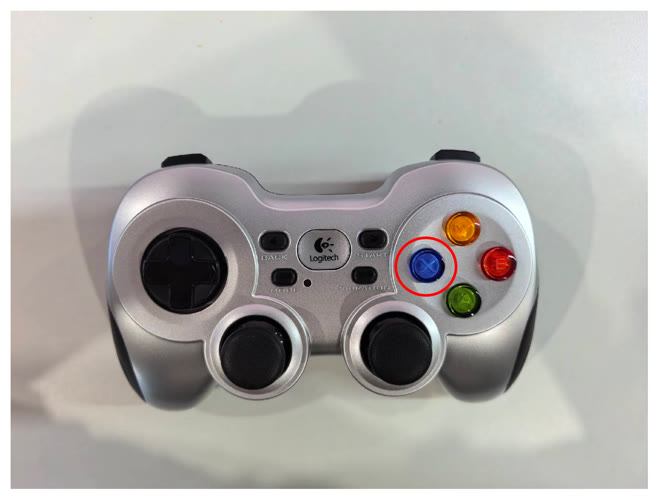
- Press the "X" button on the controller to put the robot into motion control mode.
- The running terminal on the robot (in the container or on the x86 host) should display "stand2walk".
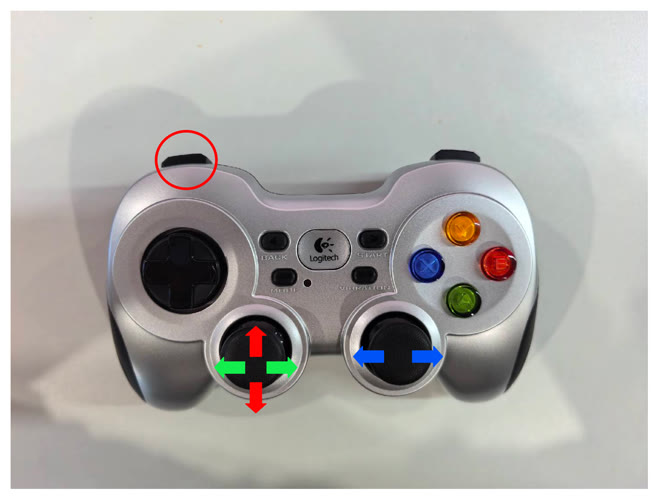
- Press the "LB" button to enable the control sticks. The two sticks can issue control commands.
- The red arrow corresponds to the stick direction for forward and backward movement.
- The green arrow corresponds to the stick direction for left and right lateral movement.
- The blue arrow corresponds to the stick direction for left and right turning.
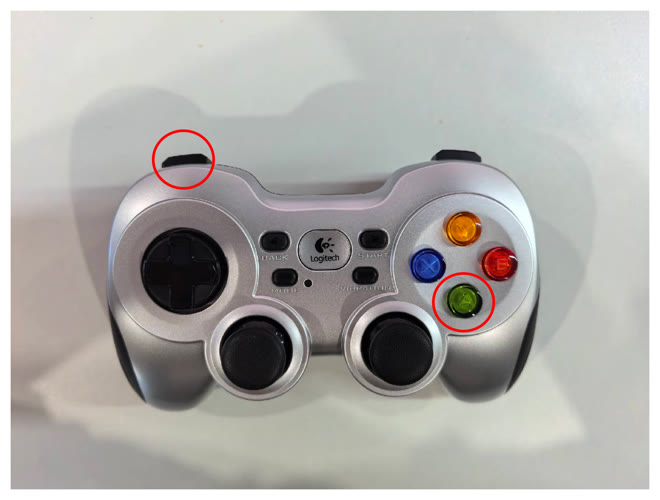
- Press the "Y" button (green circle) to lift the robot, then press the "start" button (blue circle) to end robot control.
3.6.2 Controller Button Logic
- "Start" button: Switches the robot into or out of startup mode.
- Startup mode: Position control for each joint, where Kp is very small, and the robot's leg and arm joints should feel a small force and can be moved but with resistance; the running terminal on the robot (in the container or on the x86 host) should display "start control".
- Exit startup mode: The robot's leg and arm joints are not under force, and the terminal displays "stop control".
- "LB" and "A" buttons: Switches the robot into or out of position control mode.
- Enter motion control mode: The robot's leg and arm joints should feel a force and can be moved slightly but with resistance; the running terminal on the robot (in the container or on the x86 host) should display "lie2stand".
- Exit motion control mode: The robot returns to startup mode, and the terminal displays "stand2lie".
- "X" button: Switches the robot into motion control mode.
- The robot can stand autonomously; the running terminal on the robot (in the container or on the x86 host) should display "stand2walk".
- "Y" button: Switches the robot out of motion control mode.
- The robot returns to position control mode, and the terminal displays "walk2stand".
- "LB" button: Enables the control sticks.
- When this button is pressed, the two sticks on the controller can issue control commands.